2015-11-26 14:57
2015-10-23 16:52
[PHP] 從 RGB 轉換到 HSB
HSB(HSV)通過色相/飽和度/亮度三要素來表達顏色。
- H(Hue):表示颜色的類型 (例如红色,绿色或者黄色),取值範圍為 0 ~ 360,其中每一个值代表一種顏色
- S(Saturation):顏色的飽和度從 0 到 1,有时候也稱為纯度 (0 表示灰度圖,1 表示纯的顏色)
- B(Brightness or Value):顏色的明亮程度從 0 到 1 (0 表示黑色,1 表示特定飽和度的顏色)
function rgb2hsb($rgb) {
    $red   = max(0, min(255, $rgb['red']));
    $green = max(0, min(255, $rgb['green']));
    $blue  = max(0, min(255, $rgb['blue']));

    $max = max($red, $green, $blue);
    $min = min($red, $green, $blue);
    $delta = $max - $min;

    $b = $max / 255;
    $s = $max == 0 ? 0 : $delta / $max;

    $h = 0;
    if ($delta == 0) {
        $h = 0;
    } else if ($max == $red && $green >= $blue) {
        $h = 0   + 60 * ($green - $blue) / $delta;
    } else if ($max == $red && $green < $blue) {
        $h = 360 + 60 * ($green - $blue) / $delta;
    } else if ($max == $green) {
        $h = 120 + 60 * ($blue - $red) / $delta;
    } else if ($max == $blue) {
        $h = 240 + 60 * ($red - $green) / $delta;
    }

    return array('hue' => fmod($h, 360), 'saturation' => $s, 'brightness' => $b);
}


function hsb2rgb($hsb) {
    $h = $hsb['hue'];
    $s = max(0, min(1, $hsb['saturation']));
    $b = max(0, min(1, $hsb['brightness']));

    $h = fmod($h, 360);
    if($h < 0){ $h += 360; }

    $i = ($h / 60) % 6;
    $f = ($h / 60) - $i;
    $p = $b * (1 - $s);
    $q = $b * (1 - $f * $s);
    $t = $b * (1 - (1 - $f) * $s);

    $p = intval(round(255 * $p));
    $q = intval(round(255 * $q));
    $t = intval(round(255 * $t));
    $b = intval(round(255 * $bri));

    switch ($i) {
        case 0: return array('red' => $b, 'green' => $t, 'blue' => $p);
        case 1: return array('red' => $q, 'green' => $b, 'blue' => $p);
        case 2: return array('red' => $p, 'green' => $b, 'blue' => $t);
        case 3: return array('red' => $p, 'green' => $q, 'blue' => $b);
        case 4: return array('red' => $t, 'green' => $p, 'blue' => $b);
        case 5: return array('red' => $b, 'green' => $p, 'blue' => $q);
        default: return array('red' => 0, 'green' => 0, 'blue' => 0);
    }
}
2015-10-23 16:44
[PHP] 從 Hex 轉換到 RGB
function hex2rgb($hex) {
    list($r, $g, $b) = sscanf($hex, "%02x%02x%02x");
    return array('red' => $r, 'green' => $g, 'blue' => $b);
}

function rgb2hex($rgb) {
    return sprintf("%02x%02x%02x", $rgb['red'], $rgb['green'], $rgb['blue']);
}
2015-04-27 17:49
[轉載] Spring 使用 Cache、整合 Ehcache
轉載自:Spring使用Cache、整合Ehcache
從 3.1 開始,Spring 引入了對 Cache 的支持。其使用方法和原理都類似於 Spring 對事務管理的支持。Spring Cache 是作用在方法上的,其核心思想是這樣的:當我們在調用一個緩存方法時會把該方法參數和返回結果作為一個鍵值對存放在緩存中,等到下次利用同樣的參數來調用該方法時將不再執行該方法,而是直接從緩存中獲取結果進行返回。所以在使用 Spring Cache 的時候我們要保證我們緩存的方法對於相同的方法參數要有相同的返回結果。
使用 Spring Cache 需要我們做兩方面的事:
和 Spring 對事務管理的支持一樣,Spring 對 Cache 的支持也有基於注解和基於 XML 配置兩種方式。下面我們先來看看基於注解的方式。
Spring 為我們提供了幾個注解來支持 Spring Cache。其核心主要是
value 屬性是必須指定的,其表示當前方法的返回值是會被緩存在哪個 Cache 上的,對應 Cache 的名稱。其可以是一個 Cache 也可以是多個 Cache,當需要指定多個 Cache 時其是一個陣列。
key 屬性是用來指定 Spring 緩存方法的返回結果時對應的 key 的。該屬性支持 SpringEL 表達式。當我們沒有指定該屬性時,Spring 將使用默認策略生成 key。我們這裡先來看看自定義策略,至於默認策略會在後文單獨介紹。
自定義策略是指我們可以通過 Spring 的 EL 表達式來指定我們的 key。這裡的 EL 表達式可以使用方法參數及它們對應的屬性。使用方法參數時我們可以直接使用
除了上述使用方法參數作為 key 之外,Spring 還為我們提供了一個 root 對像可以用來生成 key。通過該 root 對像我們可以獲取到以下信息。
當我們要使用 root 對像的屬性作為 key 時我們也可以將
有的時候我們可能並不希望緩存一個方法所有的返回結果。通過 condition 屬性可以實現這一功能。condition 屬性默認為空,表示將緩存所有的調用情形。其值是通過 SpringEL 表達式來指定的,當為
在支持 Spring Cache 的環境下,對於使用
allEntries 是 boolean 類型,表示是否需要清除緩存中的所有元素。默認為 false,表示不需要。當指定了 allEntries 為 true 時,Spring Cache 將忽略指定的 key。有的時候我們需要 Cache 一下清除所有的元素,這比一個一個清除元素更有效率。
清除操作默認是在對應方法成功執行之後觸發的,即方法如果因為拋出異常而未能成功返回時也不會觸發清除操作。使用 beforeInvocation 可以改變觸發清除操作的時間,當我們指定該屬性值為 true 時,Spring 會在調用該方法之前清除緩存中的指定元素。
其實除了使用
Spring 允許我們在配置可緩存的方法時使用自定義的注解,前提是自定義的注解上必須使用對應的注解進行標注。如我們有如下這麼一個使用
那麼在我們需要緩存的方法上使用
配置 Spring 對基於注解的 Cache 的支持,首先我們需要在 Spring 的配置文件中引入 cache 命名空間,其次通過
此外,
需要注意的是
除了使用注解來聲明對 Cache 的支持外,Spring 還支持使用 XML 來聲明對 Cache 的支持。這主要是通過類似於 aop:advice 的 cache:advice 來進行的。在 cache 命名空間下定義了一個 cache:advice 元素用來定義一個對於 Cache 的 advice。其需要指定一個 cache-manager 屬性,默認為 cacheManager。 cache:advice 下面可以指定多個 cache:caching 元素,其有點類似於使用注解時的
上面配置定義了一個名為 cacheAdvice 的 cache:advice,其中指定了將緩存 findById 方法和 find 方法到名為 users 的緩存中。這裡的方法還可以使用通配符
有了cache:advice 之後,我們還需要引入 aop 命名空間,然後通過 aop:config 指定定義好的 cacheAdvice 要應用在哪些 pointcut 上。如:
上面的配置表示在調用 com.xxx.UserService 中任意公共方法時將使用 cacheAdvice 對應的 cache:advice 來進行 Spring Cache 處理。更多關於 Spring AOP 的內容不在本文討論範疇內。
CacheManager 是 Spring 定義的一個用來管理 Cache 的接口。Spring 自身已經為我們提供了兩種 CacheManager 的實現,一種是基於 Java API 的 ConcurrentMap,另一種是基於第三方 Cache 實現—— Ehcache,如果我們需要使用其它類型的緩存時,我們可以自己來實現 Spring 的 CacheManager 接口或 AbstractCacheManager 抽像類。下面分別來看看 Spring 已經為我們實現好了的兩種 CacheManager 的配置示例。
上面的配置使用的是一個 SimpleCacheManager,其中包含一個名為
上面的配置使用了一個 Spring 提供的 EhCacheCacheManager 來生成一個 Spring 的 CacheManager,其接收一個 Ehcache 的 CacheManager,因為真正用來存入緩存數據的還是 Ehcache。Ehcache 的 CacheManager 是通過 Spring 提供的 EhCacheManagerFactoryBean 來生成的,其可以通過指定 ehcache 的配置文件位置來生成一個 Ehcache 的 CacheManager。若未指定則將按照 Ehcache 的默認規則取 classpath 根路徑下的 ehcache.xml 文件,若該文件也不存在,則獲取 Ehcache 對應 jar 包中的 ehcache-failsafe.xml 文件作為配置文件。更多關於 Ehcache 的內容這裡就不多說了,它不屬於本文討論的內容,欲了解更多關於 Ehcache 的內容可以參考我之前發布的 Ehcache 系列文章,也可以參考官方文檔等。
鍵的生成策略有兩種,一種是默認策略,一種是自定義策略。
默認的 key 生成策略是通過 KeyGenerator 生成的,其默認策略如下:
如果我們需要指定自己的默認策略的話,那麼我們可以實現自己的 KeyGenerator,然後指定我們的 Spring Cache 使用的 KeyGenerator 為我們自己定義的 KeyGenerator。
使用基於注解的配置時是通過 cache:annotation-driven 指定的.
而使用基於 XML 配置時是通過 cache:advice 來指定的。
需要注意的是此時我們所有的 Cache 使用的 Key 的默認生成策略都是同一個 KeyGenerator。
自定義策略是指我們可以通過 Spring 的 EL 表達式來指定我們的 key。這裡的 EL 表達式可以使用方法參數及它們對應的屬性。使用方法參數時我們可以直接使用
除了上述使用方法參數作為 key 之外,Spring 還為我們提供了一個 root 對像可以用來生成 key。通過該 root 對像我們可以獲取到以下信息。
當我們要使用 root 對像的屬性作為 key 時我們也可以將
前面介紹的內容是 Spring 內置的對 Cache 的支持,其實我們也可以通過 Spring 自己單獨的使用 Ehcache 的 CacheManager 或 Ehcache 對像。通過在 Application Context 中配置 EhCacheManagerFactoryBean 和 EhCacheFactoryBean,我們就可以把對應的 EhCache 的 CacheManager 和 Ehcache 對像注入到其它的 Spring bean 對像中進行使用。
EhCacheManagerFactoryBean 是 Spring 內置的一個可以產生 Ehcache 的 CacheManager 對像的 FactoryBean。其可以通過屬性 configLocation 指定用於創建 CacheManager 的 Ehcache 配置文件的路徑,通常是 ehcache.xml文件的路徑。如果沒有指定 configLocation,則將使用默認位置的配置文件創建 CacheManager,這是屬於 Ehcache 自身的邏輯,即如果在 classpath 根路徑下存在 ehcache.xml 文件,則直接使用該文件作為 Ehcache 的配置文件,否則將使用 ehcache-xxx.jar 中的 ehcache-failsafe.xml 文件作為配置文件來創建 Ehcache 的 CacheManager。此外,如果不希望創建的 CacheManager 使用默認的名稱(在 ehcache.xml 文件中定義的,或者是由 CacheManager 內部定義的),則可以通過 cacheManagerName 屬性進行指定。下面是一個配置 EhCacheManagerFactoryBean 的示例。
EhCacheFactoryBean 是用來產生 Ehcache 的 Ehcache 對像的 FactoryBean。定義 EhcacheFactoryBean 時有兩個很重要的屬性我們可以來指定。一個是 cacheManager 屬性,其可以指定將用來獲取或創建 Ehcache 的 CacheManager 對像,若未指定則將通過 CacheManager.create() 獲取或創建默認的 CacheManager。另一個重要屬性是 cacheName,其表示當前 EhCacheFactoryBean 對應的是 CacheManager 中的哪一個 Ehcache 對像,若未指定默認使用 beanName 作為 cacheName。若 CacheManager 中不存在對應 cacheName 的 Ehcache 對像,則將使用 CacheManager 創建一個名為 cacheName 的 Cache 對像。此外我們還可以通過 EhCacheFactoryBean 的 timeToIdle、timeToLive 等屬性指定要創建的 Cache 的對應屬性,注意這些屬性只對 CacheManager 中不存在對應 Cache 時新建的 Cache 才起作用,對已經存在的 Cache 將不起作用,更多屬性設置請參考 Spring 的 API 文檔。此外還有幾個屬性是對不管是已經存在還是新創建的 Cache 都起作用的屬性:statisticsEnabled、sampledStatisticsEnabled、disabled、blocking 和 cacheEventListeners,其中前四個默認都是 false,最後一個表示為當前 Cache 指定 CacheEventListener。下面是一個定義 EhCacheFactoryBean 的示例。
(注:本文是基於 Spring 3.1.0 所寫)
Spring 使用 Cache
從 3.1 開始,Spring 引入了對 Cache 的支持。其使用方法和原理都類似於 Spring 對事務管理的支持。Spring Cache 是作用在方法上的,其核心思想是這樣的:當我們在調用一個緩存方法時會把該方法參數和返回結果作為一個鍵值對存放在緩存中,等到下次利用同樣的參數來調用該方法時將不再執行該方法,而是直接從緩存中獲取結果進行返回。所以在使用 Spring Cache 的時候我們要保證我們緩存的方法對於相同的方法參數要有相同的返回結果。
使用 Spring Cache 需要我們做兩方面的事:
- 聲明某些方法使用緩存
- 配置 Spring 對 Cache 的支持
和 Spring 對事務管理的支持一樣,Spring 對 Cache 的支持也有基於注解和基於 XML 配置兩種方式。下面我們先來看看基於注解的方式。
1 基於注解的支持
Spring 為我們提供了幾個注解來支持 Spring Cache。其核心主要是
@Cacheable 和 @CacheEvict。使用 @Cacheable 標記的方法在執行後 Spring Cache 將緩存其返回結果,而使用 @CacheEvict 標記的方法會在方法執行前或者執行後移除 Spring Cache 中的某些元素。下面我們將來詳細介紹一下 Spring 基於注解對 Cache 的支持所提供的幾個注解。1.1 @Cacheable
@Cacheable 可以標記在一個方法上,也可以標記在一個類上。當標記在一個方法上時表示該方法是支持緩存的,當標記在一個類上時則表示該類所有的方法都是支持緩存的。對於一個支持緩存的方法,Spring 會在其被調用後將其返回值緩存起來,以保證下次利用同樣的參數來執行該方法時可以直接從緩存中獲取結果,而不需要再次執行該方法。Spring 在緩存方法的返回值時是以鍵值對進行緩存的,值就是方法的返回結果,至於鍵的話,Spring 又支持兩種策略,默認策略和自定義策略,這個稍後會進行說明。需要注意的是當一個支持緩存的方法在對像內部被調用時是不會觸發緩存功能的。@Cacheable 可以指定三個屬性,value、key 和 condition。1.1.1 value 屬性指定 Cache 名稱
value 屬性是必須指定的,其表示當前方法的返回值是會被緩存在哪個 Cache 上的,對應 Cache 的名稱。其可以是一個 Cache 也可以是多個 Cache,當需要指定多個 Cache 時其是一個陣列。
@Cacheable("cache1") // Cache 是發生在 cache1 上的
public User find(Integer id) {
    return null;
}

@Cacheable({"cache1", "cache2"}) // Cache 是發生在 cache1 和 cache2 上的
public User find(Integer id) {
    return null;
}
1.1.2 使用 key 屬性自定義 key
key 屬性是用來指定 Spring 緩存方法的返回結果時對應的 key 的。該屬性支持 SpringEL 表達式。當我們沒有指定該屬性時,Spring 將使用默認策略生成 key。我們這裡先來看看自定義策略,至於默認策略會在後文單獨介紹。
自定義策略是指我們可以通過 Spring 的 EL 表達式來指定我們的 key。這裡的 EL 表達式可以使用方法參數及它們對應的屬性。使用方法參數時我們可以直接使用
"#參數名" 或者 "#p參數index"。下面是幾個使用參數作為 key 的示例。@Cacheable(value="users", key="#id")
public User find(Integer id) {
return null;
}
@Cacheable(value="users", key="#p0")
public User find(Integer id) {
return null;
}
@Cacheable(value="users", key="#user.id")
public User find(User user) {
return null;
}
@Cacheable(value="users", key="#p0.id")
public User find(User user) {
return null;
}
除了上述使用方法參數作為 key 之外,Spring 還為我們提供了一個 root 對像可以用來生成 key。通過該 root 對像我們可以獲取到以下信息。
| 屬性名稱 | 描述 | 示例 |
|---|---|---|
| methodName | 當前方法名 | #root.methodName |
| method | 當前方法 | #root.method.name |
| target | 當前被調用的對像 | #root.target |
| targetClass | 當前被調用的對像的 class | #root.targetClass |
| args | 當前方法參數組成的陣列 | #root.args[0] |
| caches | 當前被調用的方法使用的 Cache | #root.caches[0].name |
當我們要使用 root 對像的屬性作為 key 時我們也可以將
"#root" 省略,因為 Spring 默認使用的就是 root 對像的屬性。如:@Cacheable(value={"users", "xxx"}, key="caches[1].name")
public User find(User user) {
return null;
}
1.1.3 condition 屬性指定發生的條件
有的時候我們可能並不希望緩存一個方法所有的返回結果。通過 condition 屬性可以實現這一功能。condition 屬性默認為空,表示將緩存所有的調用情形。其值是通過 SpringEL 表達式來指定的,當為
true 時表示進行緩存處理;當為 false 時表示不進行緩存處理,即每次調用該方法時該方法都會執行一次。如下示例表示只有當 user 的 id 為偶數時才會進行緩存。@Cacheable(value={"users"}, key="#user.id", condition="#user.id%2==0")
public User find(User user) {
System.out.println("find user by user " + user);
return user;
}
1.2 @CachePut
在支持 Spring Cache 的環境下,對於使用
@Cacheable 標注的方法,Spring 在每次執行前都會檢查 Cache 中是否存在相同 key 的緩存元素,如果存在就不再執行該方法,而是直接從緩存中獲取結果進行返回,否則才會執行並將返回結果存入指定的緩存中。@CachePut 也可以聲明一個方法支持緩存功能。與 @Cacheable 不同的是使用 @CachePut 標注的方法在執行前不會去檢查緩存中是否存在之前執行過的結果,而是每次都會執行該方法,並將執行結果以鍵值對的形式存入指定的緩存中。@CachePut 也可以標注在類上和方法上。使用 @CachePut 時我們可以指定的屬性跟 @Cacheable 是一樣的。@CachePut("users") // 每次都會執行方法,並將結果存入指定的緩存中
public User find(Integer id) {
return null;
}
1.3 @CacheEvict
@CacheEvict 是用來標注在需要清除緩存元素的方法或類上的。當標記在一個類上時表示其中所有的方法的執行都會觸發緩存的清除操作。@CacheEvict 可以指定的屬性有 value、key、condition、allEntries 和 beforeInvocation。其中 value、key 和 condition 的語義與 @Cacheable 對應的屬性類似。即 value 表示清除操作是發生在哪些 Cache 上的(對應 Cache 的名稱);key 表示需要清除的是哪個 key,如未指定則會使用默認策略生成的 key;condition 表示清除操作發生的條件。下面我們來介紹一下新出現的兩個屬性 allEntries和 beforeInvocation。1.3.1 allEntries 屬性
allEntries 是 boolean 類型,表示是否需要清除緩存中的所有元素。默認為 false,表示不需要。當指定了 allEntries 為 true 時,Spring Cache 將忽略指定的 key。有的時候我們需要 Cache 一下清除所有的元素,這比一個一個清除元素更有效率。
@CacheEvict(value="users", allEntries=true)
public void delete(Integer id) {
    System.out.println("delete user by id: " + id);
}
1.3.2 beforeInvocation 屬性
清除操作默認是在對應方法成功執行之後觸發的,即方法如果因為拋出異常而未能成功返回時也不會觸發清除操作。使用 beforeInvocation 可以改變觸發清除操作的時間,當我們指定該屬性值為 true 時,Spring 會在調用該方法之前清除緩存中的指定元素。
@CacheEvict(value="users", beforeInvocation=true)
public void delete(Integer id) {
    System.out.println("delete user by id: " + id);
}
其實除了使用
@CacheEvict 清除緩存元素外,當我們使用 Ehcache 作為實現時,我們也可以配置 Ehcache 自身的驅除策略,其是通過 Ehcache 的配置文件來指定的。由於 Ehcache 不是本文描述的重點,這裡就不多贅述了,想了解更多關於 Ehcache 的信息,請查看我關於 Ehcache 的專欄。1.4 @Caching
@Caching 注解可以讓我們在一個方法或者類上同時指定多個 Spring Cache 相關的注解。其擁有三個屬性:cacheable、put 和 evict,分別用於指定 @Cacheable、@CachePut 和 @CacheEvict。@Caching(
cacheable = @Cacheable("users"),
evict = {
@CacheEvict("cache2"),
@CacheEvict(value = "cache3", allEntries = true)
}
)
public User find(Integer id) {
return null;
}
1.5 使用自定義注解
Spring 允許我們在配置可緩存的方法時使用自定義的注解,前提是自定義的注解上必須使用對應的注解進行標注。如我們有如下這麼一個使用
@Cacheable 進行標注的自定義注解。@Target({ElementType.TYPE, ElementType.METHOD})
@Retention(RetentionPolicy.RUNTIME)
@Cacheable(value="users")
public @interface MyCacheable {
}
那麼在我們需要緩存的方法上使用
@MyCacheable 進行標注也可以達到同樣的效果。@MyCacheable
public User findById(Integer id) {
System.out.println("find user by id: " + id);
User user = new User();
user.setId(id);
user.setName("Name" + id);
return user;
}
2 配置 Spring 對 Cache 的支持
2.1 聲明對Cache的支持
2.1.1 基於注解
配置 Spring 對基於注解的 Cache 的支持,首先我們需要在 Spring 的配置文件中引入 cache 命名空間,其次通過
<cache:annotation-driven/> 就可以啟用 Spring 對基於注解的 Cache 的支持。<?xml version="1.0" encoding="UTF-8"?>
<beans xmlns="http://www.springframework.org/schema/beans"
xmlns:xsi="http://www.w3.org/2001/XMLSchema-instance"
xmlns:cache="http://www.springframework.org/schema/cache"
xsi:schemaLocation="
http://www.springframework.org/schema/beans
http://www.springframework.org/schema/beans/spring-beans-3.0.xsd
http://www.springframework.org/schema/cache
http://www.springframework.org/schema/cache/spring-cache.xsd"
>
<cache:annotation-driven/>
</beans>
<cache:annotation-driven/> 有一個 cache-manager 屬性用來指定當前所使用的 CacheManager 對應的 bean 的名稱,默認是 cacheManager,所以當我們的 CacheManager 的 id 為 cacheManager 時我們可以不指定該參數,否則就需要我們指定了。<cache:annotation-driven/> 還可以指定一個 mode 屬性,可選值有 proxy 和 aspectj。默認是使用 proxy。當 mode 為 proxy 時,只有緩存方法在外部被調用的時候 Spring Cache 才會發生作用,這也就意味著如果一個緩存方法在其聲明對像內部被調用時 Spring Cache 是不會發生作用的。而 mode 為 aspectj 時就不會有這種問題。另外使用 proxy 時,只有 public 方法上的 @Cacheable 等標注才會起作用,如果需要非 public 方法上的方法也可以使用 Spring Cache 時把 mode 設置為 aspectj。此外,
<cache:annotation-driven/> 還可以指定一個 proxy-target-class 屬性,表示是否要代理 class,默認為 false。我們前面提到的 @Cacheable、@cacheEvict 等也可以標注在接口上,這對於基於接口的代理來說是沒有什麼問題的,但是需要注意的是當我們設置 proxy-target-class 為 true 或者 mode 為 aspectj 時,是直接基於 class 進行操作的,定義在接口上的 @Cacheable 等 Cache 注解不會被識別到,那對應的 Spring Cache 也不會起作用了。需要注意的是
<cache:annotation-driven/> 只會去尋找定義在同一個 ApplicationContext 下的 @Cacheable 等緩存注解。2.1.2 基於 XML 配置
除了使用注解來聲明對 Cache 的支持外,Spring 還支持使用 XML 來聲明對 Cache 的支持。這主要是通過類似於 aop:advice 的 cache:advice 來進行的。在 cache 命名空間下定義了一個 cache:advice 元素用來定義一個對於 Cache 的 advice。其需要指定一個 cache-manager 屬性,默認為 cacheManager。 cache:advice 下面可以指定多個 cache:caching 元素,其有點類似於使用注解時的
@Caching 注解。cache:caching 元素下又可以指定 cache:cacheable、cache:cache-put 和 cache:cache-evict 元素,它們類似於使用注解時的 @Cacheable、@CachePut 和 @CacheEvict。下面來看一個示例:<cache:advice id="cacheAdvice" cache-manager="cacheManager">
<cache:caching cache="users">
<cache:cacheable method="findById" key="#p0"/>
<cache:cacheable method="find" key="#user.id"/>
<cache:cache-evict method="deleteAll" all-entries="true"/>
</cache:caching>
</cache:advice>
上面配置定義了一個名為 cacheAdvice 的 cache:advice,其中指定了將緩存 findById 方法和 find 方法到名為 users 的緩存中。這裡的方法還可以使用通配符
"*",比如 "find*" 表示任何以 "find" 開始的方法。有了cache:advice 之後,我們還需要引入 aop 命名空間,然後通過 aop:config 指定定義好的 cacheAdvice 要應用在哪些 pointcut 上。如:
<aop:config proxy-target-class="false">
    <aop:advisor advice-ref="cacheAdvice" pointcut="execution(* com.xxx.UserService.*(..))"/>
</aop:config>
上面的配置表示在調用 com.xxx.UserService 中任意公共方法時將使用 cacheAdvice 對應的 cache:advice 來進行 Spring Cache 處理。更多關於 Spring AOP 的內容不在本文討論範疇內。
2.2 配置 CacheManager
CacheManager 是 Spring 定義的一個用來管理 Cache 的接口。Spring 自身已經為我們提供了兩種 CacheManager 的實現,一種是基於 Java API 的 ConcurrentMap,另一種是基於第三方 Cache 實現—— Ehcache,如果我們需要使用其它類型的緩存時,我們可以自己來實現 Spring 的 CacheManager 接口或 AbstractCacheManager 抽像類。下面分別來看看 Spring 已經為我們實現好了的兩種 CacheManager 的配置示例。
2.2.1 基於 ConcurrentMap 的配置
<bean id="cacheManager" class="org.springframework.cache.support.SimpleCacheManager">
    <property name="caches">
        <set>
            <bean class="org.springframework.cache.concurrent.ConcurrentMapCacheFactoryBean" p:name="xxx"/>
        </set>
    </property>
</bean>
上面的配置使用的是一個 SimpleCacheManager,其中包含一個名為
"xxx" 的 ConcurrentMapCache。2.2.2 基於 Ehcache 的配置
<!-- Ehcache 實現 -->
<bean id="ehCacheManagerFactory" class="org.springframework.cache.ehcache.EhCacheManagerFactoryBean">
    <property name="configLocation" value="/WEB-INF/ehcache.xml"/>
</bean>

<bean id="ehCacheManager" class="org.springframework.cache.ehcache.EhCacheCacheManager">
    <property name="cacheManager" ref="ehCacheManagerFactory"/>
</bean>
上面的配置使用了一個 Spring 提供的 EhCacheCacheManager 來生成一個 Spring 的 CacheManager,其接收一個 Ehcache 的 CacheManager,因為真正用來存入緩存數據的還是 Ehcache。Ehcache 的 CacheManager 是通過 Spring 提供的 EhCacheManagerFactoryBean 來生成的,其可以通過指定 ehcache 的配置文件位置來生成一個 Ehcache 的 CacheManager。若未指定則將按照 Ehcache 的默認規則取 classpath 根路徑下的 ehcache.xml 文件,若該文件也不存在,則獲取 Ehcache 對應 jar 包中的 ehcache-failsafe.xml 文件作為配置文件。更多關於 Ehcache 的內容這裡就不多說了,它不屬於本文討論的內容,欲了解更多關於 Ehcache 的內容可以參考我之前發布的 Ehcache 系列文章,也可以參考官方文檔等。
3 鍵的生成策略
鍵的生成策略有兩種,一種是默認策略,一種是自定義策略。
3.1 默認策略
默認的 key 生成策略是通過 KeyGenerator 生成的,其默認策略如下:
- 如果方法沒有參數,則使用 0 作為 key
- 如果只有一個參數的話則使用該參數作為 key
- 如果參數多餘一個的話則使用所有參數的 hashCode 作為 key
如果我們需要指定自己的默認策略的話,那麼我們可以實現自己的 KeyGenerator,然後指定我們的 Spring Cache 使用的 KeyGenerator 為我們自己定義的 KeyGenerator。
使用基於注解的配置時是通過 cache:annotation-driven 指定的.
<cache:annotation-driven key-generator="userKeyGenerator"/>
<bean id="userKeyGenerator" class="com.xxx.cache.UserKeyGenerator"/>
而使用基於 XML 配置時是通過 cache:advice 來指定的。
<cache:advice id="cacheAdvice" cache-manager="cacheManager" key-generator="userKeyGenerator">
</cache:advice>
需要注意的是此時我們所有的 Cache 使用的 Key 的默認生成策略都是同一個 KeyGenerator。
3.1 自定義策略
自定義策略是指我們可以通過 Spring 的 EL 表達式來指定我們的 key。這裡的 EL 表達式可以使用方法參數及它們對應的屬性。使用方法參數時我們可以直接使用
"#參數名" 或者 "#p參數index"。下面是幾個使用參數作為 key 的示例。@Cacheable(value="users", key="#id")
public User find(Integer id) {
return null;
}
@Cacheable(value="users", key="#p0")
public User find(Integer id) {
return null;
}
@Cacheable(value="users", key="#user.id")
public User find(User user) {
return null;
}
@Cacheable(value="users", key="#p0.id")
public User find(User user) {
return null;
}
除了上述使用方法參數作為 key 之外,Spring 還為我們提供了一個 root 對像可以用來生成 key。通過該 root 對像我們可以獲取到以下信息。
| 屬性名稱 | 描述 | 示例 |
|---|---|---|
| methodName | 當前方法名 | #root.methodName |
| method | 當前方法 | #root.method.name |
| target | 當前被調用的對像 | #root.target |
| targetClass | 當前被調用的對像的 class | #root.targetClass |
| args | 當前方法參數組成的陣列 | #root.args[0] |
| caches | 當前被調用的方法使用的 Cache | #root.caches[0].name |
當我們要使用 root 對像的屬性作為 key 時我們也可以將
"#root" 省略,因為 Spring 默認使用的就是 root 對像的屬性。如:@Cacheable(value={"users", "xxx"}, key="caches[1].name")
public User find(User user) {
return null;
}
4 Spring 單獨使用 Ehcache
前面介紹的內容是 Spring 內置的對 Cache 的支持,其實我們也可以通過 Spring 自己單獨的使用 Ehcache 的 CacheManager 或 Ehcache 對像。通過在 Application Context 中配置 EhCacheManagerFactoryBean 和 EhCacheFactoryBean,我們就可以把對應的 EhCache 的 CacheManager 和 Ehcache 對像注入到其它的 Spring bean 對像中進行使用。
4.1 EhCacheManagerFactoryBean
EhCacheManagerFactoryBean 是 Spring 內置的一個可以產生 Ehcache 的 CacheManager 對像的 FactoryBean。其可以通過屬性 configLocation 指定用於創建 CacheManager 的 Ehcache 配置文件的路徑,通常是 ehcache.xml文件的路徑。如果沒有指定 configLocation,則將使用默認位置的配置文件創建 CacheManager,這是屬於 Ehcache 自身的邏輯,即如果在 classpath 根路徑下存在 ehcache.xml 文件,則直接使用該文件作為 Ehcache 的配置文件,否則將使用 ehcache-xxx.jar 中的 ehcache-failsafe.xml 文件作為配置文件來創建 Ehcache 的 CacheManager。此外,如果不希望創建的 CacheManager 使用默認的名稱(在 ehcache.xml 文件中定義的,或者是由 CacheManager 內部定義的),則可以通過 cacheManagerName 屬性進行指定。下面是一個配置 EhCacheManagerFactoryBean 的示例。
<!-- 定義 CacheManager -->
<bean id="cacheManager"
       class="org.springframework.cache.ehcache.EhCacheManagerFactoryBean">

    <!-- 指定配置文件的位置 -->
    <property name="configLocation" value="/WEB-INF/config/ehcache.xml"/>

    <!-- 指定新建的 CacheManager 的名稱 -->
    <property name="cacheManagerName" value="cacheManagerName"/>
</bean>
4.2 EhCacheFactoryBean
EhCacheFactoryBean 是用來產生 Ehcache 的 Ehcache 對像的 FactoryBean。定義 EhcacheFactoryBean 時有兩個很重要的屬性我們可以來指定。一個是 cacheManager 屬性,其可以指定將用來獲取或創建 Ehcache 的 CacheManager 對像,若未指定則將通過 CacheManager.create() 獲取或創建默認的 CacheManager。另一個重要屬性是 cacheName,其表示當前 EhCacheFactoryBean 對應的是 CacheManager 中的哪一個 Ehcache 對像,若未指定默認使用 beanName 作為 cacheName。若 CacheManager 中不存在對應 cacheName 的 Ehcache 對像,則將使用 CacheManager 創建一個名為 cacheName 的 Cache 對像。此外我們還可以通過 EhCacheFactoryBean 的 timeToIdle、timeToLive 等屬性指定要創建的 Cache 的對應屬性,注意這些屬性只對 CacheManager 中不存在對應 Cache 時新建的 Cache 才起作用,對已經存在的 Cache 將不起作用,更多屬性設置請參考 Spring 的 API 文檔。此外還有幾個屬性是對不管是已經存在還是新創建的 Cache 都起作用的屬性:statisticsEnabled、sampledStatisticsEnabled、disabled、blocking 和 cacheEventListeners,其中前四個默認都是 false,最後一個表示為當前 Cache 指定 CacheEventListener。下面是一個定義 EhCacheFactoryBean 的示例。
<!-- 定義 CacheManager -->
<bean id="cacheManager"
       class="org.springframework.cache.ehcache.EhCacheManagerFactoryBean">

    <!-- 指定配置文件的位置 -->
    <property name="configLocation" value="/WEB-INF/config/ehcache.xml"/>
    <!-- 指定新建的 CacheManager 的名稱 -->
    <property name="cacheManagerName" value="cacheManagerName"/>
</bean>

<!-- 定義一個 Ehcache -->
<bean id="userCache"
       class="org.springframework.cache.ehcache.EhCacheFactoryBean">
    <property name="cacheName" value="user"/>
    <property name="cacheManager" ref="cacheManager"/>
</bean>
(注:本文是基於 Spring 3.1.0 所寫)
2015-03-26 14:39
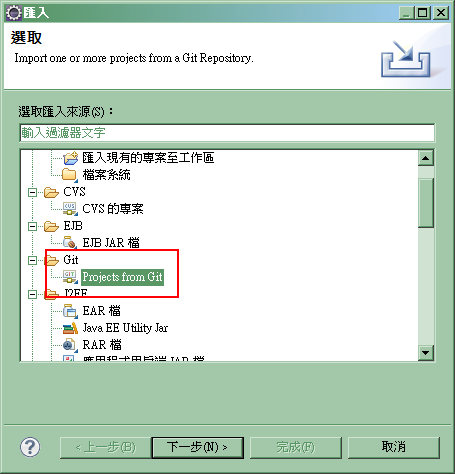
Eclipse Git 基本操作
Git 只有本地端(local)跟遠端(remote)的分別,並不是 client 跟 server 的關係,只要是非專案本身的都可以稱為遠端,例如 A 與 B 專案都在自己的電腦裡,A 專案是可以將 B 專案設為遠端進行版本傳遞。
幾個基本日常操作的名稱意義:
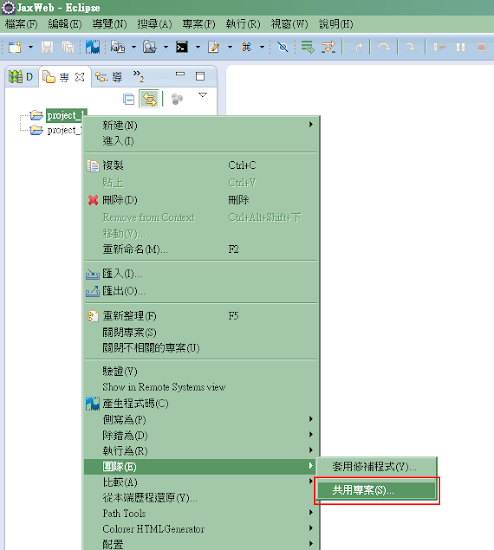
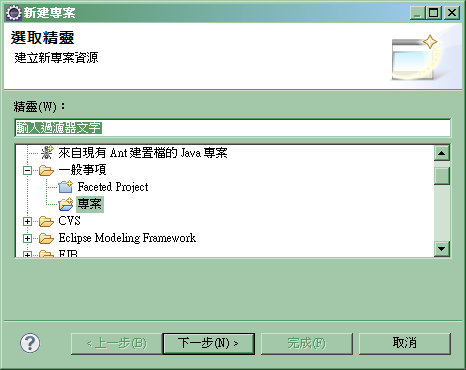
在一個專案上滑鼠右鍵選擇 [團隊]->[共享專案]
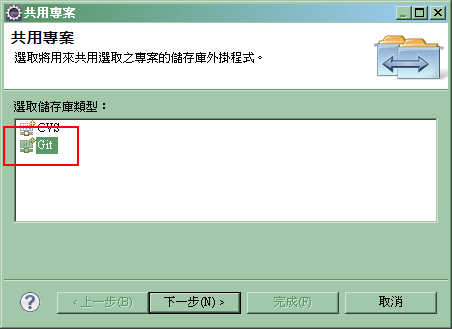
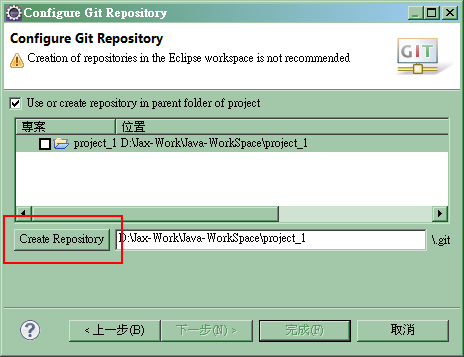
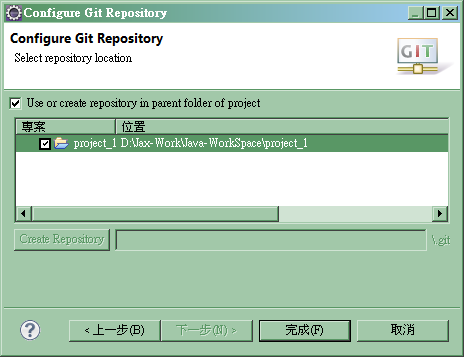
先建立 Git 儲存庫
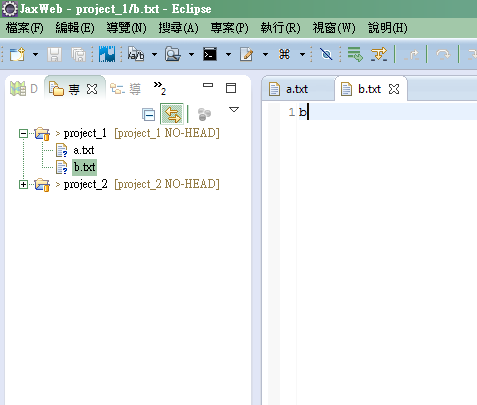
隨便建立幾個文件
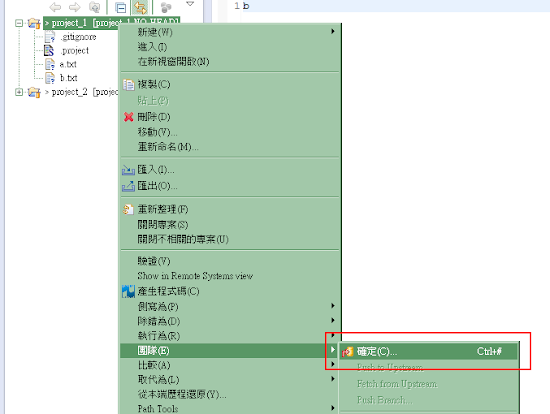
在專案上右鍵選擇 [團隊]->[確定]
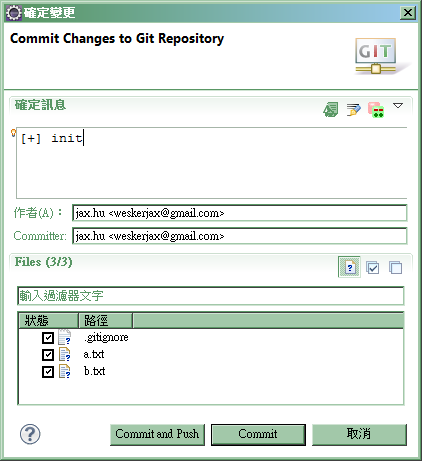
填寫 commit 的訊息,以及選擇要 commit 的檔案
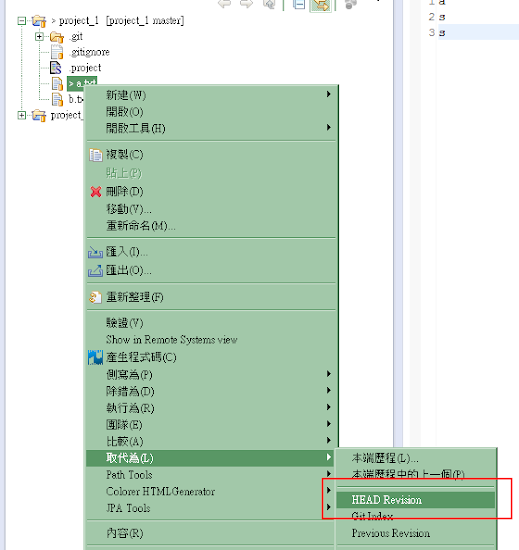
在要回復的檔案右鍵選擇 [取代為]->[HEAD Revision]
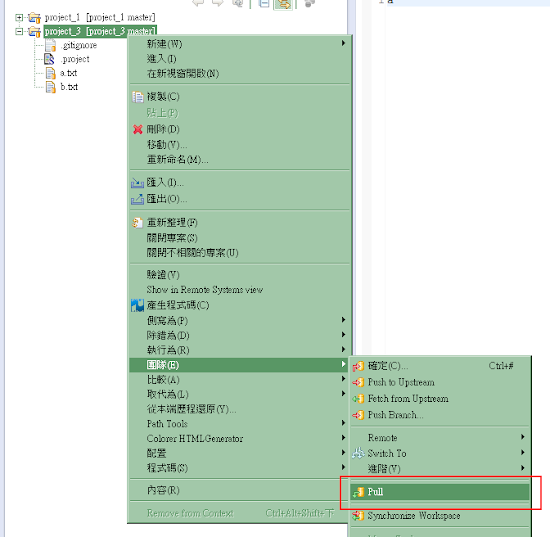
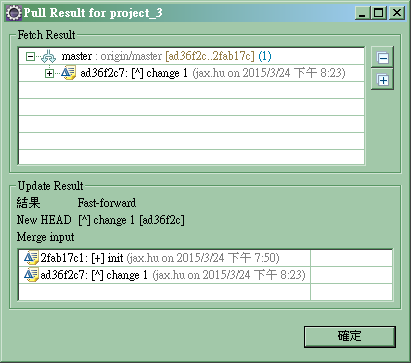
在專案上右鍵選擇 [團隊]->[Pull] 從遠端取回有差異的程式
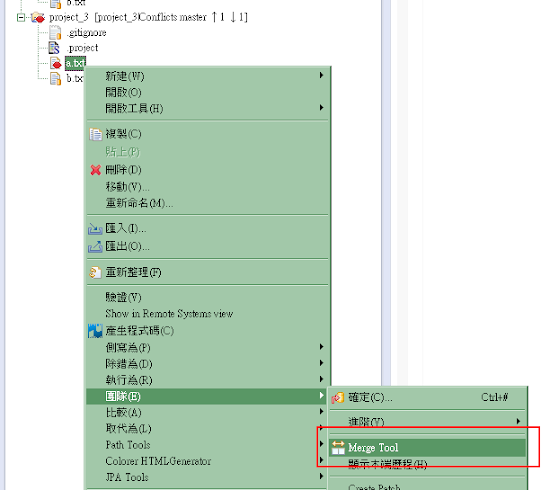
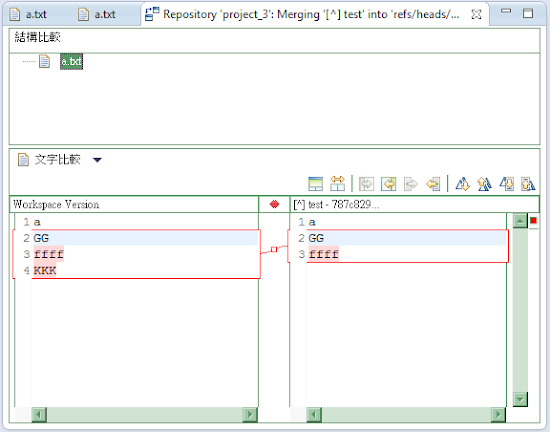
當檔案出現衝突時會顯示紅色的標記,這時候檔案右鍵選擇 [團隊]->[Merge Tool]
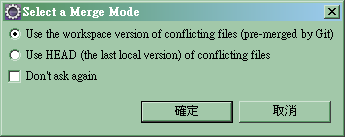
接著就會出現合併的工具,修改完儲存關閉
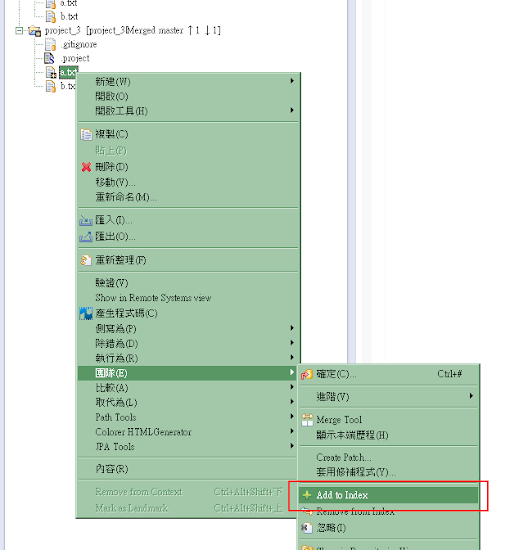
最後檔案右鍵選擇 [團隊]->[Add to Index] 將檔案加到 commit 清單中

指定來源的遠端
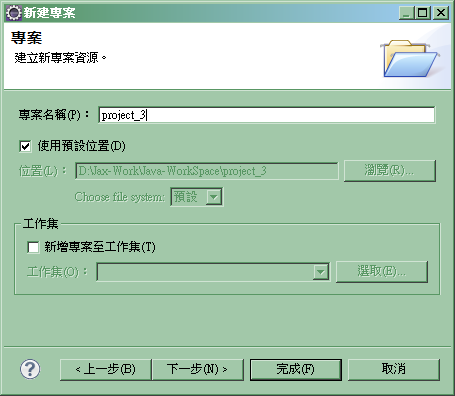
目的地目錄最好修改到 Workspace 中

幾個基本日常操作的名稱意義:
- commit: 將完成的程式提交到版本控制中
- revert: 放棄修改,將程式回復
- merge: 將兩個不同版本的程式進行合併
- pull: 從遠端取回有差異的程式版本
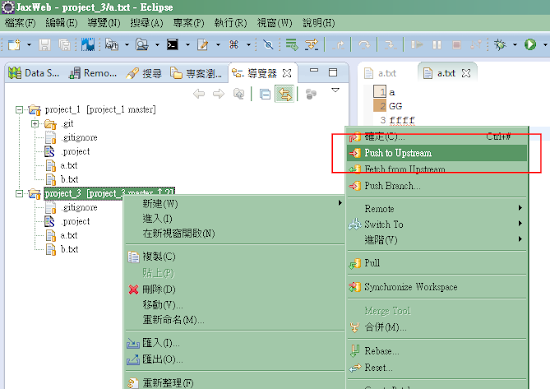
- push: 將本地端的版本傳到遠端
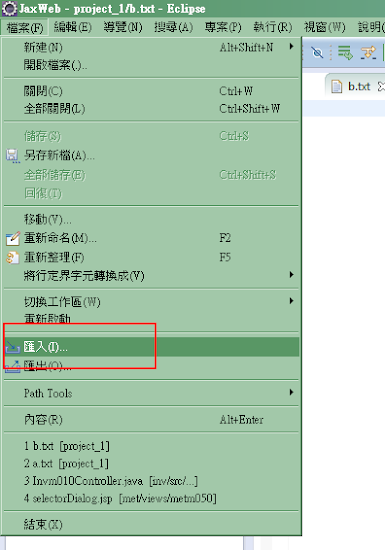
- clone: 從遠端複製一個專案到本地
在專案建立 Git 版本控制
在一個專案上滑鼠右鍵選擇 [團隊]->[共享專案]


先建立 Git 儲存庫


將專案中的異動 commit 到 Git 版本控制
隨便建立幾個文件

在專案上右鍵選擇 [團隊]->[確定]

填寫 commit 的訊息,以及選擇要 commit 的檔案

程式回復到尚未修改時
在要回復的檔案右鍵選擇 [取代為]->[HEAD Revision]

版本合併
在專案上右鍵選擇 [團隊]->[Pull] 從遠端取回有差異的程式


當檔案出現衝突時會顯示紅色的標記,這時候檔案右鍵選擇 [團隊]->[Merge Tool]


接著就會出現合併的工具,修改完儲存關閉

最後檔案右鍵選擇 [團隊]->[Add to Index] 將檔案加到 commit 清單中

將本地端的版本傳到遠端

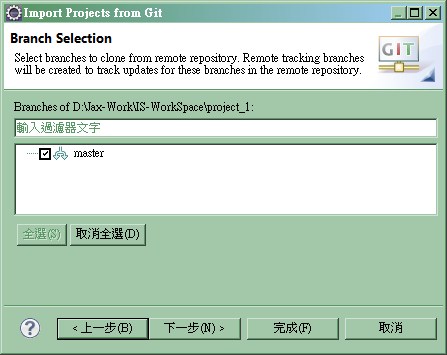
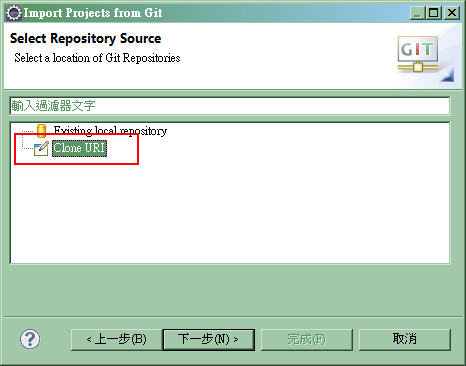
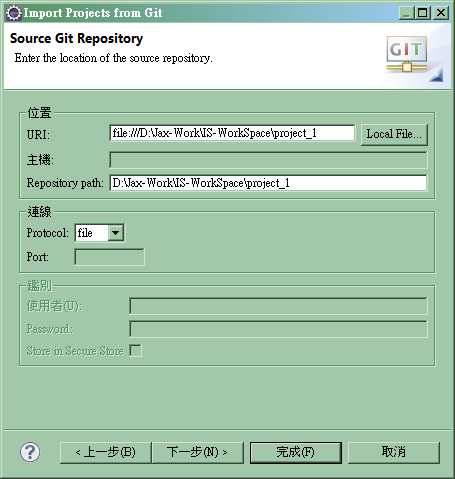
從遠端複製一個專案


指定來源的遠端

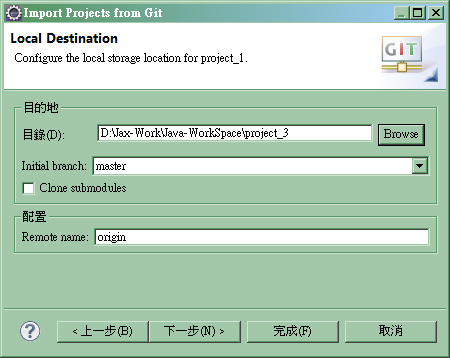
目的地目錄最好修改到 Workspace 中


2015-03-13 13:12
[Java] Ant zip 解壓縮筆記
<unzip dest="./target_dir">

    <!-- 來源的壓縮檔 -->
    <fileset dir="lib">
        <include name="tiles-jsp-*.jar"/>
    </fileset>

    <!-- 要解出的檔案 -->
    <patternset>
        <include name="**/*.tld"/>
    </patternset>

    <!-- 解出路徑的轉換 -->
    <mapper type="flatten"/>

</unzip>
參考文件:
Apache Ant™ User Manual : Unzip Task
Apache Ant™ User Manual : Mapper
2015-03-13 11:59
[Java] Reflection 筆記
@SuppressWarnings("unused")
Object obj = new Object() {
    String id = "123";
    public String name = "Jax";
};

Class<?> cl = obj.getClass();

for (Field field : cl.getFields()) {
    System.out.printf("%s = %s {%s}\n",
        field.getName(), field.get(obj), field.getType());
}

System.out.println("=======================");

for (Field field : cl.getDeclaredFields()) {
    System.out.printf("%s = %s {%s}\n",
        field.getName(), field.get(obj), field.getType());
}
Output:
name = Jax {class java.lang.String}
=======================
id = 123 {class java.lang.String}
name = Jax {class java.lang.String}
2015-03-10 15:18
[Java] 產生驗證碼圖片
import java.awt.Color;
import java.awt.Font;
import java.awt.Graphics;
import java.awt.image.BufferedImage;
import java.io.File;
import java.util.Random;

import javax.imageio.ImageIO;

public class TestCaptchaImage {

    public static void main(String[] args) throws Exception {
        String captcha = "09875";

        int width = 55;
        int height = 20;
        Color fontColor = new Color(36, 85, 92); /*文字顏色*/
        Color lineColor = new Color(65, 161, 175); /*線條顏色*/
        Color bgColor = new Color(208, 226, 229); /*底色*/

        Random random = new Random();
        random.setSeed(System.currentTimeMillis());

        BufferedImage image = new BufferedImage(
            width, height, BufferedImage.TYPE_INT_RGB
        );
        Graphics g = image.getGraphics();

        /* 底色 */
        g.setColor(bgColor);
        g.fillRect(0, 0, width, height);

        /* 畫線 */
        g.setColor(lineColor);
        for (int i=0; i < 20; i++) {
            g.drawLine(
                random.nextInt(width), 0,
                random.nextInt(width), height
            );
        }

        /* 畫出文字 */
        g.setFont(new Font("Atlantic Inline", Font.BOLD, 20));
        g.setColor(fontColor);
        g.drawString(captcha, 0, 18);

        /* 畫線 */
        g.setColor(lineColor);
        for (int i=0; i < 4; i++) {
            g.drawLine(
                0, random.nextInt(height),
                width, random.nextInt(height)
            );
        }

        g.dispose();

        ImageIO.write(image, "png", new File("captcha_image.png"));
    }
}
參考文件:
Graphics (Java 2 Platform SE 6)
2015-03-06 17:12
[Java] 製作縮圖筆記
package test_image;

import java.awt.Graphics;
import java.awt.image.BufferedImage;
import java.io.File;

import javax.imageio.ImageIO;

public class TestImageResize {

    private static int targetWidth = 120;
    private static int targetHeight = 80;
    private static double targetRate = (double) targetWidth / targetHeight;

    public static void main(String[] args) throws Exception {

        System.out.printf("Target w:%s, h:%s, r:%s\n",
            targetWidth, targetHeight, targetRate);


        BufferedImage image = ImageIO.read(new File("input.jpg"));

        int type = image.getType();
        if(type == 0) { type = BufferedImage.TYPE_INT_ARGB; }

        int width = image.getWidth();
        int height = image.getHeight();
        double rate = (double) width / height;

        System.out.printf("Source w:%s, h:%s, r:%s\n", width, height, rate);


        /* 等比例縮小至指定大小內 */
        int rWidth = targetWidth;
        int rHeight = targetHeight;

        if(width < targetWidth && height < targetHeight) {
            rWidth = width;
            rHeight = height;
        } else if(rate > targetRate) {
            rHeight = (int) (targetWidth / rate);
        } else {
            rWidth = (int) (targetHeight * rate);
        }
        System.out.printf("Resize w:%s, h:%s\n", rWidth, rHeight);

        BufferedImage resize1 = new BufferedImage(rWidth, rHeight, type);
        Graphics g1 = resize1.getGraphics();
        g1.drawImage(image, 0, 0, rWidth, rHeight, null);
        g1.dispose();

        ImageIO.write(resize1, "jpg", new File("output_1.jpg"));


        /* 等比例縮小填滿指定大小 */
        BufferedImage resize2 = new BufferedImage(targetWidth,targetHeight,type);
        Graphics g2 = resize2.getGraphics();

        int startX = 0;
        int startY = 0;
        int size = 0;

        if(rate > targetRate) {
            startX = (int) (width - height * targetRate) / 2;
            size = height;
        } else {
            startY = (int) (height - width / targetRate) / 2;
            size = width;
        }
        System.out.printf("x:%s, y:%s, size:%s\n", startX, startY, size);

        g2.drawImage(
            image,
            0, 0, targetWidth, targetHeight,
            startX, startY, (size + startX), (size + startY),
            null
        );

        g2.dispose();

        ImageIO.write(resize2, "jpg", new File("output_2.jpg"));
    }
}
參考文件:
Graphics (Java 2 Platform SE 6)
2015-03-06 15:33
[Java] Jsoup 筆記
import org.jsoup.Jsoup;
import org.jsoup.nodes.Document;
import org.jsoup.nodes.Element;
import org.jsoup.select.Elements;

public class TestJsoup {

    public static void main(String[] args) throws Exception {

        String url = "http://epg.dishstar.net/calendar.php?s=DISC&d=1";

        // Document doc = Jsoup.parse(new URL(url), 5000);
        Document doc = Jsoup.connect(url)
                            .userAgent("Mozilla/5.0")
                            .timeout(5000).get();

        Elements trs = doc.select("table tr");
        for (Element tr : trs) {
            String time = tr.select("td:eq(0)").text();
            String title = tr.select("td:eq(1)").text();

            System.out.println(time + " <=> " + title);
        }
    }
}
2015-03-06 11:57
Spring JavaMail 筆記
Gmail via SSL
Gmail via TLS
Sample Code
參考自:
JavaMail API – Sending email via Gmail SMTP example : Mkyong
Spring – Sending e-mail with attachment : Mkyong
Spring – Define an E-mail template in bean configuration file : Mkyong
Spring – Sending E-mail via Gmail SMTP server with MailSender : Mkyong
<bean id="mailSender" class="org.springframework.mail.javamail.JavaMailSenderImpl">
    <property name="host" value="smtp.gmail.com" />
    <property name="port" value="465" />
    <property name="username" value="smtp-user" />
    <property name="password" value="smtp-passwd" />

    <property name="javaMailProperties">
        <props>
            <prop key="mail.smtp.socketFactory.class">javax.net.ssl.SSLSocketFactory</prop>
            <prop key="mail.smtp.auth">true</prop>
        </props>
    </property>
</bean>
Gmail via TLS
<bean id="mailSender" class="org.springframework.mail.javamail.JavaMailSenderImpl">
    <property name="host" value="smtp.gmail.com" />
    <property name="port" value="587" />
    <property name="username" value="smtp-user" />
    <property name="password" value="smtp-passwd" />
    <property name="javaMailProperties">
        <props>
            <prop key="mail.smtp.starttls.enable">true</prop>
            <prop key="mail.smtp.auth">true</prop>
        </props>
    </property>
</bean>
Sample Code
package test_mail;

import javax.mail.Message;
import javax.mail.MessagingException;
import javax.mail.internet.MimeMessage;

import org.springframework.context.support.AbstractApplicationContext;
import org.springframework.context.support.ClassPathXmlApplicationContext;
import org.springframework.mail.SimpleMailMessage;
import org.springframework.mail.javamail.JavaMailSender;
import org.springframework.mail.javamail.MimeMessageHelper;

public class TestSpringMail {

    public static void main( String[] args ) throws Exception {

        AbstractApplicationContext context
            = new ClassPathXmlApplicationContext("test_mail/spring-mail.xml");

        JavaMailSender mailSender
            = (JavaMailSender) context.getBean("mailSender");

        sample1(mailSender);
        sample2(mailSender);
        sample3(mailSender);

        context.close();
    }


    public static void sample1(JavaMailSender mailSender) throws Exception {
        MimeMessage mimeMessage = mailSender.createMimeMessage();

        mimeMessage.setFrom("from@no-spam.com");
        mimeMessage.setRecipients(
            Message.RecipientType.TO, "to@no-spam.com"
        );
        mimeMessage.setSubject("Testing Subject");
        mimeMessage.setContent(
            "<b>Testing Content.</b>",
            "text/html; charset=utf-8"
        );

        mailSender.send(mimeMessage);
    }


    public static void sample2(JavaMailSender mailSender) throws Exception {
        MimeMessage mimeMessage = mailSender.createMimeMessage();
        MimeMessageHelper message = new MimeMessageHelper(mimeMessage, "utf-8");

        message.setFrom("from@no-spam.com");
        message.setTo("to@no-spam.com");
        message.setSubject("Testing Subject");
        message.setText("<b>Testing Content.</b>", true);

        mailSender.send(mimeMessage);
    }


    public static void sample3(JavaMailSender mailSender) {
        SimpleMailMessage message = new SimpleMailMessage();
        message.setFrom("from@no-spam.com");
        message.setTo("to@no-spam.com");
        message.setSubject("Testing Subject");
        message.setText("Testing Content.");

        mailSender.send(message);
    }

}
參考自:
JavaMail API – Sending email via Gmail SMTP example : Mkyong
Spring – Sending e-mail with attachment : Mkyong
Spring – Define an E-mail template in bean configuration file : Mkyong
Spring – Sending E-mail via Gmail SMTP server with MailSender : Mkyong
2015-03-05 10:24
用 Spring 取得 JSP 執行後的字串內容
為了取得執行後的字串內容,我們需要建立
接著可以從 Spring 的
想到要建立 Request 跟 Response 就感覺讓人頭痛,還好 Spring 有提供 Mock 的類別可以簡單地去建立 Request 跟 Response。
參考自:Render and capture the output of a JSP as a String | Technological Oddity
Response 並且替換 PrintWriter,這樣才有辦法取得執行後的內容。接著可以從 Spring 的
ViewResolver 去取得 View,再透過 View 去處理 render 前的包裝,最後才由 dispatcher 真正去處理 render 的動作。 想到要建立 Request 跟 Response 就感覺讓人頭痛,還好 Spring 有提供 Mock 的類別可以簡單地去建立 Request 跟 Response。
JspRenderer
package com.orion.webmvc.util;

import java.io.IOException;
import java.io.PrintWriter;
import java.io.StringWriter;
import java.io.UnsupportedEncodingException;
import java.util.Locale;
import java.util.Map;

import javax.servlet.RequestDispatcher;
import javax.servlet.ServletContext;

import org.springframework.beans.factory.annotation.Autowired;
import org.springframework.mock.web.MockHttpServletRequest;
import org.springframework.mock.web.MockHttpServletResponse;
import org.springframework.ui.Model;
import org.springframework.web.servlet.View;
import org.springframework.web.servlet.ViewResolver;


public class JspRenderer {

    @Autowired
    private ServletContext servletContext;


    private ViewResolver viewResolver;

    public void setViewResolver(ViewResolver viewResolver) {
        this.viewResolver = viewResolver;
    }


    public String render(String viewName, Model model)
        throws IOException
    {
        return render(viewName, model.asMap());
    }

    public String render(String viewName, Map<String,Object> modelMap)
        throws IOException
    {

        RendererRequest request = new RendererRequest(servletContext);
        RendererResponse response = new RendererResponse();

        try {
            /* 透過 ViewResolver 取得 View 進行 render 的動作 */
            View view = viewResolver.resolveViewName(
                viewName, Locale.getDefault()
            );
            view.render(modelMap, request, response);

            return response.getContentAsString();
        }
        catch(Exception e) {
            throw new IOException(e);
        }
    }
}


class RendererRequest extends MockHttpServletRequest {

    private ServletContext servletContext;

    public RendererRequest(ServletContext servletContext) {
        this.servletContext = servletContext;
    }

    @Override
    public RequestDispatcher getRequestDispatcher(String path) {
        /* 需要透過真實的 RequestDispatcher 進行 Render */
        return servletContext.getRequestDispatcher(path);
    }
}


class RendererResponse extends MockHttpServletResponse {

    private StringWriter writer = new StringWriter();

    @Override
    public PrintWriter getWriter() throws UnsupportedEncodingException {
        /* 用 StringWriter 作為輸出的容器 */
        return new PrintWriter(writer);
    }

    @Override
    public boolean isCommitted() {
        /* true 是為了讓 View 可以採用 include 方式 Render 到 Response */
        return true;
    }

    @Override
    public String getContentAsString() throws UnsupportedEncodingException {
        /* 取得 Render 後的內容 */
        return writer.getBuffer().toString();
    }
}
配置 spring.xml
<bean id="viewResolver" class="org.springframework.web.servlet.view.InternalResourceViewResolver">
    <property name="prefix" value="/WEB-INF/views/" />
    <property name="suffix" value=".jsp" />
</bean>

<bean id="jspRenderer" class="com.orion.webmvc.util.JspRenderer">
    <property name="viewResolver" ref="viewResolver"/>
</bean>
使用範例
//@Autowired
//private JspRenderer jspRenderer;

Map<String,Object> jspMap = new HashMap<String,Object>();
jspMap.put("jspMessage", "中文訊息測試");
jspMap.put("costMessage", 4567.89);

String jspOutput = jspRenderer.render("/mailer/test", jspMap);
System.out.println(jspOutput);
參考自:Render and capture the output of a JSP as a String | Technological Oddity
2015-03-04 11:33
[Java] FileFilter 筆記
File dir = new File("D:/log");

File[] list = dir.listFiles(new FileFilter(){
    public boolean accept(File file) {
        return file.getName().endsWith(".txt");
    }
});

for(File file : list){
    System.out.println(file.getAbsoluteFile());
}

// 004.txt
2015-03-04 11:27
[Java] 取得本地端 IP 與 MAC
import java.net.InetAddress;
import java.net.NetworkInterface;

public class TestInetAddress {

    public static void main(String[] args) throws Exception {
        InetAddress ip = InetAddress.getLocalHost();

        System.out.println("Current IP address : " + ip.getHostAddress());
        // Current IP address : 192.168.0.109

        System.out.println(ip.getCanonicalHostName());
        // 192.168.0.109

        System.out.println(ip.getHostName());
        // jaxhu-PC


        NetworkInterface network = NetworkInterface.getByInetAddress(ip);

        byte[] mac = network.getHardwareAddress();

        StringBuilder sb = new StringBuilder();
        for (int i = 0; i < mac.length; i++) {
            sb.append(String.format("%s%02X", (i > 0 ? "-" : ""), mac[i]));
        }

        System.out.println("Current MAC address : " + sb.toString());
        // Current MAC address : 38-2C-4A-B4-C3-24

        System.out.println(network.getDisplayName());
        // Realtek PCIe GBE Family Controller

        System.out.println(network.getName());
        // eth3
    }
}
參考自:How to get MAC address in Java : Mkyong
2015-03-04 11:23
[Java] Object Serializable 筆記
import java.io.FileInputStream;
import java.io.FileOutputStream;
import java.io.ObjectInputStream;
import java.io.ObjectOutputStream;
import java.io.Serializable;

class Address implements Serializable {

    private static final long serialVersionUID = 1L;

    String street;
    String country;

    public Address() {}

    public Address(String s, String c) {
        street = s; country = c;
    }

    public void setStreet(String street){ this.street = street; }
    public String getStreet(){ return this.street; }

    public void setCountry(String country){ this.country = country; }
    public String getCountry(){ return this.country; }

    @Override
    public String toString() {
        return String.format("Street : %s Country : %s", street, country);
    }
}


public class TestSerializable {

    public static void main(String[] args) throws Exception {
        Address addr = new Address("wall street", "united state");

        FileOutputStream fout = new FileOutputStream("address.ser");
        ObjectOutputStream oos = new ObjectOutputStream(fout);
        oos.writeObject(addr);
        oos.close();

        FileInputStream fin = new FileInputStream("address.ser");
        ObjectInputStream ois = new ObjectInputStream(fin);
        Address addr2 = (Address) ois.readObject();
        ois.close();

        System.out.println(addr2);
        // Street : wall street Country : united state
    }
}
參考自:
How to read an Object from file in Java : Mkyong
How to write an Object to file in Java : Mkyong
Understand the serialVersionUID : Mkyong
2015-03-04 11:20
[Java] 執行 shell command
Process p = Runtime.getRuntime().exec("ping -n 3 google.com");
p.waitFor();

Scanner sc = new Scanner(p.getInputStream(), "MS950");
String output = sc.useDelimiter("\\Z").next();
sc.close();

System.out.println("exitValue: " + p.exitValue());
System.out.println(output);
Output:
exitValue: 0

Ping google.com [173.194.72.138] (使用 32 位元組的資料):
回覆自 173.194.72.138: 位元組=32 時間=21ms TTL=48
回覆自 173.194.72.138: 位元組=32 時間=20ms TTL=48
回覆自 173.194.72.138: 位元組=32 時間=18ms TTL=48

173.194.72.138 的 Ping 統計資料:
    封包: 已傳送 = 3,已收到 = 3, 已遺失 = 0 (0% 遺失),
大約的來回時間 (毫秒):
    最小值 = 18ms,最大值 = 21ms,平均 = 19ms
2015-03-03 16:40
[Java] 自定字符集 Charset
網路上找到有關自定 Charset 的資料很少,大部分的人都是不建議自行定義一個 Charset,的確沒有什麼特別的理由,實在不需要去做這樣的事,但實際遇到的是工作上用的 DB 實在太舊,還在用 Big5 編碼,以及一堆的自造字,偏偏大部分都還是人名,讓別人的名子變成奇怪的字,實在很不禮貌,基於這個理由我延伸了 Big5 Charset。
要製作一個 Charset 一定要瞭解 Java 的字串核心,如果之前是寫 C 語言的朋友,首先要認知 char 跟 btye 是不一樣的,在 Java 的 char 是固定 Unicode 編碼,所有輸入都會轉成 Unicode,輸出時在轉成指定編碼,如下圖:

那麼要實做哪些東西呢??
最後再將
參考自:Java字符编码解码的实现详解_java_脚本之家
要製作一個 Charset 一定要瞭解 Java 的字串核心,如果之前是寫 C 語言的朋友,首先要認知 char 跟 btye 是不一樣的,在 Java 的 char 是固定 Unicode 編碼,所有輸入都會轉成 Unicode,輸出時在轉成指定編碼,如下圖:

那麼要實做哪些東西呢??
- class Charset
- 定義 Charset 的名稱跟提供 Encoder 跟 Decoder,跟據 IANA 的規範自定的 Charset 名稱必須以
X-或x-開頭。 - class CharsetDecoder
- 字符解碼器負責將
byte[]轉換成char[]。 - class CharsetEncoder
- 字符編碼器負責將
char[]轉換成byte[]。 - class CharsetProvider
- Charset 提供者,以名稱提供 Charset,在
Charset.forName("xxx")調用時會尋訪所有的 Provider 來取得 Charset。 - META-INF/services/java.nio.charset.spi.CharsetProvider
- 告知 JVM 將
CharsetProvider註冊到延伸清單中,JVM 在啟動的時候會掃描所有這個路徑的檔案。
最後再將
{Charset}.jar 檔複製到 {jre}/lib/ext 目錄下就部署完畢Big5_Extend
public class Big5_Extend extends Charset {

    private static final String BASE_CHARSET = "Big5";
    private static final String NAME = "X-Big5-Extend";
    private static final String[] ALIASES = { "X-Big5_Extend" };
    private Charset baseCharset;

    public Big5_Extend() {
        this(NAME, ALIASES);
    }

    public Big5_Extend(String canonical, String[] aliases) {
        super(canonical, aliases);
        baseCharset = Charset.forName(BASE_CHARSET);
    }

    public boolean contains(Charset cs) {
        return this.getClass().isInstance(cs) ||
                baseCharset.getClass().isInstance(cs);
    }

    public CharsetDecoder newDecoder() {
        return new Decoder(this, baseCharset.newDecoder());
    }

    public CharsetEncoder newEncoder() {
        return new Encoder(this, baseCharset.newEncoder());
    }

    // ...
}
繼承自 Charset,我們只要實作名稱定義跟 Encoder / Decoder 兩件事,當然如果有 char mapping array 也是在這裡初始化,讓所有 Encoder 跟 Decoder 可以共用同一個記憶體空間。 解碼處理
protected CoderResult decodeLoop(ByteBuffer in, CharBuffer out) {
    base.reset(); /* 重置狀態 */

    /* 先用原生的 Big5 進行解碼 */
    CoderResult result = base.decode(in, out, true);
    if(!result.isUnmappable() || in.remaining() < 2){ return result; }


    /* 無法轉換,進一步使用自訂的解碼 */
    int pos = in.position();
    char big5Char = (char)(in.get(pos) << 8 | in.get(pos + 1));
    char outChar;

    switch (big5Char) {
        case '\uFA40': outChar = '\u5803'; break; /* 堃 */
        case '\uFA41': outChar = '\u83D3'; break; /* 菓 */
        case '\uFA42': outChar = '\u854B'; break; /* 蕋 */
        case '\uFA43': outChar = '\u4F8A'; break; /* 侊 */
        default: return result; /* 不在清單內直接回傳 */
    }
    out.put(outChar);

    in.position(pos + 2);
    return decodeLoop(in, out); /* 遞迴處理*/
}
解碼的部分就是先呼叫 big5 原本的 decode,當發生無法解碼的四種狀況就會停止解碼,回傳解碼狀態,我們只要針對 isUnmappable 的狀態接著處裡,base.reset() 是為了清除 Decoder 內部的狀態紀錄,不然會被前一次的解碼結果所影響。編碼處理
protected CoderResult encodeLoop(CharBuffer in, ByteBuffer out) {
    base.reset(); /* 重置狀態 */

    /* 先用原生的 Big5 進行編碼 */
    CoderResult result = base.encode(in, out, true);
    if(!result.isUnmappable() || out.remaining() < 2){ return result; }


    /* 無法轉換,進一步使用自訂的編碼 */
    int pos = in.position();
    char uniChar = in.get(pos);
    char outChar;

    switch (uniChar) {
        case '\u5803': outChar = '\uFA40'; break; /* 堃 */
        case '\u83D3': outChar = '\uFA41'; break; /* 菓 */
        case '\u854B': outChar = '\uFA42'; break; /* 蕋 */
        case '\u4F8A': outChar ='\uFA43'; break; /* 侊 */
        default: return result; /* 不在清單內直接回傳 */
    }
    out.put((byte)(outChar >> 8));
    out.put((byte)outChar);

    in.position(pos + 1);
    return encodeLoop(in, out); /* 遞迴處理*/
}
編碼的部分跟解碼採用相同的方式,一樣是先呼叫 big5 原本的 encode。CoderResult 四種狀態
- UNDERFLOW 欠位
- OVERFLOW 溢位
- MALFORMED 有缺陷的輸入
- UNMAPPABLE 無映射字符
完整的 Big5_Extend
package com.custom.nio.charset;

import java.nio.CharBuffer;
import java.nio.ByteBuffer;
import java.nio.charset.Charset;
import java.nio.charset.CharsetEncoder;
import java.nio.charset.CharsetDecoder;
import java.nio.charset.CoderResult;


public class Big5_Extend extends Charset {

    private static final String BASE_CHARSET = "Big5";
    private static final String NAME = "X-Big5-Extend";
    private static final String[] ALIASES = { "X-Big5_Extend" };
    private Charset baseCharset;

    public Big5_Extend() {
        this(NAME, ALIASES);
    }

    public Big5_Extend(String canonical, String[] aliases) {
        super(canonical, aliases);
        baseCharset = Charset.forName(BASE_CHARSET);
    }

    public boolean contains(Charset cs) {
        return this.getClass().isInstance(cs) ||
                baseCharset.getClass().isInstance(cs);
    }

    public CharsetDecoder newDecoder() {
        return new Decoder(this, baseCharset.newDecoder());
    }

    public CharsetEncoder newEncoder() {
        return new Encoder(this, baseCharset.newEncoder());
    }


    private class Decoder extends CharsetDecoder {
        /* Java 原生的 Big5 解碼器 */
        private final CharsetDecoder base;

        Decoder(Charset cs, CharsetDecoder base) {
            super(cs, base.averageCharsPerByte(), base.maxCharsPerByte());
            this.base = base;
        }

        @Override
        protected CoderResult decodeLoop(ByteBuffer in, CharBuffer out) {
            base.reset(); /* 重置狀態 */

            /* 先用原生的 Big5 進行解碼 */
            CoderResult result = base.decode(in, out, true);
            if(!result.isUnmappable() || in.remaining() < 2){ return result; }


            /* 無法轉換,進一步使用自訂的解碼 */
            int pos = in.position();
            char big5Char = (char)(in.get(pos) << 8 | in.get(pos + 1));
            char outChar;

            switch (big5Char) {
                case '\uFA40': outChar = '\u5803'; break; /* 堃 */
                case '\uFA41': outChar = '\u83D3'; break; /* 菓 */
                case '\uFA42': outChar = '\u854B'; break; /* 蕋 */
                case '\uFA43': outChar = '\u4F8A'; break; /* 侊 */
                default: return result; /* 不在清單內直接回傳 */
            }

            out.put(outChar);

            in.position(pos + 2);
            return decodeLoop(in, out);
        }
    }


    private class Encoder extends CharsetEncoder {
        /* Java 原生的 Big5 編碼器 */
        private final CharsetEncoder base;

        Encoder(Charset cs, CharsetEncoder base) {
            super(cs, base.averageBytesPerChar(), base.maxBytesPerChar());
            this.base = base;
        }

        @Override
        protected CoderResult encodeLoop(CharBuffer in, ByteBuffer out) {
            base.reset(); /* 重置狀態 */

            /* 先用原生的 Big5 進行編碼 */
            CoderResult result = base.encode(in, out, true);
            if(!result.isUnmappable() || out.remaining() < 2){ return result; }


            /* 無法轉換,進一步使用自訂的編碼 */
            int pos = in.position();
            char uniChar = in.get(pos);
            char outChar;

            switch (uniChar) {
                case '\u5803': outChar = '\uFA40'; break; /* 堃 */
                case '\u83D3': outChar = '\uFA41'; break; /* 菓 */
                case '\u854B': outChar = '\uFA42'; break; /* 蕋 */
                case '\u4F8A': outChar ='\uFA43'; break; /* 侊 */
                default: return result; /* 不在清單內直接回傳 */
            }

            out.put((byte)(outChar >> 8));
            out.put((byte)outChar);

            in.position(pos + 1);
            return encodeLoop(in, out);
        }
    }
}
CharsetProvider
package com.custom.nio.charset;

import java.nio.charset.Charset;
import java.util.Collection;
import java.util.HashMap;
import java.util.HashSet;
import java.util.Iterator;
import java.util.Map;

/** 字元編碼器連結器,用來向 JVM 提交自訂的編碼器
 */
public class CharsetProvider extends java.nio.charset.spi.CharsetProvider {

    static Map<String, Charset> name2charset;
    static Collection<Charset> charsets;

    public Charset charsetForName(String charsetName) {
        if (charsets == null){ init(); }
        return name2charset.get(charsetName.toLowerCase());
    }

    public Iterator<Charset> charsets() {
        if (charsets == null){ init(); }
        return charsets.iterator();
    }

    void init() {
        name2charset = new HashMap<String, Charset>();

        charsets = new HashSet<Charset>();
        charsets.add(new Big5_Extend());

        for (Charset charset : charsets) {
            name2charset.put(charset.name().toLowerCase(), charset);
            for (String aliase: charset.aliases()) {
                name2charset.put(aliase.toLowerCase(), charset);
            }
        }
    }
}
java.nio.charset.spi.CharsetProvider
com.custom.nio.charset.CharsetProvider內容就一行類別定義
測試
public class Test {

    public static void main(String[] args) throws Throwable {
        String charset = "X-Big5-Extend";
        String source = "堃菓蕋侊";

        byte[] bytes = source.getBytes(charset);
        for (byte b : bytes) {
            System.out.printf("%x ", b);
        }
        System.out.println("\n");
        // fa 40 fa 41 fa 42 fa 43

        String result = new String(bytes, charset);
        System.out.println(result);
        // 堃菓蕋侊
    }
}
參考自:Java字符编码解码的实现详解_java_脚本之家
2015-03-03 13:34
[轉載] Spring Collections (List, Set, Map, and Properties)
轉載自:Spring Collections (List, Set, Map, and Properties) example
Spring examples to show you how to inject values into collections type (List, Set, Map, and Properties). 4 major collection types are supported :
Run it…
Output
Spring examples to show you how to inject values into collections type (List, Set, Map, and Properties). 4 major collection types are supported :
- List – <list/>
- Set – <set/>
- Map – <map/>
- Properties – <props/>
Spring beans
A Customer object, with four collection properties.package com.mkyong.common;
import java.util.List;
import java.util.Map;
import java.util.Properties;
import java.util.Set;
public class Customer
{
private List<Object> lists;
private Set<Object> sets;
private Map<Object, Object> maps;
private Properties pros;
//...
}
See different code snippets to declare collection in bean configuration file.1. List example
<property name="lists">
    <list>
        <value>1</value>
        <ref bean="PersonBean" />
        <bean class="com.mkyong.common.Person">
            <property name="name" value="mkyongList" />
            <property name="address" value="address" />
            <property name="age" value="28" />
        </bean>
    </list>
</property>
2. Set example
<property name="sets">
    <set>
        <value>1</value>
        <ref bean="PersonBean" />
        <bean class="com.mkyong.common.Person">
            <property name="name" value="mkyongSet" />
            <property name="address" value="address" />
            <property name="age" value="28" />
        </bean>
    </set>
</property>
3. Map example
<property name="maps">
    <map>
        <entry key="Key 1" value="1" />
        <entry key="Key 2" value-ref="PersonBean" />
        <entry key="Key 3">
            <bean class="com.mkyong.common.Person">
                <property name="name" value="mkyongMap" />
                <property name="address" value="address" />
                <property name="age" value="28" />
            </bean>
        </entry>
    </map>
</property>
4. Properties example
<property name="pros">
    <props>
        <prop key="admin">admin@nospam.com</prop>
        <prop key="support">support@nospam.com</prop>
    </props>
</property>
Full Spring’s bean configuration file.
<beans xmlns="http://www.springframework.org/schema/beans"
    xmlns:xsi="http://www.w3.org/2001/XMLSchema-instance"
    xsi:schemaLocation="http://www.springframework.org/schema/beans
    http://www.springframework.org/schema/beans/spring-beans-2.5.xsd">

    <bean id="CustomerBean" class="com.mkyong.common.Customer">

        <!-- java.util.List -->
        <property name="lists">
            <list>
                <value>1</value>
                <ref bean="PersonBean" />
                <bean class="com.mkyong.common.Person">
                    <property name="name" value="mkyongList" />
                    <property name="address" value="address" />
                    <property name="age" value="28" />
                </bean>
            </list>
        </property>

        <!-- java.util.Set -->
        <property name="sets">
            <set>
                <value>1</value>
                <ref bean="PersonBean" />
                <bean class="com.mkyong.common.Person">
                    <property name="name" value="mkyongSet" />
                    <property name="address" value="address" />
                    <property name="age" value="28" />
                </bean>
            </set>
        </property>

        <!-- java.util.Map -->
        <property name="maps">
            <map>
                <entry key="Key 1" value="1" />
                <entry key="Key 2" value-ref="PersonBean" />
                <entry key="Key 3">
                    <bean class="com.mkyong.common.Person">
                        <property name="name" value="mkyongMap" />
                        <property name="address" value="address" />
                        <property name="age" value="28" />
                    </bean>
                </entry>
            </map>
        </property>

        <!-- java.util.Properties -->
        <property name="pros">
            <props>
                <prop key="admin">admin@nospam.com</prop>
                <prop key="support">support@nospam.com</prop>
            </props>
        </property>

    </bean>

    <bean id="PersonBean" class="com.mkyong.common.Person">
        <property name="name" value="mkyong1" />
        <property name="address" value="address 1" />
        <property name="age" value="28" />
    </bean>
</beans>
Run it…
package com.mkyong.common;

import org.springframework.context.ApplicationContext;
import org.springframework.context.support.ClassPathXmlApplicationContext;

public class App {

    public static void main( String[] args ) {

        ApplicationContext context
            = new ClassPathXmlApplicationContext("SpringBeans.xml");

        Customer cust = (Customer)context.getBean("CustomerBean");
        System.out.println(cust);
    }
}
Output
Customer [
    lists=[
        1,
        Person [address=address 1, age=28, name=mkyong1],
        Person [address=address, age=28, name=mkyongList]
    ],

    maps={
        key 1=1,
        key 2=Person [address=address 1, age=28, name=mkyong1],
        key 3=Person [address=address, age=28, name=mkyongMap]
    },

    pros={
        admin=admin@nospam.com,
        support=support@nospam.com
    },

    sets=[
        1,
        Person [address=address 1, age=28, name=mkyong1],
        Person [address=address, age=28, name=mkyongSet]
    ]
]
2015-03-01 20:14
[Java] Jackson Json Parser 筆記
Object Encode / Decode
Parser to Map
Encode Date
參考自:FasterXML/jackson-databind · GitHub
import java.util.Arrays;
import java.util.Date;

import com.fasterxml.jackson.databind.ObjectMapper;

class Album {
    private int id;
    private String title;
    private Date date;
    private String[] list;

    public int getId() { return id; }
    public void setId(int id) { this.id = id; }

    public String getTitle() { return title; }
    public void setTitle(String title) { this.title = title; }

    public Date getDate() { return date; }
    public void setDate(Date date) { this.date = date; }

    public String[] getList() { return list; }
    public void setList(String[] list) { this.list = list; }

    @Override
    public String toString() {
        return String.format("id: %s, title: %s, date: %s, list: %s",
            id, title, date, Arrays.toString(list)
        );
    }
}

public class TestJackson {

    public static void main(String[] args) throws Exception {
        Album album = new Album();
        album.setId(1);
        album.setTitle("Go Go Go!");;
        album.setDate(new Date());
        album.setList(new String[]{"Love", "Despair"});

        ObjectMapper jsonMapper = new ObjectMapper();

        String json = jsonMapper.writeValueAsString(album);
        System.out.println(json);
        // {"id":1,"title":"Go Go Go!","date":1425211903948,"list":["Love","Despair"]}

        Album album2 = jsonMapper.readValue(json, Album.class);
        System.out.println(album2);
        // id: 1, title: Go Go Go!, date: Sun Mar 01 20:11:43 CST 2015, list: [Love, Despair]
    }
}
Parser to Map
ObjectMapper jsonMapper = new ObjectMapper();
Map<String,String> map;

map = jsonMapper.readValue(
    "{\"name\":\"jax\", \"age\":\"31\"}",
    new TypeReference<HashMap<String,String>>(){}
);
System.out.println(map);
// {age=31, name=jax}


jsonMapper.configure(JsonParser.Feature.ALLOW_UNQUOTED_FIELD_NAMES, true);
jsonMapper.configure(JsonParser.Feature.ALLOW_SINGLE_QUOTES, true);

map = jsonMapper.readValue(
    "{name:'jax', age:'31'}",
    new TypeReference<HashMap<String,String>>(){}
);
System.out.println(map);
// {age=31, name=jax}
Encode Date
Date date = new Date();

String json;
ObjectMapper jsonMapper = new ObjectMapper();

json = jsonMapper.writeValueAsString(date);
System.out.println(json);
// 1425211840183


jsonMapper.disable(SerializationFeature.WRITE_DATES_AS_TIMESTAMPS);

json = jsonMapper.writeValueAsString(date);
System.out.println(json);
// "2015-03-01T12:10:40.183+0000"
參考自:FasterXML/jackson-databind · GitHub
2015-03-01 18:10
[轉載] Make 命令教程
轉載自:Make 命令教程 - 阮一峰的网络日志
代碼變成可執行文件,叫做編譯(compile);先編譯這個,還是先編譯那個(即編譯的安排),叫做構建(build)。
Make 是最常用的構建工具,誕生於 1977 年,主要用於 C 語言的項目。但是實際上 ,任何只要某個文件有變化,就要重新構建的項目,都可以用 Make 構建。
本文介紹 Make 命令的用法,從簡單的講起,不需要任何基礎,只要會使用命令行,就能看懂。我的參考資料主要是Isaac Schlueter的《Makefile文件教程》和《GNU Make手冊》。
Make 這個詞,英語的意思是"制作"。Make 命令直接用了這個意思,就是要做出某個文件。比如,要做出文件 a.txt,就可以執行下面的命令。
但是,如果你真的輸入這條命令,它並不會起作用。因為 Make 命令本身並不知道,如何做出 a.txt,需要有人告訴它,如何調用其他命令完成這個目標。
比如,假設文件 a.txt 依賴於 b.txt 和 c.txt ,是後面兩個文件連接(
也就是說,make a.txt 這條命令的背後,實際上分成兩步:第一步,確認 b.txt 和 c.txt 必須已經存在,第二步使用
像這樣的規則,都寫在一個叫做 Makefile 的文件中,Make 命令依賴這個文件進行構建。Makefile 文件也可以寫為 makefile, 或者用命令行參數指定為其他文件名。
上面代碼指定 make 命令依據 rules.txt 文件中的規則,進行構建。
總之,make 只是一個根據指定的 Shell 命令進行構建的工具。它的規則很簡單,你規定要構建哪個文件、它依賴哪些源文件,當那些文件有變動時,如何重新構建它。
構建規則都寫在 Makefile 文件裡面,要學會如何 Make 命令,就必須學會如何編寫 Makefile 文件。
Makefile 文件由一系列規則(rules)構成。每條規則的形式如下。
上面第一行冒號前面的部分,叫做"目標"(target),冒號後面的部分叫做"前置條件"(prerequisites);第二行必須由一個tab鍵起首,後面跟著"命令"(commands)。
"目標"是必需的,不可省略;"前置條件"和"命令"都是可選的,但是兩者之中必須至少存在一個。
每條規則就明確兩件事:構建目標的前置條件是什麼,以及如何構建。下面就詳細講解,每條規則的這三個組成部分。
一個目標(target)就構成一條規則。目標通常是文件名,指明Make命令所要構建的對像,比如上文的 a.txt 。目標可以是一個文件名,也可以是多個文件名,之間用空格分隔。
除了文件名,目標還可以是某個操作的名字,這稱為"偽目標"(phony target)。
上面代碼的目標是 clean,它不是文件名,而是一個操作的名字,屬於"偽目標 ",作用是刪除對像文件。
但是,如果當前目錄中,正好有一個文件叫做 clean,那麼這個命令不會執行。因為 Make 發現 clean 文件已經存在,就認為沒有必要重新構建了,就不會執行指定的
為了避免這種情況,可以明確聲明 clean 是"偽目標",寫法如下。
聲明 clean 是"偽目標"之後,make 就不會去檢查是否存在一個叫做 clean 的文件,而是每次運行都執行對應的命令。像 .PHONY 這樣的內置目標名還有不少,可以查看手冊。
如果 Make 命令運行時沒有指定目標,默認會執行 Makefile 文件的第一個目標。
上面代碼執行 Makefile 文件的第一個目標。
前置條件通常是一組文件名,之間用空格分隔。它指定了"目標"是否重新構建的判斷標准:只要有一個前置文件不存在,或者有過更新(前置文件的 last-modification 時間戳比目標的時間戳新),"目標"就需要重新構建。
上面代碼中,構建 result.txt 的前置條件是 source.txt 。如果當前目錄中,source.txt 已經存在,那麼
上面代碼中,source.txt 後面沒有前置條件,就意味著它跟其他文件都無關,只要這個文件還不存在,每次調用
上面命令連續執行兩次
如果需要生成多個文件,往往采用下面的寫法。
上面代碼中,source 是一個偽目標,只有三個前置文件,沒有任何對應的命令。
執行
命令(commands)表示如何更新目標文件,由一行或多行的 Shell 命令組成。它是構建"目標"的具體指令,它的運行結果通常就是生成目標文件。
每行命令之前必須有一個 tab 鍵。如果想用其他鍵,可以用內置變量 .RECIPEPREFIX 聲明。
上面代碼用 .RECIPEPREFIX 指定,大於號(>)替代 tab 鍵。所以,每一行命令的起首變成了大於號,而不是 tab 鍵。
需要注意的是,每行命令在一個單獨的 shell 中執行。這些 Shell 之間沒有繼承關系。
上面代碼執行後(
另一個解決辦法是在換行符前加反斜杠轉義。
最後一個方法是加上
井號(#)在 Makefile 中表示注釋。
正常情況下,make 會打印每條命令,然後再執行,這就叫做回聲(echoing)。
執行上面的規則,會得到下面的結果。
在命令的前面加上
現在再執行
由於在構建過程中,需要了解當前在執行哪條命令,所以通常只在注釋和純顯示的
通配符(wildcard)用來指定一組符合條件的文件名。Makefile 的通配符與 Bash 一致,主要有星號(*)、問號(?)和 [...] 。比如,
Make 命令允許對文件名,進行類似正則運算的匹配,主要用到的匹配符是
等同於下面的寫法。
使用匹配符
Makefile 允許使用等號自定義變量。
上面代碼中,變量 txt 等於 Hello World。調用時,變量需要放在 $( ) 之中。
調用Shell變量,需要在美元符號前,再加一個美元符號,這是因為Make命令會對美元符號轉義。
有時,變量的值可能指向另一個變量。
上面代碼中,變量 v1 的值是另一個變量 v2。這時會產生一個問題,v1 的值到底在定義時擴展(靜態擴展),還是在運行時擴展(動態擴展)?如果 v2 的值是動態的,這兩種擴展方式的結果可能會差異很大。
為了解決類似問題,Makefile 一共提供了四個賦值運算符 (=、:=、?=、+=),它們的區別請看 StackOverflow。
Make命令提供一系列內置變量,比如,
Make 命令還提供一些自動變量,它們的值與當前規則有關。主要有以下幾個。
(1)$@
$@指代當前目標,就是Make命令當前構建的那個目標。比如,
等同於下面的寫法。
(2)$<
$< 指代第一個前置條件。比如,規則為 t: p1 p2,那麼$< 就指代p1。
等同於下面的寫法。
(3)$?
$? 指代比目標更新的所有前置條件,之間以空格分隔。比如,規則為 t: p1 p2,其中 p2 的時間戳比 t 新,$?就指代p2。
(4)$^
$^ 指代所有前置條件,之間以空格分隔。比如,規則為 t: p1 p2,那麼 $^ 就指代 p1 p2 。
(5)$*
$* 指代匹配符 % 匹配的部分, 比如% 匹配 f1.txt 中的f1 ,$* 就表示 f1。
(6)$(@D) 和 $(@F)
$(@D) 和 $(@F) 分別指向 $@ 的目錄名和文件名。比如,$@是 src/input.c,那麼$(@D) 的值為 src ,$(@F) 的值為 input.c。
(7)$(<D) 和 $(<F)
$(<D) 和 $(<F) 分別指向 $< 的目錄名和文件名。
所有的自動變量清單,請看手冊。下面是自動變量的一個例子。
上面代碼將 src 目錄下的 txt 文件,拷貝到 dest 目錄下。首先判斷 dest 目錄是否存在,如果不存在就新建,然後,$< 指代前置文件(src/%.txt), $@ 指代目標文件(dest/%.txt)。
Makefile使用 Bash 語法,完成判斷和循環。
上面代碼判斷當前編譯器是否 gcc ,然後指定不同的庫文件。
上面代碼的運行結果。
Makefile 還可以使用函數,格式如下。
Makefile提供了許多內置函數,可供調用。下面是幾個常用的內置函數。
(1)shell 函數
shell 函數用來執行 shell 命令
(2)wildcard 函數
wildcard 函數用來在 Makefile 中,替換 Bash 的通配符。
(3)subst 函數
subst 函數用來文本替換,格式如下。
下面的例子將字符串 "feet on the street" 替換成 "fEEt on the strEEt"。
下面是一個稍微復雜的例子。
(4)patsubst 函數
patsubst 函數用於模式匹配的替換,格式如下。
下面的例子將文件名 "x.c.c bar.c",替換成 "x.c.o bar.o"。
(5)替換後綴名
替換後綴名函數的寫法是:變量名 + 冒號 + 後綴名替換規則。它實際上 patsubst 函數的一種簡寫形式。
上面代碼的意思是,將變量 OUTPUT 中的後綴名 .js 全部替換成 .min.js 。
(1)執行多個目標
上面代碼可以調用不同目標,刪除不同後綴名的文件,也可以調用一個目標(cleanall),刪除所有指定類型的文件。
(2)編譯C語言項目
代碼變成可執行文件,叫做編譯(compile);先編譯這個,還是先編譯那個(即編譯的安排),叫做構建(build)。
Make 是最常用的構建工具,誕生於 1977 年,主要用於 C 語言的項目。但是實際上 ,任何只要某個文件有變化,就要重新構建的項目,都可以用 Make 構建。
本文介紹 Make 命令的用法,從簡單的講起,不需要任何基礎,只要會使用命令行,就能看懂。我的參考資料主要是Isaac Schlueter的《Makefile文件教程》和《GNU Make手冊》。
一、Make 的概念
Make 這個詞,英語的意思是"制作"。Make 命令直接用了這個意思,就是要做出某個文件。比如,要做出文件 a.txt,就可以執行下面的命令。
$ make a.txt
但是,如果你真的輸入這條命令,它並不會起作用。因為 Make 命令本身並不知道,如何做出 a.txt,需要有人告訴它,如何調用其他命令完成這個目標。
比如,假設文件 a.txt 依賴於 b.txt 和 c.txt ,是後面兩個文件連接(
cat 命令)的產物。那麼,make 需要知道下面的規則。a.txt: b.txt c.txt
cat b.txt c.txt > a.txt
也就是說,make a.txt 這條命令的背後,實際上分成兩步:第一步,確認 b.txt 和 c.txt 必須已經存在,第二步使用
cat 命令 將這個兩個文件合並,輸出為新文件。像這樣的規則,都寫在一個叫做 Makefile 的文件中,Make 命令依賴這個文件進行構建。Makefile 文件也可以寫為 makefile, 或者用命令行參數指定為其他文件名。
$ make -f rules.txt
# 或者
$ make --file=rules.txt
上面代碼指定 make 命令依據 rules.txt 文件中的規則,進行構建。
總之,make 只是一個根據指定的 Shell 命令進行構建的工具。它的規則很簡單,你規定要構建哪個文件、它依賴哪些源文件,當那些文件有變動時,如何重新構建它。
二、Makefile 文件的格式
構建規則都寫在 Makefile 文件裡面,要學會如何 Make 命令,就必須學會如何編寫 Makefile 文件。
2.1 概述
Makefile 文件由一系列規則(rules)構成。每條規則的形式如下。
<target> : <prerequisites>
[tab]  <commands>
上面第一行冒號前面的部分,叫做"目標"(target),冒號後面的部分叫做"前置條件"(prerequisites);第二行必須由一個tab鍵起首,後面跟著"命令"(commands)。
"目標"是必需的,不可省略;"前置條件"和"命令"都是可選的,但是兩者之中必須至少存在一個。
每條規則就明確兩件事:構建目標的前置條件是什麼,以及如何構建。下面就詳細講解,每條規則的這三個組成部分。
2.2 目標(target)
一個目標(target)就構成一條規則。目標通常是文件名,指明Make命令所要構建的對像,比如上文的 a.txt 。目標可以是一個文件名,也可以是多個文件名,之間用空格分隔。
除了文件名,目標還可以是某個操作的名字,這稱為"偽目標"(phony target)。
clean:
    rm *.o
上面代碼的目標是 clean,它不是文件名,而是一個操作的名字,屬於"偽目標 ",作用是刪除對像文件。
$ make clean
但是,如果當前目錄中,正好有一個文件叫做 clean,那麼這個命令不會執行。因為 Make 發現 clean 文件已經存在,就認為沒有必要重新構建了,就不會執行指定的
rm 命令。為了避免這種情況,可以明確聲明 clean 是"偽目標",寫法如下。
.PHONY: clean
clean:
    rm *.o temp
聲明 clean 是"偽目標"之後,make 就不會去檢查是否存在一個叫做 clean 的文件,而是每次運行都執行對應的命令。像 .PHONY 這樣的內置目標名還有不少,可以查看手冊。
如果 Make 命令運行時沒有指定目標,默認會執行 Makefile 文件的第一個目標。
$ make
上面代碼執行 Makefile 文件的第一個目標。
2.3 前置條件(prerequisites)
前置條件通常是一組文件名,之間用空格分隔。它指定了"目標"是否重新構建的判斷標准:只要有一個前置文件不存在,或者有過更新(前置文件的 last-modification 時間戳比目標的時間戳新),"目標"就需要重新構建。
result.txt: source.txt
    cp source.txt result.txt
上面代碼中,構建 result.txt 的前置條件是 source.txt 。如果當前目錄中,source.txt 已經存在,那麼
make result.txt 可以正常運行,否則必須再寫一條規則,來生成 source.txt 。source.txt:
echo "this is the source" > source.txt
上面代碼中,source.txt 後面沒有前置條件,就意味著它跟其他文件都無關,只要這個文件還不存在,每次調用
make source.txt,它都會生成。$ make result.txt $ make result.txt
上面命令連續執行兩次
make result.txt。第一次執行會先新建 source.txt,然後再新建 result.txt。第二次執行,Make 發現 source.txt 沒有變動(時間戳晚於 result.txt),就不會執行任何操作,result.txt 也不會重新生成。如果需要生成多個文件,往往采用下面的寫法。
source: file1 file2 file3
上面代碼中,source 是一個偽目標,只有三個前置文件,沒有任何對應的命令。
$ make source
執行
make source 命令後,就會一次性生成 file1,file2,file3 三個文件。這比下面的寫法要方便很多。$ make file1 $ make file2 $ make file3
2.4 命令(commands)
命令(commands)表示如何更新目標文件,由一行或多行的 Shell 命令組成。它是構建"目標"的具體指令,它的運行結果通常就是生成目標文件。
每行命令之前必須有一個 tab 鍵。如果想用其他鍵,可以用內置變量 .RECIPEPREFIX 聲明。
.RECIPEPREFIX = >
all:
> echo Hello, world
上面代碼用 .RECIPEPREFIX 指定,大於號(>)替代 tab 鍵。所以,每一行命令的起首變成了大於號,而不是 tab 鍵。
需要注意的是,每行命令在一個單獨的 shell 中執行。這些 Shell 之間沒有繼承關系。
var-lost:
    export foo=bar
    echo "foo=[$$foo]"
上面代碼執行後(
make var-lost),取不到 foo 的值。因為兩行命令在兩個不同的進程執行。一個解決辦法是將兩行命令寫在一行,中間用分號分隔。var-kept:
export foo=bar; echo "foo=[$$foo]"
另一個解決辦法是在換行符前加反斜杠轉義。
var-kept:
export foo=bar; \
echo "foo=[$$foo]"
最後一個方法是加上
.ONESHELL: 命令。.ONESHELL:
var-kept:
    export foo=bar; echo "foo=[$$foo]"
三、Makefile文件的語法
3.1 注釋
井號(#)在 Makefile 中表示注釋。
# 这是注释
result.txt: source.txt
    # 这是注释
    cp source.txt result.txt # 这也是注释
3.2 回聲(echoing)
正常情況下,make 會打印每條命令,然後再執行,這就叫做回聲(echoing)。
test:
    # 这是测试
執行上面的規則,會得到下面的結果。
$ make test
# 这是测试
在命令的前面加上
@,就可以關閉回聲。test:
@# 这是测试
現在再執行
make test,就不會有任何輸出。由於在構建過程中,需要了解當前在執行哪條命令,所以通常只在注釋和純顯示的
echo 命令前面加上 @。test:
@# 这是测试
@echo TODO
3.3 通配符
通配符(wildcard)用來指定一組符合條件的文件名。Makefile 的通配符與 Bash 一致,主要有星號(*)、問號(?)和 [...] 。比如,
*.o 表示所有後綴名為 o 的文件。clean:
rm -f *.o
3.4 模式匹配
Make 命令允許對文件名,進行類似正則運算的匹配,主要用到的匹配符是
%。比如,假定當前目錄下有 f1.c 和 f2.c 兩個源碼文件,需要將它們編譯為對應的對像文件。%.o: %.c
等同於下面的寫法。
f1.o: f1.c
f2.o: f2.c
使用匹配符
%,可以將大量同類型的文件,只用一條規則就完成構建。3.5 變量和賦值符
Makefile 允許使用等號自定義變量。
txt = Hello World
test:
    @echo $(txt)
上面代碼中,變量 txt 等於 Hello World。調用時,變量需要放在 $( ) 之中。
調用Shell變量,需要在美元符號前,再加一個美元符號,這是因為Make命令會對美元符號轉義。
test:
    @echo $$HOME
有時,變量的值可能指向另一個變量。
v1 = $(v2)
上面代碼中,變量 v1 的值是另一個變量 v2。這時會產生一個問題,v1 的值到底在定義時擴展(靜態擴展),還是在運行時擴展(動態擴展)?如果 v2 的值是動態的,這兩種擴展方式的結果可能會差異很大。
為了解決類似問題,Makefile 一共提供了四個賦值運算符 (=、:=、?=、+=),它們的區別請看 StackOverflow。
VARIABLE = value
# 在执行时扩展,允许递归扩展。

VARIABLE := value
# 在定义时扩展。

VARIABLE ?= value
# 只有在该变量为空时才设置值。

VARIABLE += value
# 将值追加到变量的尾端。
3.6 內置變量(Implicit Variables)
Make命令提供一系列內置變量,比如,
$(CC) 指向當前使用的編譯器,$(MAKE) 指向當前使用的Make工具。這主要是為了跨平台的兼容性,詳細的內置變量清單見手冊。output:
$(CC) -o output input.c
3.7 自動變量(Automatic Variables)
Make 命令還提供一些自動變量,它們的值與當前規則有關。主要有以下幾個。
(1)$@
$@指代當前目標,就是Make命令當前構建的那個目標。比如,
make foo的 $@ 就指代foo。 a.txt b.txt:
touch $@
等同於下面的寫法。
a.txt:
    touch a.txt
b.txt:
    touch b.txt
(2)$<
$< 指代第一個前置條件。比如,規則為 t: p1 p2,那麼$< 就指代p1。
a.txt: b.txt c.txt
    cp $< $@
等同於下面的寫法。
a.txt: b.txt c.txt
    cp b.txt a.txt
(3)$?
$? 指代比目標更新的所有前置條件,之間以空格分隔。比如,規則為 t: p1 p2,其中 p2 的時間戳比 t 新,$?就指代p2。
(4)$^
$^ 指代所有前置條件,之間以空格分隔。比如,規則為 t: p1 p2,那麼 $^ 就指代 p1 p2 。
(5)$*
$* 指代匹配符 % 匹配的部分, 比如% 匹配 f1.txt 中的f1 ,$* 就表示 f1。
(6)$(@D) 和 $(@F)
$(@D) 和 $(@F) 分別指向 $@ 的目錄名和文件名。比如,$@是 src/input.c,那麼$(@D) 的值為 src ,$(@F) 的值為 input.c。
(7)$(<D) 和 $(<F)
$(<D) 和 $(<F) 分別指向 $< 的目錄名和文件名。
所有的自動變量清單,請看手冊。下面是自動變量的一個例子。
dest/%.txt: src/%.txt
    @[ -d dest ] || mkdir dest
    cp $< $@
上面代碼將 src 目錄下的 txt 文件,拷貝到 dest 目錄下。首先判斷 dest 目錄是否存在,如果不存在就新建,然後,$< 指代前置文件(src/%.txt), $@ 指代目標文件(dest/%.txt)。
3.8 判斷和循環
Makefile使用 Bash 語法,完成判斷和循環。
ifeq ($(CC),gcc)
    libs=$(libs_for_gcc)
else
    libs=$(normal_libs)
endif
上面代碼判斷當前編譯器是否 gcc ,然後指定不同的庫文件。
LIST = one two three
all:
    for i in $(LIST); do \
        echo $$i; \
    done

# 等同于

all:
    for i in one two three; do \
        echo $i; \
    done
上面代碼的運行結果。
one
two
three
3.9 函數
Makefile 還可以使用函數,格式如下。
$(function arguments)
# 或者
${function arguments}
Makefile提供了許多內置函數,可供調用。下面是幾個常用的內置函數。
(1)shell 函數
shell 函數用來執行 shell 命令
srcfiles := $(shell echo src/{00..99}.txt)
(2)wildcard 函數
wildcard 函數用來在 Makefile 中,替換 Bash 的通配符。
srcfiles := $(wildcard src/*.txt)
(3)subst 函數
subst 函數用來文本替換,格式如下。
$(subst from,to,text)
下面的例子將字符串 "feet on the street" 替換成 "fEEt on the strEEt"。
$(subst ee,EE,feet on the street)
下面是一個稍微復雜的例子。
comma:= ,
empty:=
# space变量用两个空变量作为标识符,当中是一个空格
space:= $(empty) $(empty)
foo:= a b c
bar:= $(subst $(space),$(comma),$(foo))
# bar is now `a,b,c'.
(4)patsubst 函數
patsubst 函數用於模式匹配的替換,格式如下。
$(patsubst pattern,replacement,text)
下面的例子將文件名 "x.c.c bar.c",替換成 "x.c.o bar.o"。
$(patsubst %.c,%.o,x.c.c bar.c)
(5)替換後綴名
替換後綴名函數的寫法是:變量名 + 冒號 + 後綴名替換規則。它實際上 patsubst 函數的一種簡寫形式。
min: $(OUTPUT:.js=.min.js)
上面代碼的意思是,將變量 OUTPUT 中的後綴名 .js 全部替換成 .min.js 。
四、Makefile 的實例
(1)執行多個目標
.PHONY: cleanall cleanobj cleandiff

cleanall : cleanobj cleandiff
    rm program

cleanobj :
    rm *.o

cleandiff :
    rm *.diff
上面代碼可以調用不同目標,刪除不同後綴名的文件,也可以調用一個目標(cleanall),刪除所有指定類型的文件。
(2)編譯C語言項目
edit : main.o kbd.o command.o display.o
    cc -o edit main.o kbd.o command.o display.o

main.o : main.c defs.h
    cc -c main.c
kbd.o : kbd.c defs.h command.h
    cc -c kbd.c
command.o : command.c defs.h command.h
    cc -c command.c
display.o : display.c defs.h
    cc -c display.c

clean :
    rm edit main.o kbd.o command.o display.o

.PHONY: edit clean
2015-03-01 15:36
Spring Security 存取控制表示式
常用内建表示式
ps: 定義在 SecurityExpressionRoot| 表示式 | 說明 |
|---|---|
| hasRole('role') | 當前的 User 擁有指定的 Role 就回傳 true |
| hasAnyRole('role1', 'role2') | 當前的 User 擁有任一個 Role 就回傳 true |
| principal | 當前的 User 的 Principal 物件 |
| authentication | 當前的 User 的 Authentication 物件 |
| permitAll | 總是為 true |
| denyAll | 總是為 false |
| isAnonymous() | 當前的 User 是匿名登入就回傳 true |
| isRememberMe() | 當前的 User 是透過 remember-me 登入就回傳 true |
| isAuthenticated() | 當前的 User 不是匿名登入就回傳 true |
| isFullyAuthenticated() | 當前的 User 不是匿名登入或 remember-me 登入就回傳 true |
在方法執行前的驗證
驗證 User 角色
@PreAuthorize("hasRole('ROLE_USER')")
public void create(Contact contact);
驗證參數值是否等於 User 名稱
@PreAuthorize("#contact.name == authentication.name")
public void doSomething(Contact contact);
驗證 User 角色以及來源 IP 區間
@PreAuthorize("hasRole('admin') and hasIpAddress('192.168.1.0/24')")
public void doSomething(Contact contact);
在方法內的驗證
取得角色驗證
@RequestMapping("/index")
public void index(HttpServletRequest request) {
    System.out.println(request.isUserInRole("ROLE_USER"));

    if (request.isUserInRole("admin")) {
        System.out.println("is admin");
    }
}
在 JSP 的驗證
取得 User 名稱
<sec:authentication property="name"/>
<sec:authentication property="principal.username"/>
取得 User IP
<sec:authentication property="details.remoteAddress"/>
取得 User SessionId
<sec:authentication property="details.sessionId"/>
驗證角色為 admin 才顯示
<sec:authorize access="hasRole('admin')">
    <div>is admin</div>
</sec:authorize>
驗證角色為 admin 存入變數 isAdmin
<sec:authorize var="isAdmin" access="hasRole('admin')" />
<c:if test="isAdmin">
    <div>is admin</div>
</c:if>
參考自:15. Expression-Based Access Control
2015-02-27 22:27
在 Eclipse 為 Tomcat Library 增加原始碼附件
在專案目錄下選擇 [Java Resources]->[Libraries]->[Apache Tomcat]->[xxx.jar]->[右鍵內容]

在 Java 程式碼附件 就可以連接程式原始碼

在 Javadoc 位置 則可以連接 Javadoc

其實剛剛的設定都記錄在:
內容如下:
所以只要編寫 org.eclipse.jst.server.tomcat.runtimeTarget.xml 的內容,重新啟動 Eclipse 就會連結原始碼附件,當然這麼麻煩的事還是寫程式自動處理比較快樂,既然是用 Eclipse 寫 Java 當然是用 Ant 來處理是最好的。
首先幾個環境定義:
tomcat-xml-build.xml
執行前需要 ant-contrib,然後啟動配置必須是[在工作區的同一個 JRE 中執行],這是因為用到 Eclipse Ant 所以提供的環境變數,執行完後重新啟動 Eclipse 就可以看到連結的附件。


在 Java 程式碼附件 就可以連接程式原始碼

在 Javadoc 位置 則可以連接 Javadoc

其實剛剛的設定都記錄在:
{WorkSpace}/.metadata/.plugins/org.eclipse.jst.server.core/

org.eclipse.jst.server.tomcat.runtimeTarget.xml
內容如下:
<?xml version="1.0" encoding="UTF-8" standalone="no"?>
<classpath>
  <source-attachment entry="D:/apache-tomcat-7.0.53/lib/commons-io-2.4.jar" runtime-id="Apache Tomcat v7.0" source-attachment-path="D:/apache-tomcat-7.0.53/src/commons-io-2.4-sources.jar">
    <attribute name="javadoc_location" value="jar:file:/D:/apache-tomcat-7.0.53/src/commons-io-2.4-javadoc.jar!/"/>
  </source-attachment>
  <source-attachment entry="D:/apache-tomcat-7.0.53/lib/commons-logging-1.1.3.jar" runtime-id="Apache Tomcat v7.0" source-attachment-path="D:/apache-tomcat-7.0.53/src/commons-logging-1.1.3-sources.jar">
    <attribute name="javadoc_location" value="jar:file:/D:/apache-tomcat-7.0.53/src/commons-logging-1.1.3-javadoc.jar!/"/>
  </source-attachment>
</classpath>
所以只要編寫 org.eclipse.jst.server.tomcat.runtimeTarget.xml 的內容,重新啟動 Eclipse 就會連結原始碼附件,當然這麼麻煩的事還是寫程式自動處理比較快樂,既然是用 Eclipse 寫 Java 當然是用 Ant 來處理是最好的。
首先幾個環境定義:
- Server Src 路徑:D:/apache-tomcat-7.0.53/src
- Server Lib 路徑:D:/apache-tomcat-7.0.53/lib
- Runtime Id:Apache Tomcat v7.0
- Jar 名稱:xxxxx.jar
- Source 名稱:xxxxx-sources.jar
- Javadoc 名稱:xxxxx-javadoc.jar
tomcat-xml-build.xml
<?xml version="1.0" encoding="UTF-8" standalone="no"?>
<!DOCTYPE project>
<project name="tomcat-xml-build" default="deploy-output-xml" basedir=".">

    <!-- 載入額外 ant-contrib 定義  [if,not,or,then,equals] -->
    <taskdef resource="net/sf/antcontrib/antcontrib.properties"/>

    <property name="tomcat.id" value="Apache Tomcat v7.0" />
    <property name="tomcat.home" value="D:/apache-tomcat-7.0.53" />
    <property name="output.file" value="org.eclipse.jst.server.tomcat.runtimeTarget.xml" />
    <basename property="ant.filename" file="${ant.file}" />


    <path id="tomcat.lib">
        <fileset dir="${tomcat.home}/lib" includes="*.jar" />
    </path>


    <target name="build-xml">
        <echo>====================================================================</echo>
        <echo>開始建立 ${output.file}</echo>

        <echo file="${output.file}"><?xml version="1.0" encoding="UTF-8" standalone="no"?>
<classpath>
<!-- Code Generate from "${ant.filename}" --></echo>

        <foreach target="loop-jar-file" param="jar-file">
            <path refid="tomcat.lib"/>
        </foreach>

        <echo file="${output.file}" append="true">
</classpath></echo>

        <echo>====================================================================</echo>
        <echo>完成產生 ${output.file}</echo>
    </target>


    <target name="loop-jar-file" if="jar-file">
        <echo level="info">${jar-file}</echo>

        <basename property="jar-name" file="${jar-file}" suffix=".jar"/>
        <if>
            <or>
                <available file="${tomcat.home}/src/${jar-name}-sources.jar"/>
                <available file="${tomcat.home}/src/${jar-name}-javadoc.jar"/>
            </or>
            <then>
                <echo>輸出  ${jar-name}</echo>
                <echo file="${output.file}" append="true">
  <source-attachment entry="${tomcat.home}/lib/${jar-name}.jar" runtime-id="${tomcat.id}" source-attachment-path="${tomcat.home}/src/${jar-name}-sources.jar">
    <attribute name="javadoc_location" value="jar:file://${tomcat.home}/src/${jar-name}-javadoc.jar!/"/>
  </source-attachment></echo>
            </then>
        </if>
    </target>


    <target name="deploy-output-xml" depends="build-xml">
        <echo>====================================================================</echo>
        <echo>部署 ${output.file} 到 .metadata</echo>

        <eclipse.convertPath resourcepath="workspace_loc:/" property="workspace_loc"/>
        <copy file="${output.file}" todir="${workspace_loc}/.metadata/.plugins/org.eclipse.jst.server.core" />
    </target>


    <target name="show-properties">
        <echoproperties />
    </target>

</project>
執行前需要 ant-contrib,然後啟動配置必須是[在工作區的同一個 JRE 中執行],這是因為用到 Eclipse Ant 所以提供的環境變數,執行完後重新啟動 Eclipse 就可以看到連結的附件。

2015-02-27 19:57
在 Eclipse 安裝 ant-contrib
先下載 ant-contrib,然後放置到
接者在 [視窗]->[喜好設定]->[Ant 執行時期]->[類別路徑]->[Ant 起始目錄項目]->[新增外部 JAR]->[選擇 ant-contrib.jar]

然後在要使用 ant-contrib 的 build.xml 中加入以下宣告:
{eclipse_home}/plugins/org.apache.ant_XXXXXXX/lib接者在 [視窗]->[喜好設定]->[Ant 執行時期]->[類別路徑]->[Ant 起始目錄項目]->[新增外部 JAR]->[選擇 ant-contrib.jar]

然後在要使用 ant-contrib 的 build.xml 中加入以下宣告:
<taskdef resource="net/sf/antcontrib/antcontrib.properties"/>
2015-02-26 16:15
[轉載] Java 內部類別
轉載自:Java Gossip: 內部類別
可以在類別中再定義類別,稱之為內部類別(Inner class),初學者暫時不會使用到內部類別,在這邊先簡單介紹語法,雖然會無聊一些,不過之後章節就會看到相關應用。
內部類別可以定義在類別區塊之中。例如以下程式片段建立了非靜態的內部類別:
雖然實務上很少看到接下來的寫法,不過要使用
內部類別也可以使用 public、protected 或 private 宣告。例如:
內部類別本身可以存取外部類別的成員,通常非靜態內部類別會宣告為 private,這類內部類別是輔助類別中某些操作而設計,外部不用知道內部類別的存在。
內部類別也可以宣告為 static。例如:
一個被宣告為 static 的內部類別,通常是將外部類別當作名稱空間。你可以如下建立類別實例:
被宣告為 static 的內部類別,雖然將外部類別當作名稱空間,但算是個獨立類別,它可以存取外部類別 static 成員,但不可存取外部類別非 static 成員。例如:

方法中也可以宣告類別,這通常是輔助方法中演算之用,方法外無法使用。例如:
實務上比較少看到在方法中定義具名的內部類別,倒很常看到方法中定義匿名內部類別(Anonymous inner class)並直接實例化,這跟類別繼承或介面實作有關,以下先看一下語法,細節留到談到繼承與介面時再作討論:
如果要稍微解釋一下,這個語法定義了一個沒有名稱的類別,它繼承
可以在類別中再定義類別,稱之為內部類別(Inner class),初學者暫時不會使用到內部類別,在這邊先簡單介紹語法,雖然會無聊一些,不過之後章節就會看到相關應用。
內部類別可以定義在類別區塊之中。例如以下程式片段建立了非靜態的內部類別:
class Some {
    class Other {
    }
}
雖然實務上很少看到接下來的寫法,不過要使用
Some 中的 Other 類別,必須先建立實例 Some 實例。例如:Some s = new Some(); Some.Other o = s.new Other();
內部類別也可以使用 public、protected 或 private 宣告。例如:
class Some {
    private class Other {
    }
}
內部類別本身可以存取外部類別的成員,通常非靜態內部類別會宣告為 private,這類內部類別是輔助類別中某些操作而設計,外部不用知道內部類別的存在。
內部類別也可以宣告為 static。例如:
class Some {
    static class Other {
    }
}
一個被宣告為 static 的內部類別,通常是將外部類別當作名稱空間。你可以如下建立類別實例:
Some.Other o = new Some.Other();
被宣告為 static 的內部類別,雖然將外部類別當作名稱空間,但算是個獨立類別,它可以存取外部類別 static 成員,但不可存取外部類別非 static 成員。例如:
方法中也可以宣告類別,這通常是輔助方法中演算之用,方法外無法使用。例如:
class Some {
    public void doSome() {
        class Other {
        }
    }
}
實務上比較少看到在方法中定義具名的內部類別,倒很常看到方法中定義匿名內部類別(Anonymous inner class)並直接實例化,這跟類別繼承或介面實作有關,以下先看一下語法,細節留到談到繼承與介面時再作討論:
Object o = new Object() {
    public String toString() {
        return "無聊的語法示範而已";
    }
};
如果要稍微解釋一下,這個語法定義了一個沒有名稱的類別,它繼承
Object 類別,並重新定義(Override)了 toString() 方法,new 表示實例化這個沒有名稱的類別。匿名類別語法本身,在某些場合有時有些囉嗦,JDK 8 提出了 Lambda,有一部份目的是用來解決匿名類別語法囉嗦的問題,之後會再討論。
訂閱:
意見 (Atom)