function transformInt(num1, num2, padZeno, compute) {
    num1 = '' + num1;
    num2 = '' + num2;

    var p1 = 0, p2 = 0;
    try { p1 = num1.split(".")[1].length } catch (e) { }
    try { p2 = num2.split(".")[1].length } catch (e) { }

    if(padZeno){
        while (p1 < p2) { p1++; num1 += '0'; }
        while (p2 < p1) { p2++; num2 += '0'; }
    }

    var int1 = parseInt(num1.replace(".", ""), 10);
    var int2 = parseInt(num2.replace(".", ""), 10);
    return compute(int1, int2, p1, p2);
}


/*浮點數相加*/
function floatAdd(num1, num2) {
    return transformInt(num1, num2, true, function(int1, int2, p1, p2){
        return (int1 + int2) / Math.pow(10, p1);
    });
}

/*浮點數相減*/
function floatSub(num1, num2) {
    return transformInt(num1, num2, true, function(int1, int2, p1, p2){
        return (int1 - int2) / Math.pow(10, p1);
    });
}

/*浮點數相乘*/
function floatMul(num1, num2) {
    return transformInt(num1, num2, false, function(int1, int2, p1, p2){
        return (int1 * int2) / Math.pow(10, p1 + p2);
    });
}

/*浮點數相除*/
function floatDiv(num1, num2) {
    return transformInt(num1, num2, false, function(int1, int2, p1, p2){
        return (int1 / int2) / Math.pow(10, p1 - p2);
    });
}


function unitTest(method, list){
    console.log('=[ ' + method.name + ' ]==============================================');

    for (var i = 0; i < list.length; i++){
        var row = list[i];
        var result = method(row.num1, row.num2);

        if(result == row.ans){
            console.log(row, result);
        }else{
            console.error(row, result);
        }
    };
}

unitTest(floatAdd, [
    {num1:0.11, num2:0.2, ans: 0.31},
    {num1:0.21, num2:0.2, ans: 0.41},
    {num1:0.31, num2:0.2, ans: 0.51},
    {num1:0.41, num2:0.2, ans: 0.61},
    {num1:0.51, num2:0.2, ans: 0.71},
    {num1:0.61, num2:0.2, ans: 0.81},
    {num1:0.71, num2:0.2, ans: 0.91},
    {num1:0.81, num2:0.2, ans: 1.01},
    {num1:0.91, num2:0.2, ans: 1.11},
    {num1:1.01, num2:0.2, ans: 1.21},
]);

unitTest(floatSub, [
    {num1:1.02, num2:0.2, ans: 0.82},
    {num1:1.12, num2:0.2, ans: 0.92},
    {num1:1.22, num2:0.2, ans: 1.02},
    {num1:1.32, num2:0.2, ans: 1.12},
    {num1:1.42, num2:0.2, ans: 1.22},
    {num1:1.52, num2:0.2, ans: 1.32},
    {num1:1.62, num2:0.2, ans: 1.42},
    {num1:1.72, num2:0.2, ans: 1.52},
    {num1:1.82, num2:0.2, ans: 1.62},
    {num1:1.92, num2:0.2, ans: 1.72},
]);

unitTest(floatMul, [
    {num1:10, num2:0.14, ans: 1.4},
    {num1:10, num2:0.24, ans: 2.4},
    {num1:10, num2:0.34, ans: 3.4},
    {num1:10, num2:0.44, ans: 4.4},
    {num1:10, num2:0.54, ans: 5.4},
    {num1:10, num2:0.64, ans: 6.4},
    {num1:10, num2:0.74, ans: 7.4},
    {num1:10, num2:0.84, ans: 8.4},
    {num1:10, num2:0.94, ans: 9.4},
    {num1:10, num2:1.04, ans: 10.4},
]);

unitTest(floatDiv, [
    {num1:1.1, num2:0.1, ans: 11},
    {num1:1.1, num2:0.2, ans: 5.5},
    {num1:0.99, num2:0.3, ans: 3.3},
    {num1:1.1, num2:0.4, ans: 2.75},
    {num1:1.1, num2:0.5, ans: 2.2},
    {num1:1.32, num2:0.6, ans: 2.2},
    {num1:1.54, num2:0.7, ans: 2.2},
    {num1:1.76, num2:0.8, ans: 2.2},
    {num1:2.97, num2:0.9, ans: 3.3},
    {num1:1.1, num2:0.1, ans: 11},
]);
2017-03-20 10:13
JavaScript 浮點數計算
一直一來都很少處理 JS 精準運算的問題,大部分的時候 UI 有點不準也不會造成太大的問題,這次用 JS 做一些加減的數字計算,遇到小數的時候就出現運算誤差,既然是 JS 計算機不精準是不行的,User 不可能接受的,找了一堆文章後沒一個靠譜的,但重點都是轉換到整數進行運算,再做浮點位移,整個計算最好盡量避免小數的處理,另外的問題就是位數不能太多。
2016-04-07 12:07
C# MVC + Cassette
Cassette 與 MVC 預設的 Bundle 最大的差異就是會自動轉換 CSS 的圖片網址。缺點就是開發時 F5 啟動專案會變慢。
基本上安裝完就會自動配置以下設定,但可以在確認一下。
增加給 cshtml 用的 namespace
當 Web.config 的 compilation debug="false" 就會壓縮綑綁。
NuGet 安裝
- Cassette.Aspnet
- Cassette.Views
- Cassette
Web.config
基本上安裝完就會自動配置以下設定,但可以在確認一下。
<configuration>
  <configSections>
    <section name="cassette"
             type="Cassette.CassetteConfigurationSection, Cassette"
             requirePermission="false"
    />
  </configSections>
  <system.web>
    <pages>
      <namespaces>
        <add namespace="Cassette.Views" />
      </namespaces>
    </pages>
    <httpModules>
      <add name="CassetteHttpModule"
           type="Cassette.Aspnet.CassetteHttpModule, Cassette.Aspnet"
      />
    </httpModules>
    <httpHandlers>
      <!-- 用來處理綑綁打包的處理器 -->
      <add path="cassette.axd"
           verb="*"
           type="Cassette.Aspnet.CassetteHttpHandler, Cassette.Aspnet"
       />
    </httpHandlers>
  </system.web>
  <system.webServer>
    <!-- 保留 httpHandlers(IIS6) 及 handlers(IIS7) 需要關閉驗證 -->
    <validation validateIntegratedModeConfiguration="false" />
    <modules>
      <add name="CassetteHttpModule"
           type="Cassette.Aspnet.CassetteHttpModule, Cassette.Aspnet"
      />
    </modules>
    <handlers>
      <!-- 用來處理綑綁打包的處理器 -->
      <add name="CassetteHttpHandler"
           path="cassette.axd"
           verb="*"
           allowPathInfo="true"
           preCondition="integratedMode"
           type="Cassette.Aspnet.CassetteHttpHandler, Cassette.Aspnet"
       />
    </handlers>
  </system.webServer>

  <!-- For configuration options: http://getcassette.net/documentation/v2/web-config -->
  <cassette rewriteHtml="false" />
</configuration>
Views/Web.config
增加給 cshtml 用的 namespace
<configuration>
  <system.web.webPages.razor>
    <pages pageBaseType="System.Web.Mvc.WebViewPage">
      <namespaces>
        <add namespace="Cassette.Views" />
      </namespaces>
    </pages>
  </system.web.webPages.razor>
</configuration>
CassetteConfiguration.cs
public class CassetteBundleConfiguration : IConfiguration<BundleCollection>
{
    public void Configure(BundleCollection bundles)
    {
        bundles.AddPerIndividualFile<StylesheetBundle>("Content");
        bundles.AddPerIndividualFile<ScriptBundle>("Scripts");

        bundles.Add<StylesheetBundle>("Styles/Bundles", new string[]
        {
            "~/Scripts/bootstrap/css/bootstrap.css",
            "~/Scripts/bootstrap/css/bootstrap-theme.css",
            //...
        });

        bundles.Add<ScriptBundle>("Scripts/Bundles", new string[]
        {
            "~/Scripts/jquery/jquery-1.12.2.js",
            "~/Scripts/jquery.validate/jquery.validate-1.12.0.js",
            //...
        });
    }
}
_Layout.cshtml
<!DOCTYPE html>
@{
    Bundles.Reference("Styles/Bundles");
    Bundles.Reference("Scripts/Bundles");
}
<html>
<head>
    @Bundles.RenderStylesheets()
</head>
<body id="DialogLayout">
    @Bundles.RenderScripts()
</body>
</html>
Release Mode
當 Web.config 的 compilation debug="false" 就會壓縮綑綁。
<compilation debug="false" targetFramework="4.5" />
2015-11-26 14:57
2015-10-23 16:52
[PHP] 從 RGB 轉換到 HSB
HSB(HSV)通過色相/飽和度/亮度三要素來表達顏色。
- H(Hue):表示颜色的類型 (例如红色,绿色或者黄色),取值範圍為 0 ~ 360,其中每一个值代表一種顏色
- S(Saturation):顏色的飽和度從 0 到 1,有时候也稱為纯度 (0 表示灰度圖,1 表示纯的顏色)
- B(Brightness or Value):顏色的明亮程度從 0 到 1 (0 表示黑色,1 表示特定飽和度的顏色)
function rgb2hsb($rgb) {
    $red   = max(0, min(255, $rgb['red']));
    $green = max(0, min(255, $rgb['green']));
    $blue  = max(0, min(255, $rgb['blue']));

    $max = max($red, $green, $blue);
    $min = min($red, $green, $blue);
    $delta = $max - $min;

    $b = $max / 255;
    $s = $max == 0 ? 0 : $delta / $max;

    $h = 0;
    if ($delta == 0) {
        $h = 0;
    } else if ($max == $red && $green >= $blue) {
        $h = 0   + 60 * ($green - $blue) / $delta;
    } else if ($max == $red && $green < $blue) {
        $h = 360 + 60 * ($green - $blue) / $delta;
    } else if ($max == $green) {
        $h = 120 + 60 * ($blue - $red) / $delta;
    } else if ($max == $blue) {
        $h = 240 + 60 * ($red - $green) / $delta;
    }

    return array('hue' => fmod($h, 360), 'saturation' => $s, 'brightness' => $b);
}


function hsb2rgb($hsb) {
    $h = $hsb['hue'];
    $s = max(0, min(1, $hsb['saturation']));
    $b = max(0, min(1, $hsb['brightness']));

    $h = fmod($h, 360);
    if($h < 0){ $h += 360; }

    $i = ($h / 60) % 6;
    $f = ($h / 60) - $i;
    $p = $b * (1 - $s);
    $q = $b * (1 - $f * $s);
    $t = $b * (1 - (1 - $f) * $s);

    $p = intval(round(255 * $p));
    $q = intval(round(255 * $q));
    $t = intval(round(255 * $t));
    $b = intval(round(255 * $bri));

    switch ($i) {
        case 0: return array('red' => $b, 'green' => $t, 'blue' => $p);
        case 1: return array('red' => $q, 'green' => $b, 'blue' => $p);
        case 2: return array('red' => $p, 'green' => $b, 'blue' => $t);
        case 3: return array('red' => $p, 'green' => $q, 'blue' => $b);
        case 4: return array('red' => $t, 'green' => $p, 'blue' => $b);
        case 5: return array('red' => $b, 'green' => $p, 'blue' => $q);
        default: return array('red' => 0, 'green' => 0, 'blue' => 0);
    }
}
2015-10-23 16:44
[PHP] 從 Hex 轉換到 RGB
function hex2rgb($hex) {
    list($r, $g, $b) = sscanf($hex, "%02x%02x%02x");
    return array('red' => $r, 'green' => $g, 'blue' => $b);
}

function rgb2hex($rgb) {
    return sprintf("%02x%02x%02x", $rgb['red'], $rgb['green'], $rgb['blue']);
}
2015-04-27 17:49
[轉載] Spring 使用 Cache、整合 Ehcache
轉載自:Spring使用Cache、整合Ehcache
從 3.1 開始,Spring 引入了對 Cache 的支持。其使用方法和原理都類似於 Spring 對事務管理的支持。Spring Cache 是作用在方法上的,其核心思想是這樣的:當我們在調用一個緩存方法時會把該方法參數和返回結果作為一個鍵值對存放在緩存中,等到下次利用同樣的參數來調用該方法時將不再執行該方法,而是直接從緩存中獲取結果進行返回。所以在使用 Spring Cache 的時候我們要保證我們緩存的方法對於相同的方法參數要有相同的返回結果。
使用 Spring Cache 需要我們做兩方面的事:
和 Spring 對事務管理的支持一樣,Spring 對 Cache 的支持也有基於注解和基於 XML 配置兩種方式。下面我們先來看看基於注解的方式。
Spring 為我們提供了幾個注解來支持 Spring Cache。其核心主要是
value 屬性是必須指定的,其表示當前方法的返回值是會被緩存在哪個 Cache 上的,對應 Cache 的名稱。其可以是一個 Cache 也可以是多個 Cache,當需要指定多個 Cache 時其是一個陣列。
key 屬性是用來指定 Spring 緩存方法的返回結果時對應的 key 的。該屬性支持 SpringEL 表達式。當我們沒有指定該屬性時,Spring 將使用默認策略生成 key。我們這裡先來看看自定義策略,至於默認策略會在後文單獨介紹。
自定義策略是指我們可以通過 Spring 的 EL 表達式來指定我們的 key。這裡的 EL 表達式可以使用方法參數及它們對應的屬性。使用方法參數時我們可以直接使用
除了上述使用方法參數作為 key 之外,Spring 還為我們提供了一個 root 對像可以用來生成 key。通過該 root 對像我們可以獲取到以下信息。
當我們要使用 root 對像的屬性作為 key 時我們也可以將
有的時候我們可能並不希望緩存一個方法所有的返回結果。通過 condition 屬性可以實現這一功能。condition 屬性默認為空,表示將緩存所有的調用情形。其值是通過 SpringEL 表達式來指定的,當為
在支持 Spring Cache 的環境下,對於使用
allEntries 是 boolean 類型,表示是否需要清除緩存中的所有元素。默認為 false,表示不需要。當指定了 allEntries 為 true 時,Spring Cache 將忽略指定的 key。有的時候我們需要 Cache 一下清除所有的元素,這比一個一個清除元素更有效率。
清除操作默認是在對應方法成功執行之後觸發的,即方法如果因為拋出異常而未能成功返回時也不會觸發清除操作。使用 beforeInvocation 可以改變觸發清除操作的時間,當我們指定該屬性值為 true 時,Spring 會在調用該方法之前清除緩存中的指定元素。
其實除了使用
Spring 允許我們在配置可緩存的方法時使用自定義的注解,前提是自定義的注解上必須使用對應的注解進行標注。如我們有如下這麼一個使用
那麼在我們需要緩存的方法上使用
配置 Spring 對基於注解的 Cache 的支持,首先我們需要在 Spring 的配置文件中引入 cache 命名空間,其次通過
此外,
需要注意的是
除了使用注解來聲明對 Cache 的支持外,Spring 還支持使用 XML 來聲明對 Cache 的支持。這主要是通過類似於 aop:advice 的 cache:advice 來進行的。在 cache 命名空間下定義了一個 cache:advice 元素用來定義一個對於 Cache 的 advice。其需要指定一個 cache-manager 屬性,默認為 cacheManager。 cache:advice 下面可以指定多個 cache:caching 元素,其有點類似於使用注解時的
上面配置定義了一個名為 cacheAdvice 的 cache:advice,其中指定了將緩存 findById 方法和 find 方法到名為 users 的緩存中。這裡的方法還可以使用通配符
有了cache:advice 之後,我們還需要引入 aop 命名空間,然後通過 aop:config 指定定義好的 cacheAdvice 要應用在哪些 pointcut 上。如:
上面的配置表示在調用 com.xxx.UserService 中任意公共方法時將使用 cacheAdvice 對應的 cache:advice 來進行 Spring Cache 處理。更多關於 Spring AOP 的內容不在本文討論範疇內。
CacheManager 是 Spring 定義的一個用來管理 Cache 的接口。Spring 自身已經為我們提供了兩種 CacheManager 的實現,一種是基於 Java API 的 ConcurrentMap,另一種是基於第三方 Cache 實現—— Ehcache,如果我們需要使用其它類型的緩存時,我們可以自己來實現 Spring 的 CacheManager 接口或 AbstractCacheManager 抽像類。下面分別來看看 Spring 已經為我們實現好了的兩種 CacheManager 的配置示例。
上面的配置使用的是一個 SimpleCacheManager,其中包含一個名為
上面的配置使用了一個 Spring 提供的 EhCacheCacheManager 來生成一個 Spring 的 CacheManager,其接收一個 Ehcache 的 CacheManager,因為真正用來存入緩存數據的還是 Ehcache。Ehcache 的 CacheManager 是通過 Spring 提供的 EhCacheManagerFactoryBean 來生成的,其可以通過指定 ehcache 的配置文件位置來生成一個 Ehcache 的 CacheManager。若未指定則將按照 Ehcache 的默認規則取 classpath 根路徑下的 ehcache.xml 文件,若該文件也不存在,則獲取 Ehcache 對應 jar 包中的 ehcache-failsafe.xml 文件作為配置文件。更多關於 Ehcache 的內容這裡就不多說了,它不屬於本文討論的內容,欲了解更多關於 Ehcache 的內容可以參考我之前發布的 Ehcache 系列文章,也可以參考官方文檔等。
鍵的生成策略有兩種,一種是默認策略,一種是自定義策略。
默認的 key 生成策略是通過 KeyGenerator 生成的,其默認策略如下:
如果我們需要指定自己的默認策略的話,那麼我們可以實現自己的 KeyGenerator,然後指定我們的 Spring Cache 使用的 KeyGenerator 為我們自己定義的 KeyGenerator。
使用基於注解的配置時是通過 cache:annotation-driven 指定的.
而使用基於 XML 配置時是通過 cache:advice 來指定的。
需要注意的是此時我們所有的 Cache 使用的 Key 的默認生成策略都是同一個 KeyGenerator。
自定義策略是指我們可以通過 Spring 的 EL 表達式來指定我們的 key。這裡的 EL 表達式可以使用方法參數及它們對應的屬性。使用方法參數時我們可以直接使用
除了上述使用方法參數作為 key 之外,Spring 還為我們提供了一個 root 對像可以用來生成 key。通過該 root 對像我們可以獲取到以下信息。
當我們要使用 root 對像的屬性作為 key 時我們也可以將
前面介紹的內容是 Spring 內置的對 Cache 的支持,其實我們也可以通過 Spring 自己單獨的使用 Ehcache 的 CacheManager 或 Ehcache 對像。通過在 Application Context 中配置 EhCacheManagerFactoryBean 和 EhCacheFactoryBean,我們就可以把對應的 EhCache 的 CacheManager 和 Ehcache 對像注入到其它的 Spring bean 對像中進行使用。
EhCacheManagerFactoryBean 是 Spring 內置的一個可以產生 Ehcache 的 CacheManager 對像的 FactoryBean。其可以通過屬性 configLocation 指定用於創建 CacheManager 的 Ehcache 配置文件的路徑,通常是 ehcache.xml文件的路徑。如果沒有指定 configLocation,則將使用默認位置的配置文件創建 CacheManager,這是屬於 Ehcache 自身的邏輯,即如果在 classpath 根路徑下存在 ehcache.xml 文件,則直接使用該文件作為 Ehcache 的配置文件,否則將使用 ehcache-xxx.jar 中的 ehcache-failsafe.xml 文件作為配置文件來創建 Ehcache 的 CacheManager。此外,如果不希望創建的 CacheManager 使用默認的名稱(在 ehcache.xml 文件中定義的,或者是由 CacheManager 內部定義的),則可以通過 cacheManagerName 屬性進行指定。下面是一個配置 EhCacheManagerFactoryBean 的示例。
EhCacheFactoryBean 是用來產生 Ehcache 的 Ehcache 對像的 FactoryBean。定義 EhcacheFactoryBean 時有兩個很重要的屬性我們可以來指定。一個是 cacheManager 屬性,其可以指定將用來獲取或創建 Ehcache 的 CacheManager 對像,若未指定則將通過 CacheManager.create() 獲取或創建默認的 CacheManager。另一個重要屬性是 cacheName,其表示當前 EhCacheFactoryBean 對應的是 CacheManager 中的哪一個 Ehcache 對像,若未指定默認使用 beanName 作為 cacheName。若 CacheManager 中不存在對應 cacheName 的 Ehcache 對像,則將使用 CacheManager 創建一個名為 cacheName 的 Cache 對像。此外我們還可以通過 EhCacheFactoryBean 的 timeToIdle、timeToLive 等屬性指定要創建的 Cache 的對應屬性,注意這些屬性只對 CacheManager 中不存在對應 Cache 時新建的 Cache 才起作用,對已經存在的 Cache 將不起作用,更多屬性設置請參考 Spring 的 API 文檔。此外還有幾個屬性是對不管是已經存在還是新創建的 Cache 都起作用的屬性:statisticsEnabled、sampledStatisticsEnabled、disabled、blocking 和 cacheEventListeners,其中前四個默認都是 false,最後一個表示為當前 Cache 指定 CacheEventListener。下面是一個定義 EhCacheFactoryBean 的示例。
(注:本文是基於 Spring 3.1.0 所寫)
Spring 使用 Cache
從 3.1 開始,Spring 引入了對 Cache 的支持。其使用方法和原理都類似於 Spring 對事務管理的支持。Spring Cache 是作用在方法上的,其核心思想是這樣的:當我們在調用一個緩存方法時會把該方法參數和返回結果作為一個鍵值對存放在緩存中,等到下次利用同樣的參數來調用該方法時將不再執行該方法,而是直接從緩存中獲取結果進行返回。所以在使用 Spring Cache 的時候我們要保證我們緩存的方法對於相同的方法參數要有相同的返回結果。
使用 Spring Cache 需要我們做兩方面的事:
- 聲明某些方法使用緩存
- 配置 Spring 對 Cache 的支持
和 Spring 對事務管理的支持一樣,Spring 對 Cache 的支持也有基於注解和基於 XML 配置兩種方式。下面我們先來看看基於注解的方式。
1 基於注解的支持
Spring 為我們提供了幾個注解來支持 Spring Cache。其核心主要是
@Cacheable 和 @CacheEvict。使用 @Cacheable 標記的方法在執行後 Spring Cache 將緩存其返回結果,而使用 @CacheEvict 標記的方法會在方法執行前或者執行後移除 Spring Cache 中的某些元素。下面我們將來詳細介紹一下 Spring 基於注解對 Cache 的支持所提供的幾個注解。1.1 @Cacheable
@Cacheable 可以標記在一個方法上,也可以標記在一個類上。當標記在一個方法上時表示該方法是支持緩存的,當標記在一個類上時則表示該類所有的方法都是支持緩存的。對於一個支持緩存的方法,Spring 會在其被調用後將其返回值緩存起來,以保證下次利用同樣的參數來執行該方法時可以直接從緩存中獲取結果,而不需要再次執行該方法。Spring 在緩存方法的返回值時是以鍵值對進行緩存的,值就是方法的返回結果,至於鍵的話,Spring 又支持兩種策略,默認策略和自定義策略,這個稍後會進行說明。需要注意的是當一個支持緩存的方法在對像內部被調用時是不會觸發緩存功能的。@Cacheable 可以指定三個屬性,value、key 和 condition。1.1.1 value 屬性指定 Cache 名稱
value 屬性是必須指定的,其表示當前方法的返回值是會被緩存在哪個 Cache 上的,對應 Cache 的名稱。其可以是一個 Cache 也可以是多個 Cache,當需要指定多個 Cache 時其是一個陣列。
@Cacheable("cache1") // Cache 是發生在 cache1 上的
public User find(Integer id) {
    return null;
}

@Cacheable({"cache1", "cache2"}) // Cache 是發生在 cache1 和 cache2 上的
public User find(Integer id) {
    return null;
}
1.1.2 使用 key 屬性自定義 key
key 屬性是用來指定 Spring 緩存方法的返回結果時對應的 key 的。該屬性支持 SpringEL 表達式。當我們沒有指定該屬性時,Spring 將使用默認策略生成 key。我們這裡先來看看自定義策略,至於默認策略會在後文單獨介紹。
自定義策略是指我們可以通過 Spring 的 EL 表達式來指定我們的 key。這裡的 EL 表達式可以使用方法參數及它們對應的屬性。使用方法參數時我們可以直接使用
"#參數名" 或者 "#p參數index"。下面是幾個使用參數作為 key 的示例。@Cacheable(value="users", key="#id")
public User find(Integer id) {
return null;
}
@Cacheable(value="users", key="#p0")
public User find(Integer id) {
return null;
}
@Cacheable(value="users", key="#user.id")
public User find(User user) {
return null;
}
@Cacheable(value="users", key="#p0.id")
public User find(User user) {
return null;
}
除了上述使用方法參數作為 key 之外,Spring 還為我們提供了一個 root 對像可以用來生成 key。通過該 root 對像我們可以獲取到以下信息。
| 屬性名稱 | 描述 | 示例 |
|---|---|---|
| methodName | 當前方法名 | #root.methodName |
| method | 當前方法 | #root.method.name |
| target | 當前被調用的對像 | #root.target |
| targetClass | 當前被調用的對像的 class | #root.targetClass |
| args | 當前方法參數組成的陣列 | #root.args[0] |
| caches | 當前被調用的方法使用的 Cache | #root.caches[0].name |
當我們要使用 root 對像的屬性作為 key 時我們也可以將
"#root" 省略,因為 Spring 默認使用的就是 root 對像的屬性。如:@Cacheable(value={"users", "xxx"}, key="caches[1].name")
public User find(User user) {
return null;
}
1.1.3 condition 屬性指定發生的條件
有的時候我們可能並不希望緩存一個方法所有的返回結果。通過 condition 屬性可以實現這一功能。condition 屬性默認為空,表示將緩存所有的調用情形。其值是通過 SpringEL 表達式來指定的,當為
true 時表示進行緩存處理;當為 false 時表示不進行緩存處理,即每次調用該方法時該方法都會執行一次。如下示例表示只有當 user 的 id 為偶數時才會進行緩存。@Cacheable(value={"users"}, key="#user.id", condition="#user.id%2==0")
public User find(User user) {
System.out.println("find user by user " + user);
return user;
}
1.2 @CachePut
在支持 Spring Cache 的環境下,對於使用
@Cacheable 標注的方法,Spring 在每次執行前都會檢查 Cache 中是否存在相同 key 的緩存元素,如果存在就不再執行該方法,而是直接從緩存中獲取結果進行返回,否則才會執行並將返回結果存入指定的緩存中。@CachePut 也可以聲明一個方法支持緩存功能。與 @Cacheable 不同的是使用 @CachePut 標注的方法在執行前不會去檢查緩存中是否存在之前執行過的結果,而是每次都會執行該方法,並將執行結果以鍵值對的形式存入指定的緩存中。@CachePut 也可以標注在類上和方法上。使用 @CachePut 時我們可以指定的屬性跟 @Cacheable 是一樣的。@CachePut("users") // 每次都會執行方法,並將結果存入指定的緩存中
public User find(Integer id) {
return null;
}
1.3 @CacheEvict
@CacheEvict 是用來標注在需要清除緩存元素的方法或類上的。當標記在一個類上時表示其中所有的方法的執行都會觸發緩存的清除操作。@CacheEvict 可以指定的屬性有 value、key、condition、allEntries 和 beforeInvocation。其中 value、key 和 condition 的語義與 @Cacheable 對應的屬性類似。即 value 表示清除操作是發生在哪些 Cache 上的(對應 Cache 的名稱);key 表示需要清除的是哪個 key,如未指定則會使用默認策略生成的 key;condition 表示清除操作發生的條件。下面我們來介紹一下新出現的兩個屬性 allEntries和 beforeInvocation。1.3.1 allEntries 屬性
allEntries 是 boolean 類型,表示是否需要清除緩存中的所有元素。默認為 false,表示不需要。當指定了 allEntries 為 true 時,Spring Cache 將忽略指定的 key。有的時候我們需要 Cache 一下清除所有的元素,這比一個一個清除元素更有效率。
@CacheEvict(value="users", allEntries=true)
public void delete(Integer id) {
    System.out.println("delete user by id: " + id);
}
1.3.2 beforeInvocation 屬性
清除操作默認是在對應方法成功執行之後觸發的,即方法如果因為拋出異常而未能成功返回時也不會觸發清除操作。使用 beforeInvocation 可以改變觸發清除操作的時間,當我們指定該屬性值為 true 時,Spring 會在調用該方法之前清除緩存中的指定元素。
@CacheEvict(value="users", beforeInvocation=true)
public void delete(Integer id) {
    System.out.println("delete user by id: " + id);
}
其實除了使用
@CacheEvict 清除緩存元素外,當我們使用 Ehcache 作為實現時,我們也可以配置 Ehcache 自身的驅除策略,其是通過 Ehcache 的配置文件來指定的。由於 Ehcache 不是本文描述的重點,這裡就不多贅述了,想了解更多關於 Ehcache 的信息,請查看我關於 Ehcache 的專欄。1.4 @Caching
@Caching 注解可以讓我們在一個方法或者類上同時指定多個 Spring Cache 相關的注解。其擁有三個屬性:cacheable、put 和 evict,分別用於指定 @Cacheable、@CachePut 和 @CacheEvict。@Caching(
cacheable = @Cacheable("users"),
evict = {
@CacheEvict("cache2"),
@CacheEvict(value = "cache3", allEntries = true)
}
)
public User find(Integer id) {
return null;
}
1.5 使用自定義注解
Spring 允許我們在配置可緩存的方法時使用自定義的注解,前提是自定義的注解上必須使用對應的注解進行標注。如我們有如下這麼一個使用
@Cacheable 進行標注的自定義注解。@Target({ElementType.TYPE, ElementType.METHOD})
@Retention(RetentionPolicy.RUNTIME)
@Cacheable(value="users")
public @interface MyCacheable {
}
那麼在我們需要緩存的方法上使用
@MyCacheable 進行標注也可以達到同樣的效果。@MyCacheable
public User findById(Integer id) {
System.out.println("find user by id: " + id);
User user = new User();
user.setId(id);
user.setName("Name" + id);
return user;
}
2 配置 Spring 對 Cache 的支持
2.1 聲明對Cache的支持
2.1.1 基於注解
配置 Spring 對基於注解的 Cache 的支持,首先我們需要在 Spring 的配置文件中引入 cache 命名空間,其次通過
<cache:annotation-driven/> 就可以啟用 Spring 對基於注解的 Cache 的支持。<?xml version="1.0" encoding="UTF-8"?>
<beans xmlns="http://www.springframework.org/schema/beans"
xmlns:xsi="http://www.w3.org/2001/XMLSchema-instance"
xmlns:cache="http://www.springframework.org/schema/cache"
xsi:schemaLocation="
http://www.springframework.org/schema/beans
http://www.springframework.org/schema/beans/spring-beans-3.0.xsd
http://www.springframework.org/schema/cache
http://www.springframework.org/schema/cache/spring-cache.xsd"
>
<cache:annotation-driven/>
</beans>
<cache:annotation-driven/> 有一個 cache-manager 屬性用來指定當前所使用的 CacheManager 對應的 bean 的名稱,默認是 cacheManager,所以當我們的 CacheManager 的 id 為 cacheManager 時我們可以不指定該參數,否則就需要我們指定了。<cache:annotation-driven/> 還可以指定一個 mode 屬性,可選值有 proxy 和 aspectj。默認是使用 proxy。當 mode 為 proxy 時,只有緩存方法在外部被調用的時候 Spring Cache 才會發生作用,這也就意味著如果一個緩存方法在其聲明對像內部被調用時 Spring Cache 是不會發生作用的。而 mode 為 aspectj 時就不會有這種問題。另外使用 proxy 時,只有 public 方法上的 @Cacheable 等標注才會起作用,如果需要非 public 方法上的方法也可以使用 Spring Cache 時把 mode 設置為 aspectj。此外,
<cache:annotation-driven/> 還可以指定一個 proxy-target-class 屬性,表示是否要代理 class,默認為 false。我們前面提到的 @Cacheable、@cacheEvict 等也可以標注在接口上,這對於基於接口的代理來說是沒有什麼問題的,但是需要注意的是當我們設置 proxy-target-class 為 true 或者 mode 為 aspectj 時,是直接基於 class 進行操作的,定義在接口上的 @Cacheable 等 Cache 注解不會被識別到,那對應的 Spring Cache 也不會起作用了。需要注意的是
<cache:annotation-driven/> 只會去尋找定義在同一個 ApplicationContext 下的 @Cacheable 等緩存注解。2.1.2 基於 XML 配置
除了使用注解來聲明對 Cache 的支持外,Spring 還支持使用 XML 來聲明對 Cache 的支持。這主要是通過類似於 aop:advice 的 cache:advice 來進行的。在 cache 命名空間下定義了一個 cache:advice 元素用來定義一個對於 Cache 的 advice。其需要指定一個 cache-manager 屬性,默認為 cacheManager。 cache:advice 下面可以指定多個 cache:caching 元素,其有點類似於使用注解時的
@Caching 注解。cache:caching 元素下又可以指定 cache:cacheable、cache:cache-put 和 cache:cache-evict 元素,它們類似於使用注解時的 @Cacheable、@CachePut 和 @CacheEvict。下面來看一個示例:<cache:advice id="cacheAdvice" cache-manager="cacheManager">
<cache:caching cache="users">
<cache:cacheable method="findById" key="#p0"/>
<cache:cacheable method="find" key="#user.id"/>
<cache:cache-evict method="deleteAll" all-entries="true"/>
</cache:caching>
</cache:advice>
上面配置定義了一個名為 cacheAdvice 的 cache:advice,其中指定了將緩存 findById 方法和 find 方法到名為 users 的緩存中。這裡的方法還可以使用通配符
"*",比如 "find*" 表示任何以 "find" 開始的方法。有了cache:advice 之後,我們還需要引入 aop 命名空間,然後通過 aop:config 指定定義好的 cacheAdvice 要應用在哪些 pointcut 上。如:
<aop:config proxy-target-class="false">
    <aop:advisor advice-ref="cacheAdvice" pointcut="execution(* com.xxx.UserService.*(..))"/>
</aop:config>
上面的配置表示在調用 com.xxx.UserService 中任意公共方法時將使用 cacheAdvice 對應的 cache:advice 來進行 Spring Cache 處理。更多關於 Spring AOP 的內容不在本文討論範疇內。
2.2 配置 CacheManager
CacheManager 是 Spring 定義的一個用來管理 Cache 的接口。Spring 自身已經為我們提供了兩種 CacheManager 的實現,一種是基於 Java API 的 ConcurrentMap,另一種是基於第三方 Cache 實現—— Ehcache,如果我們需要使用其它類型的緩存時,我們可以自己來實現 Spring 的 CacheManager 接口或 AbstractCacheManager 抽像類。下面分別來看看 Spring 已經為我們實現好了的兩種 CacheManager 的配置示例。
2.2.1 基於 ConcurrentMap 的配置
<bean id="cacheManager" class="org.springframework.cache.support.SimpleCacheManager">
    <property name="caches">
        <set>
            <bean class="org.springframework.cache.concurrent.ConcurrentMapCacheFactoryBean" p:name="xxx"/>
        </set>
    </property>
</bean>
上面的配置使用的是一個 SimpleCacheManager,其中包含一個名為
"xxx" 的 ConcurrentMapCache。2.2.2 基於 Ehcache 的配置
<!-- Ehcache 實現 -->
<bean id="ehCacheManagerFactory" class="org.springframework.cache.ehcache.EhCacheManagerFactoryBean">
    <property name="configLocation" value="/WEB-INF/ehcache.xml"/>
</bean>

<bean id="ehCacheManager" class="org.springframework.cache.ehcache.EhCacheCacheManager">
    <property name="cacheManager" ref="ehCacheManagerFactory"/>
</bean>
上面的配置使用了一個 Spring 提供的 EhCacheCacheManager 來生成一個 Spring 的 CacheManager,其接收一個 Ehcache 的 CacheManager,因為真正用來存入緩存數據的還是 Ehcache。Ehcache 的 CacheManager 是通過 Spring 提供的 EhCacheManagerFactoryBean 來生成的,其可以通過指定 ehcache 的配置文件位置來生成一個 Ehcache 的 CacheManager。若未指定則將按照 Ehcache 的默認規則取 classpath 根路徑下的 ehcache.xml 文件,若該文件也不存在,則獲取 Ehcache 對應 jar 包中的 ehcache-failsafe.xml 文件作為配置文件。更多關於 Ehcache 的內容這裡就不多說了,它不屬於本文討論的內容,欲了解更多關於 Ehcache 的內容可以參考我之前發布的 Ehcache 系列文章,也可以參考官方文檔等。
3 鍵的生成策略
鍵的生成策略有兩種,一種是默認策略,一種是自定義策略。
3.1 默認策略
默認的 key 生成策略是通過 KeyGenerator 生成的,其默認策略如下:
- 如果方法沒有參數,則使用 0 作為 key
- 如果只有一個參數的話則使用該參數作為 key
- 如果參數多餘一個的話則使用所有參數的 hashCode 作為 key
如果我們需要指定自己的默認策略的話,那麼我們可以實現自己的 KeyGenerator,然後指定我們的 Spring Cache 使用的 KeyGenerator 為我們自己定義的 KeyGenerator。
使用基於注解的配置時是通過 cache:annotation-driven 指定的.
<cache:annotation-driven key-generator="userKeyGenerator"/>
<bean id="userKeyGenerator" class="com.xxx.cache.UserKeyGenerator"/>
而使用基於 XML 配置時是通過 cache:advice 來指定的。
<cache:advice id="cacheAdvice" cache-manager="cacheManager" key-generator="userKeyGenerator">
</cache:advice>
需要注意的是此時我們所有的 Cache 使用的 Key 的默認生成策略都是同一個 KeyGenerator。
3.1 自定義策略
自定義策略是指我們可以通過 Spring 的 EL 表達式來指定我們的 key。這裡的 EL 表達式可以使用方法參數及它們對應的屬性。使用方法參數時我們可以直接使用
"#參數名" 或者 "#p參數index"。下面是幾個使用參數作為 key 的示例。@Cacheable(value="users", key="#id")
public User find(Integer id) {
return null;
}
@Cacheable(value="users", key="#p0")
public User find(Integer id) {
return null;
}
@Cacheable(value="users", key="#user.id")
public User find(User user) {
return null;
}
@Cacheable(value="users", key="#p0.id")
public User find(User user) {
return null;
}
除了上述使用方法參數作為 key 之外,Spring 還為我們提供了一個 root 對像可以用來生成 key。通過該 root 對像我們可以獲取到以下信息。
| 屬性名稱 | 描述 | 示例 |
|---|---|---|
| methodName | 當前方法名 | #root.methodName |
| method | 當前方法 | #root.method.name |
| target | 當前被調用的對像 | #root.target |
| targetClass | 當前被調用的對像的 class | #root.targetClass |
| args | 當前方法參數組成的陣列 | #root.args[0] |
| caches | 當前被調用的方法使用的 Cache | #root.caches[0].name |
當我們要使用 root 對像的屬性作為 key 時我們也可以將
"#root" 省略,因為 Spring 默認使用的就是 root 對像的屬性。如:@Cacheable(value={"users", "xxx"}, key="caches[1].name")
public User find(User user) {
return null;
}
4 Spring 單獨使用 Ehcache
前面介紹的內容是 Spring 內置的對 Cache 的支持,其實我們也可以通過 Spring 自己單獨的使用 Ehcache 的 CacheManager 或 Ehcache 對像。通過在 Application Context 中配置 EhCacheManagerFactoryBean 和 EhCacheFactoryBean,我們就可以把對應的 EhCache 的 CacheManager 和 Ehcache 對像注入到其它的 Spring bean 對像中進行使用。
4.1 EhCacheManagerFactoryBean
EhCacheManagerFactoryBean 是 Spring 內置的一個可以產生 Ehcache 的 CacheManager 對像的 FactoryBean。其可以通過屬性 configLocation 指定用於創建 CacheManager 的 Ehcache 配置文件的路徑,通常是 ehcache.xml文件的路徑。如果沒有指定 configLocation,則將使用默認位置的配置文件創建 CacheManager,這是屬於 Ehcache 自身的邏輯,即如果在 classpath 根路徑下存在 ehcache.xml 文件,則直接使用該文件作為 Ehcache 的配置文件,否則將使用 ehcache-xxx.jar 中的 ehcache-failsafe.xml 文件作為配置文件來創建 Ehcache 的 CacheManager。此外,如果不希望創建的 CacheManager 使用默認的名稱(在 ehcache.xml 文件中定義的,或者是由 CacheManager 內部定義的),則可以通過 cacheManagerName 屬性進行指定。下面是一個配置 EhCacheManagerFactoryBean 的示例。
<!-- 定義 CacheManager -->
<bean id="cacheManager"
       class="org.springframework.cache.ehcache.EhCacheManagerFactoryBean">

    <!-- 指定配置文件的位置 -->
    <property name="configLocation" value="/WEB-INF/config/ehcache.xml"/>

    <!-- 指定新建的 CacheManager 的名稱 -->
    <property name="cacheManagerName" value="cacheManagerName"/>
</bean>
4.2 EhCacheFactoryBean
EhCacheFactoryBean 是用來產生 Ehcache 的 Ehcache 對像的 FactoryBean。定義 EhcacheFactoryBean 時有兩個很重要的屬性我們可以來指定。一個是 cacheManager 屬性,其可以指定將用來獲取或創建 Ehcache 的 CacheManager 對像,若未指定則將通過 CacheManager.create() 獲取或創建默認的 CacheManager。另一個重要屬性是 cacheName,其表示當前 EhCacheFactoryBean 對應的是 CacheManager 中的哪一個 Ehcache 對像,若未指定默認使用 beanName 作為 cacheName。若 CacheManager 中不存在對應 cacheName 的 Ehcache 對像,則將使用 CacheManager 創建一個名為 cacheName 的 Cache 對像。此外我們還可以通過 EhCacheFactoryBean 的 timeToIdle、timeToLive 等屬性指定要創建的 Cache 的對應屬性,注意這些屬性只對 CacheManager 中不存在對應 Cache 時新建的 Cache 才起作用,對已經存在的 Cache 將不起作用,更多屬性設置請參考 Spring 的 API 文檔。此外還有幾個屬性是對不管是已經存在還是新創建的 Cache 都起作用的屬性:statisticsEnabled、sampledStatisticsEnabled、disabled、blocking 和 cacheEventListeners,其中前四個默認都是 false,最後一個表示為當前 Cache 指定 CacheEventListener。下面是一個定義 EhCacheFactoryBean 的示例。
<!-- 定義 CacheManager -->
<bean id="cacheManager"
       class="org.springframework.cache.ehcache.EhCacheManagerFactoryBean">

    <!-- 指定配置文件的位置 -->
    <property name="configLocation" value="/WEB-INF/config/ehcache.xml"/>
    <!-- 指定新建的 CacheManager 的名稱 -->
    <property name="cacheManagerName" value="cacheManagerName"/>
</bean>

<!-- 定義一個 Ehcache -->
<bean id="userCache"
       class="org.springframework.cache.ehcache.EhCacheFactoryBean">
    <property name="cacheName" value="user"/>
    <property name="cacheManager" ref="cacheManager"/>
</bean>
(注:本文是基於 Spring 3.1.0 所寫)
2015-03-26 14:39
Eclipse Git 基本操作
Git 只有本地端(local)跟遠端(remote)的分別,並不是 client 跟 server 的關係,只要是非專案本身的都可以稱為遠端,例如 A 與 B 專案都在自己的電腦裡,A 專案是可以將 B 專案設為遠端進行版本傳遞。
幾個基本日常操作的名稱意義:
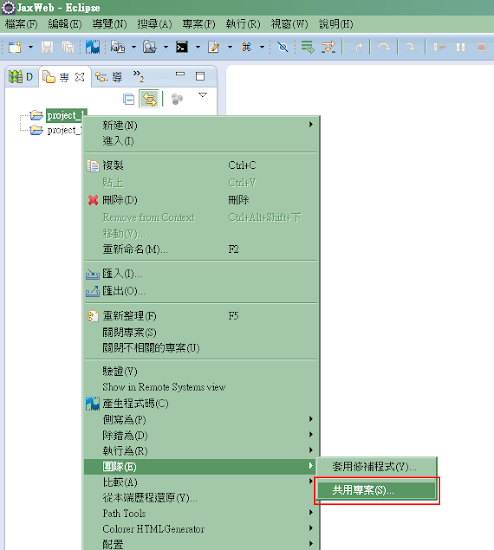
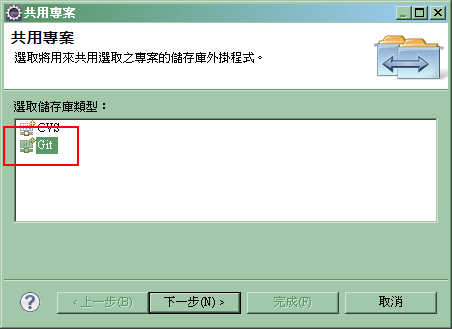
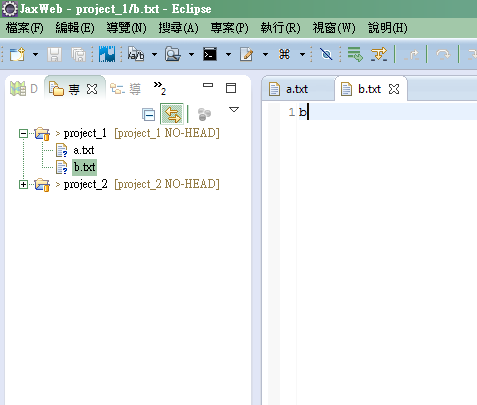
在一個專案上滑鼠右鍵選擇 [團隊]->[共享專案]
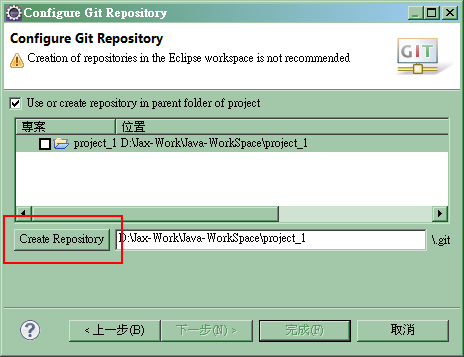
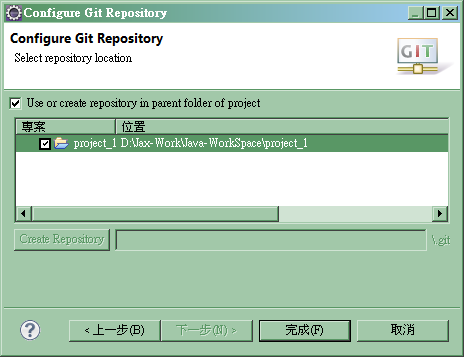
先建立 Git 儲存庫
隨便建立幾個文件
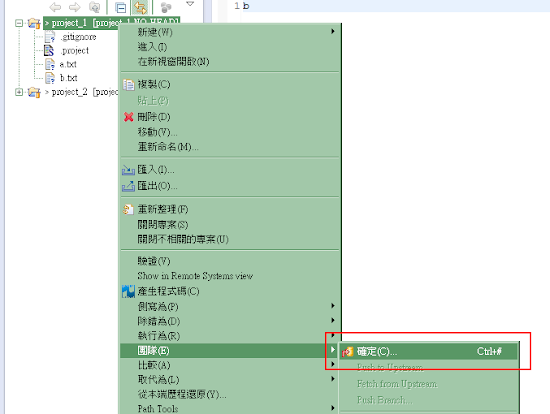
在專案上右鍵選擇 [團隊]->[確定]
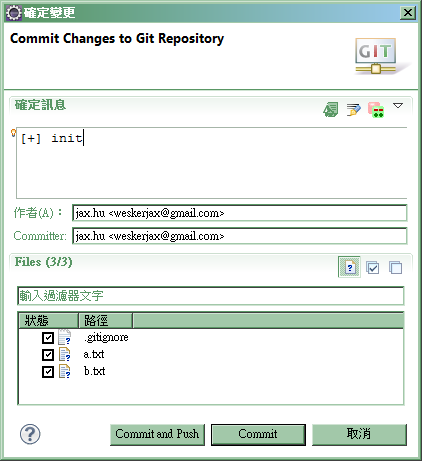
填寫 commit 的訊息,以及選擇要 commit 的檔案
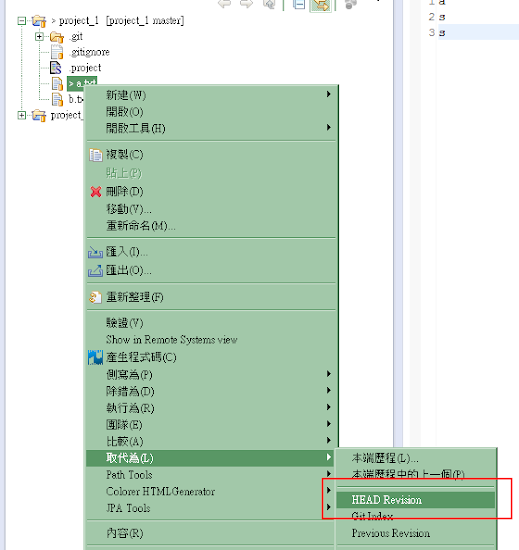
在要回復的檔案右鍵選擇 [取代為]->[HEAD Revision]
在專案上右鍵選擇 [團隊]->[Pull] 從遠端取回有差異的程式
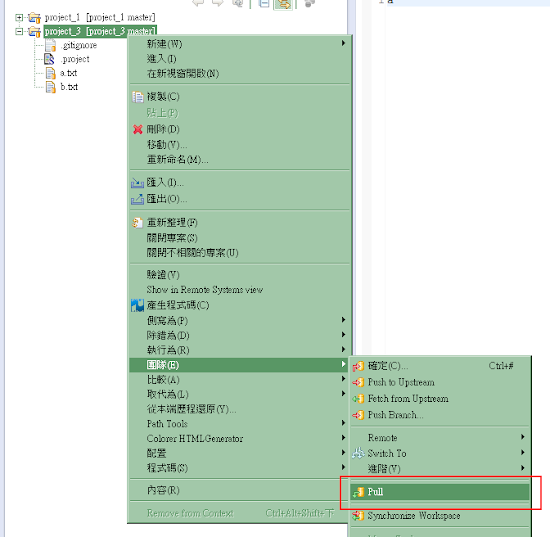
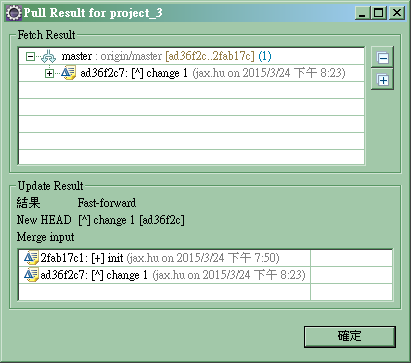
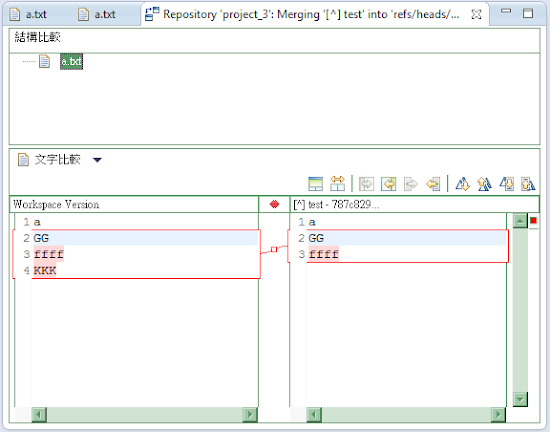
當檔案出現衝突時會顯示紅色的標記,這時候檔案右鍵選擇 [團隊]->[Merge Tool]
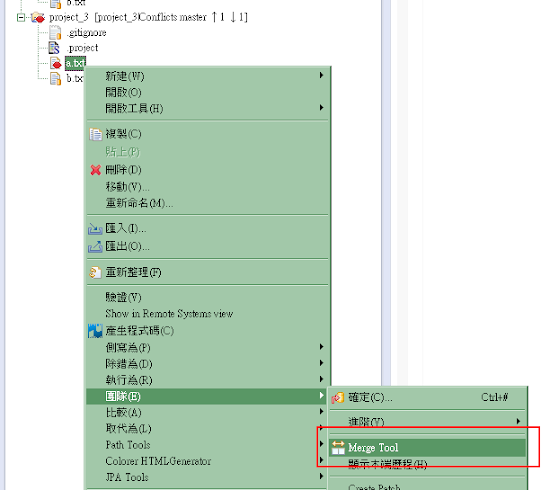
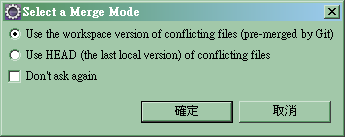
接著就會出現合併的工具,修改完儲存關閉
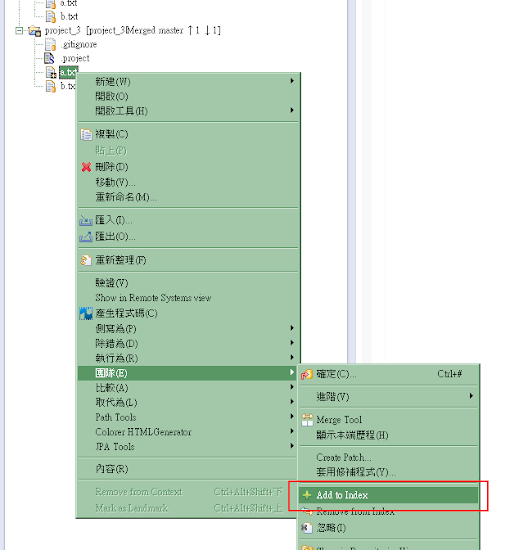
最後檔案右鍵選擇 [團隊]->[Add to Index] 將檔案加到 commit 清單中
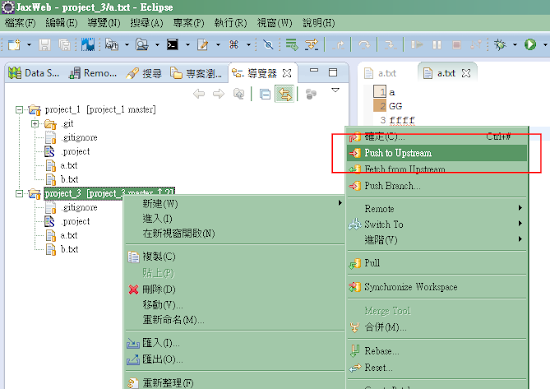
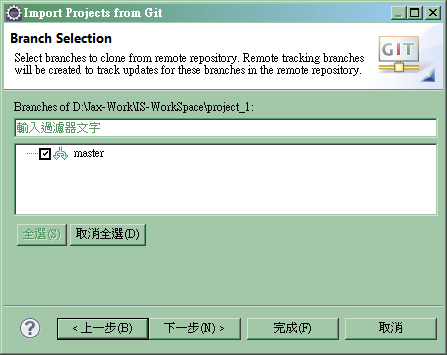
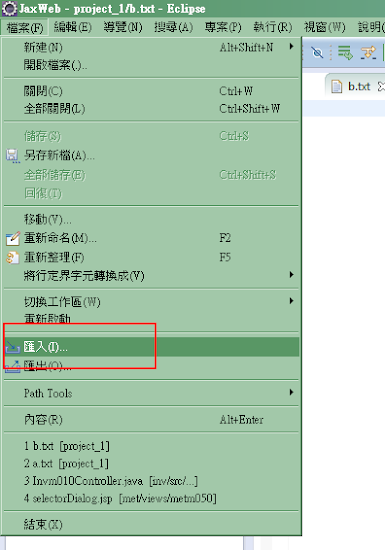
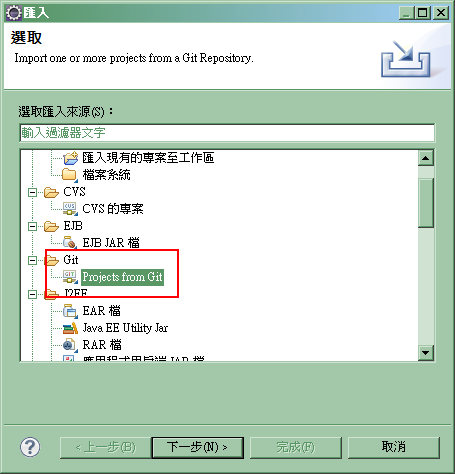
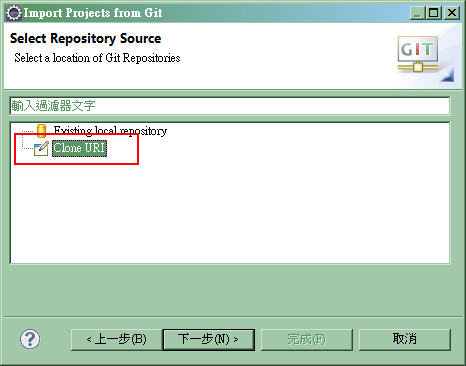
指定來源的遠端
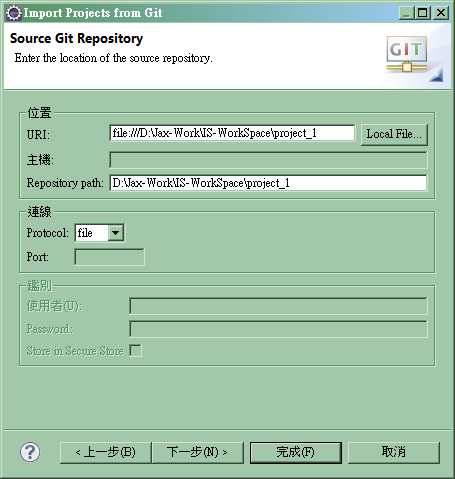
目的地目錄最好修改到 Workspace 中
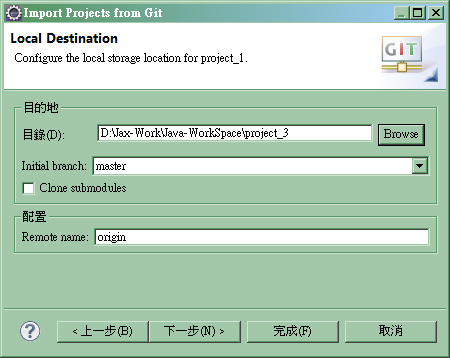
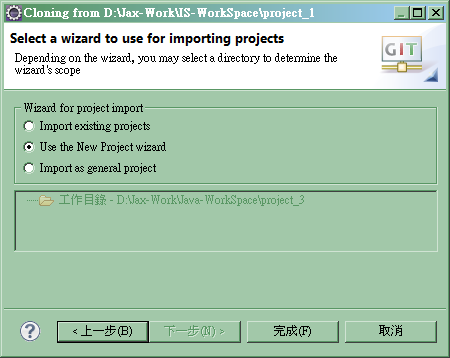
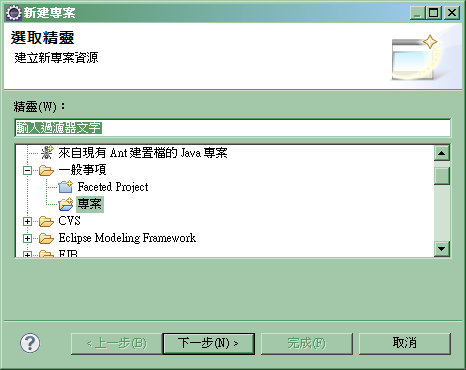
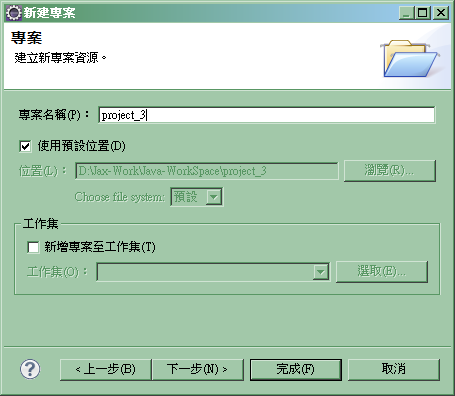
幾個基本日常操作的名稱意義:
- commit: 將完成的程式提交到版本控制中
- revert: 放棄修改,將程式回復
- merge: 將兩個不同版本的程式進行合併
- pull: 從遠端取回有差異的程式版本
- push: 將本地端的版本傳到遠端
- clone: 從遠端複製一個專案到本地
在專案建立 Git 版本控制
在一個專案上滑鼠右鍵選擇 [團隊]->[共享專案]


先建立 Git 儲存庫


將專案中的異動 commit 到 Git 版本控制
隨便建立幾個文件

在專案上右鍵選擇 [團隊]->[確定]

填寫 commit 的訊息,以及選擇要 commit 的檔案

程式回復到尚未修改時
在要回復的檔案右鍵選擇 [取代為]->[HEAD Revision]

版本合併
在專案上右鍵選擇 [團隊]->[Pull] 從遠端取回有差異的程式


當檔案出現衝突時會顯示紅色的標記,這時候檔案右鍵選擇 [團隊]->[Merge Tool]


接著就會出現合併的工具,修改完儲存關閉

最後檔案右鍵選擇 [團隊]->[Add to Index] 將檔案加到 commit 清單中

將本地端的版本傳到遠端

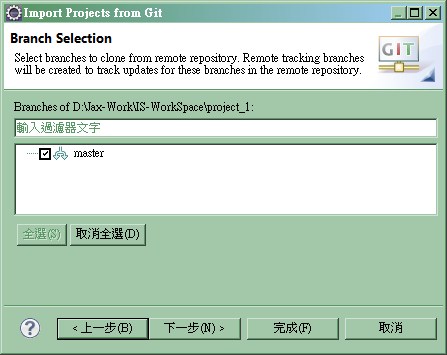
從遠端複製一個專案


指定來源的遠端

目的地目錄最好修改到 Workspace 中


2015-03-13 13:12
[Java] Ant zip 解壓縮筆記
<unzip dest="./target_dir">

    <!-- 來源的壓縮檔 -->
    <fileset dir="lib">
        <include name="tiles-jsp-*.jar"/>
    </fileset>

    <!-- 要解出的檔案 -->
    <patternset>
        <include name="**/*.tld"/>
    </patternset>

    <!-- 解出路徑的轉換 -->
    <mapper type="flatten"/>

</unzip>
參考文件:
Apache Ant™ User Manual : Unzip Task
Apache Ant™ User Manual : Mapper
訂閱:
文章 (Atom)