2012-09-30 22:24

[轉載][PHP] preg_replace 效能測試 (將兩個空白字元以上取代成一個)

轉載自:[PHP] preg_replace 效能測試 (將兩個空白字元以上取代成一個) 小惡魔 – 電腦技術 – 工作筆記 – AppleBOY

preg_replace 可以使用正規語法來取代字串任何字元,,今天探討取代空白字元的效能,雖然這是個不起眼的效能評估,一般人不太會這樣去改,不過這是國外 PHP Framework 有人提出來修正的,經過許多人的測試一致同意。功能就是一篇文章內如果有多餘的空白能空取代成一個,一般人都會用 \s+ 正規語法,畢竟大家都知道 \s 代表單一空白或 \r 等符號,但是國外有人提出用 {2,} 方式來取代空白。程式碼如下,大家可以測試看看。

<?php
$nb = 10000;
$str = str_repeat('Hi, I am appleboy  ' . "\n", 10);
$t1 = microtime(true);
for ($i = $nb; $i--; ) {
    preg_replace('/\s+/', ' ', $str);
}
$t2 = microtime(true);
for ($i = $nb; $i--; ) {
    preg_replace('/ {2,}/', ' ', 
        str_replace(array("\r","\n","\t","\x0B","\x0C"),' ',$str)
    );
}
$t3 = microtime(true);

echo $t2 - $t1;
echo "\n";
echo $t3 - $t2;

測試結果(1萬次)

PHP 5.3.3
old: 0.13053798675537
new: 0.058536052703857

PHP 5.3.15
old: 0.11732506752014
new: 0.071418046951294

PHP 5.3.17
old: 0.11612010002136
new: 0.07065486907959

PHP 5.4.5
old: 0.1185781955719
new: 0.066012859344482

PHP 5.4.7
old: 0.11343121528625
new: 0.066931962966919

結論至少快蠻多的,如果整體資料量再大一點,我想差別會更大,那至於要不要用呢,就看個人了 XD。
2012-09-05 13:32

Apache 消失的 ServerLimit 參數

在某些版本的 Apache 中如果單純加大 MaxClients 的設定值,就會得到以下的錯誤訊息:
WARNING: MaxClients of 300 exceeds ServerLimit value of 256 servers,
  lowering MaxClients to 256. To increase, please see the ServerLimit
  directive.

這時必須再增加 ServerLimit 這個設定,而這個設定在設定檔中並沒有提示,所以需要額外加入。
<IfModule mpm_prefork_module>
    ServerLimit         500 # 額外加入
    StartServers         10
    MinSpareServers      10
    MaxSpareServers      20
    MaxClients          300
    MaxRequestsPerChild   0
</IfModule>

停止並啟動(單純 restart 無法套用設定)
service apache2 stop
service apache2 start

參考來源:
Gilbert.tw > Apache 之謎樣 ServerLimit 指令 (directive)
2012-09-05 13:01

[Ubuntu] 用 logrotate 定期切割 Apache log 檔

Ubuntu 預設已經為 Apache 建立了 log 分割管理,但在建立虛擬主機(Virtual Host),但又很龜毛的將 log 獨立到個別的子目錄下的話,預設的 logrotate 是沒有辦法處理到的,所以請記得為這龜毛的動作加上額外設定。

編輯屬於 Apache 的設定檔,在檔案最後面加上額外的設定。
vim /etc/logrotate.d/apache2
/var/log/apache2/blog/*.log {
    daily
    missingok
    rotate 52
    dateext
    compress
    delaycompress
    notifempty
    create 640 root adm
    sharedscripts
    postrotate
        /etc/init.d/apache2 reload > /dev/null
    endscript
}

參數說明:
daily 每天整理,其他還有 weekly, monthly, yearly
missingok 允許 log 檔不存在
nomissingok 不允許 log 檔不存在,會丟出錯誤 (預設)
rotate 7 保留 7 次的分割
size 1M 大小超過 1M 就執行分割,單位可以是 1024, 100k, 4M, 1G
dateext 用日期來建立分割檔名,而非流水號
dateformat -%Y%m%d 日期格式
compress 壓縮分割,預設用 gzip (預設)
nocompress 不壓縮分割
delaycompress 延後壓縮直到下一次 rotate
notifempty 如果 log 是空的就不執行
copytruncate 以[複製清空]的方式分割 log,這樣可以用不到 postrotate 設定
mail xxx@address 將分割內容用 mail 寄出
prerotate/endscript 分割前要執行的指令
postrotate/endscript 分割後要執行的指令


測試設定檔是否正確
logrotate -f /etc/logrotate.conf


參考來源:
使用 logrotate 定期整理 Rails Log 檔案
[ubuntu] 使用 logrotate 定期切割壓縮 apache2 的 log 檔
2012-09-05 11:46

[轉載] [MySQL] QueryCache原理

轉載自:PHP 程式 學習 筆記本 [Mysql]QueryCache原理

原理
QueryCache(下面簡稱QC)是根據SQL語句來cache的。一個SQL查詢如果以select開頭,那麼MySQL服務器將嘗試對其使用QC。每個Cache都是以SQL文本作為key來存的。在應用QC之前,SQL文本不會被作任何處理。也就是說,兩個SQL語句,只要相差哪怕是一個字符(例如大小寫不一樣;多一個空格等),那麼這兩個SQL將使用不同的一個CACHE。

不過SQL文本有可能會被客戶端做一些處理。例如在官方的命令行客戶端裡,在發送SQL給服務器之前,會做如下處理:
  • 過濾所有註釋
  • 去掉SQL文本前後的空格,TAB等字符。注意,是文本前面和後面的。中間的不會被去掉。


下面的三條SQL裡,因為SELECT大小寫的關係,最後一條和其他兩條在QC裡肯定是用的不一樣的存儲位置。而第一條和第二條,區別在於後者有個註釋,在不同客戶端,會有不一樣的結果。所以,保險起見,請儘量不要使用動態的註釋。在PHP的mysql擴展裡,SQL的註釋是不會被去掉的。也就是三條SQL會被存儲在三個不同的緩存裡,雖然它們的結果都是一樣的
SELECT * FROM people where name='surfchen';
SELECT * FROM people where /*hey~*/name='surfchen';
SELECT * FROM people where name='surfchen';


目前只有select語句會被cache,其他類似show,use的語句則不會被cache。

因為QC是如此前端,如此簡單的一個緩存系統,所以如果一個表被更新,那麼和這個表相關的SQL的所有QC都會被失效。假設一個聯合查詢裡涉及到了表A和表B,如果表A或者表B的其中一個被更新(update或者delete),這個查詢的QC將會失效。

也就是說,如果一個表被頻繁更新,那麼就要考慮清楚究竟是否應該對相關的一些SQL進行QC了。一個被頻繁更新的表如果被應用了QC,可能會加重數據庫的負擔,而不是減輕負擔。我一般的做法是默認打開QC,而對一些涉及頻繁更新的表的SQL語句加上SQL_NO_CACHE關鍵詞來對其禁用CACHE。這樣可以儘可能避免不必要的內存操作,儘可能保持內存的連續性。

那些查詢很分散的SQL語句,也不應該使用QC。例如用來查詢用戶和密碼的語句——「select pass from user where name='surfchen'」。這樣的語句,在一個系統裡,很有可能只在一個用戶登陸的時候被使用。每個用戶的登陸所用到的查詢,都是不一樣的SQL文本,QC在這裡就幾乎不起作用了,因為緩存的數據幾乎是不會被用到的,它們只會在內存裡佔地方。


存儲塊
在本節裡「存儲塊」和「block」是同一個意思
QC緩存一個查詢結果的時候,一般情況下不是一次性地分配足夠多的內存來緩存結果的。而是在查詢結果獲得的過程中,逐塊存儲。當一個存儲塊被填滿之後,一個新的存儲塊將會被創建,並分配內存(allocate)。單個存儲塊的內存分配大小通過query_cache_min_res_unit參數控制,默認為4KB。最後一個存儲塊,如果不能被全部利用,那麼沒使用的內存將會被釋放。如果被緩存的結果很大,那麼會可能會導致分配內存操作太頻繁,系統系能也隨之下降;而如果被緩存的結果都很小,那麼可能會導致內存碎片過多,這些碎片如果太小,就很有可能不能再被分配使用。

除了查詢結果需要存儲塊之外,每個SQL文本也需要一個存儲塊,而涉及到的表也需要一個存儲塊(表的存儲塊是所有線程共享的,每個表只需要一個存儲塊)。存儲塊總數量=查詢結果數量*2+涉及的數據庫表數量。也就是說,第一個緩存生成的時候,至少需要三個存儲塊:表信息存儲塊,SQL文本存儲塊,查詢結果存儲塊。而第二個查詢如果用的是同一個表,那麼最少只需要兩個存儲塊:SQL文本存儲塊,查詢結果存儲塊。

通過觀察Qcache_queries_in_cacheQcache_total_blocks可以知道平均每個緩存結果占用的存儲塊。它們的比例如果接近1:2,則說明當前的query_cache_min_res_unit參數已經足夠大了。如果Qcache_total_blocks比Qcache_queries_in_cache多很多,則需要增加query_cache_min_res_unit的大小。

Qcache_queries_in_cache * query_cache_min_res_unit(sql文本和表信息所在的block佔用的內存很小,可以忽略)如果遠遠大於query_cache_size-Qcache_free_memory,那麼可以嘗試減小query_cache_min_res_unit的值。


調整大小
如果Qcache_lowmem_prunes增長迅速,意味著很多緩存因為內存不夠而被釋放,而不是因為相關表被更新。嘗試加大query_cache_size,儘量使Qcache_lowmem_prunes零增長。


啟動參數
show variables like 'query_cache%' 可以看到這些信息。
query_cache_limit:如果單個查詢結果大於這個值,則不Cache
query_cache_size:分配給QC的內存。如果設為0,則相當于禁用QC。要注意QC必須使用大約40KB來存儲它的結構,如果設定小於40KB,則相當于禁用QC。QC存儲的最小單位是1024 byte,所以如果你設定了一個不是1024的倍數的值,這個值會被四捨五入到最接近當前值的等於1024的倍數的值。
query_cache_type:
0 完全禁止QC,不受SQL語句控制(另外可能要注意的是,即使這裡禁用,上面一個參數所設定的內存大小還是會被分配);
1啟用QC,可以在SQL語句使用SQL_NO_CACHE禁用
2可以在SQL語句使用SQL_CACHE啟用。

query_cache_min_res_unit:每次給QC結果分配內存的大小


狀態
show status like 'Qcache%' 可以看到這些信息。
Qcache_free_blocks:當一個表被更新之後,和它相關的cache blocks將被free。但是這個block依然可能存在隊列中,除非是在隊列的尾部。這些blocks將會被統計到這個值來。可以用FLUSH QUERY CACHE語句來清空free blocks。

其他幾個狀態變量的意義:
Qcache_free_memory 表示查詢緩存區現在還有多少的可用內存,如果很小,考慮增加query_cache_size
Qcache_hits 表示查詢緩存區的命中個數,也就是直接從查詢緩存區作出響應處理的查詢個數
Qcache_inserts 表示查詢緩存區此前總過緩存過多少條查詢命令的結果
Qcache_lowmem_prunes 表示查詢緩存區已滿而從其中溢出和刪除的查詢結果的個數
Qcache_not_cached 自mysql進程啟動起,沒有被cache的只讀查詢數量(包括select,show,use,desc等)
Qcache_queries_in_cache 當前被cache的SQL數量
Qcache_total_blocks:在QC中的blocks數。一個query可能被多個blocks存儲,而這幾個blocks中的最後一個,未用滿的內存將會被釋放掉。例如一個QC結果要佔6KB內存,如果query_cache_min_res_unit是4KB,則最後將會生成3個blocks,第一個block用來存儲sql語句文本,這個不會被統計到query+cache_size裡,第二個block為4KB,第三個block為2KB(先allocate4KB,然後釋放多餘的2KB)。每個表,當第一個和它有關的SQL查詢被CACHE的時候,會使用一個block來存儲表信息。也就是說,block會被用在三處地方:表信息,SQL文本,查詢結果。

優化提示:如果Qcache_lowmem_prunes 值比較大,表示查詢緩存區大小設置太小,需要增大。如果Qcache_free_blocks 較多,表示內存碎片較多,需要清理,flush query cache

根據我看的 《High Performance MySQL》中所述,關於query_cache_min_res_unit大小的調優,書中給出了一個計算公式,可以供調優設置參考:
query_cache_min_res_unit = (query_cache_size - Qcache_free_memory) / Qcache_queries_in_cache

還要注意一點的是,FLUSH QUERY CACHE 命令可以用來整理查詢緩存區的碎片,改善內存使用狀況,但不會清理查詢緩存區的內容,這個要和RESET QUERY CACHE相區別,不要混淆,後者才是清除查詢緩存區中
的所有的內容。
2012-06-04 01:29

[轉載] 自適應網頁設計

轉載自:自适应网页设计(Responsive Web Design) 阮一峰

随着 3G 的普及,越来越多的人使用手机上网。

移动设备正超过桌面设备,成为访问互联网的最常见终端。于是,网页设计师不得不面对一个难题:如何才能在不同大小的设备上呈现同样的网页?


手机的屏幕比较小,宽度通常在 600 像素以下,PC 的屏幕宽度,一般都在 1000 像素以上(目前主流宽度是1366×768),有的还达到了 2000 像素。同样的内容,要在大小迥异的屏幕上,都呈现出满意的效果,并不是一件容易的事。

很多网站的解决方法,是为不同的设备提供不同的网页,比如专门提供一个 mobile 版本,或者 iPhone / iPad 版本。这样做固然保证了效果,但是比较麻烦,同时要维护好几个版本,而且如果一个网站有多个 portal(入口),会大大增加架构设计的复杂度。

于是,很早就有人设想,能不能"一次设计,普遍适用",让同一张网页自动适应不同大小的屏幕,根据屏幕宽度,自动调整布局(layout)?


一、"自适应网页设计"的概念

2010 年,Ethan Marcotte 提出了"自适应网页设计"(Responsive Web Design)这个名词,指可以自动识别屏幕宽度、并做出相应调整的网页设计。

他制作了一个范例,里面是《福尔摩斯历险记》六个主人公的头像。如果屏幕宽度大于 1300 像素,则 6 张图片并排在一行。


如果屏幕宽度在 600 像素到 1300 像素之间,则 6 张图片分成两行。


如果屏幕宽度在 400 像素到 600 像素之间,则导航栏移到网页头部。


如果屏幕宽度在 400 像素以下,则 6 张图片分成三行。


mediaqueri.es 上面有更多这样的例子。

这里还有一个测试小工具,可以在一张网页上,同时显示不同分辨率屏幕的测试效果,我推荐安装。


二、允许网页宽度自动调整

"自适应网页设计"到底是怎么做到的?其实并不难。

首先,在网页代码的头部,加入一行 viewport元标签

<meta name="viewport" content="width=device-width, initial-scale=1" />

viewport 是网页默认的宽度和高度,上面这行代码的意思是,网页宽度默认等于屏幕宽度(width=device-width),原始缩放比例(initial-scale=1)为 1.0,即网页初始大小占屏幕面积的 100%。

所有主流浏览器都支持这个设置,包括 IE9。对于那些老式浏览器(主要是 IE6、7、8),需要使用 css3-mediaqueries.js

<!--[if lt IE 9]>
    <script src="http://css3-mediaqueries-js.googlecode.com/svn/trunk/css3-mediaqueries.js"></script>
<![endif]-->


三、不使用绝对宽度

由于网页会根据屏幕宽度调整布局,所以不能使用绝对宽度的布局,也不能使用具有绝对宽度的元素。这一条非常重要。

具体说,CSS代码不能指定像素宽度:

width: xxx px;

只能指定百分比宽度:

width: xx%;

或者

width: auto;


四、相对大小的字体

字体也不能使用绝对大小(px),而只能使用相对大小(em)。

body {
    font: normal 100% Helvetica, Arial, sans-serif;
}

上面的代码指定,字体大小是页面默认大小的 100%,即 16 像素。

h1 {
    font-size: 1.5em; 
}

然后,h1 的大小是默认大小的 1.5 倍,即 24 像素(24/16=1.5)。

small {
    font-size: 0.875em;
}

small 元素的大小是默认大小的 0.875 倍,即 14 像素(14/16=0.875)。


五、流动布局(fluid grid)

"流动布局"的含义是,各个区块的位置都是浮动的,不是固定不变的。

.main {
    float: right;
    width: 70%; 
}

.leftBar {
    float: left;
    width: 25%;
}

float 的好处是,如果宽度太小,放不下两个元素,后面的元素会自动滚动到前面元素的下方,不会在水平方向 overflow(溢出),避免了水平滚动条的出现。

另外,绝对定位(position: absolute)的使用,也要非常小心。


六、选择加载CSS

"自适应网页设计"的核心,就是 CSS3 引入的 Media Query 模块。

它的意思就是,自动探测屏幕宽度,然后加载相应的 CSS 文件。

<link rel="stylesheet" type="text/css" media="screen and (max-device-width: 400px)" href="tinyScreen.css" />

上面的代码意思是,如果屏幕宽度小于 400 像素(max-device-width: 400px),就加载 tinyScreen.css 文件。

<link rel="stylesheet" type="text/css" media="screen and (min-width: 400px) and (max-device-width: 600px)" href="smallScreen.css" />

如果屏幕宽度在 400 像素到 600 像素之间,则加载 smallScreen.css 文件。

除了用 html 标签加载 CSS 文件,还可以在现有 CSS 文件中加载。

@import url("tinyScreen.css") screen and (max-device-width: 400px);


七、CSS 的 @media 规则

同一个 CSS 文件中,也可以根据不同的屏幕分辨率,选择应用不同的 CSS 规则。

@media screen and (max-device-width: 400px) {
    .column {
        float: none;
        width: auto;
    }
    #sidebar {
        display: none;
    }
}

上面的代码意思是,如果屏幕宽度小于 400 像素,则 column 块取消浮动(float:none)、宽度自动调节(width:auto),sidebar 块不显示(display:none)。


八、图片的自适应(fluid image)

除了布局和文本,"自适应网页设计"还必须实现图片的自动缩放

这只要一行 CSS 代码:

img { max-width: 100%; }

这行代码对于大多数嵌入网页的视频也有效,所以可以写成:

img, object { max-width: 100%; }

老版本的 IE 不支持 max-width,所以只好写成:

img { width: 100%; }

此外,windows 平台缩放图片时,可能出现图像失真现象。这时,可以尝试使用 IE 的专有命令:

img { -ms-interpolation-mode: bicubic; }

或者,Ethan Marcotte 的 imgSizer.js

addLoadEvent(function() {
    var imgs = document.getElementById("content").getElementsByTagName("img");
    imgSizer.collate(imgs);
});

不过,有条件的话,最好还是根据不同大小的屏幕,加载不同分辨率的图片。有很多方法可以做到这一条,服务器端和客户端都可以实现。

(完)
2012-05-05 01:53

[轉載] 让PHP更快的提供文件下载

作者:Laruence
本文地址:http://www.laruence.com/2012/05/02/2613.html

一般来说, 我们可以通过直接让URL指向一个位于Document Root下面的文件, 来引导用户下载文件.

但是, 这样做, 就没办法做一些统计, 权限检查, 等等的工作. 于是, 很多时候, 我们采用让PHP来做转发, 为用户提供文件下载.

<?php
    $file = "/tmp/dummy.tar.gz";
    header("Content-type: application/octet-stream");
    header('Content-Disposition: attachment; filename="' 
        . basename($file) . '"');
    header("Content-Length: ". filesize($file));
    readfile($file);

但是这个有一个问题, 就是如果文件是中文名的话, 有的用户可能下载后的文件名是乱码.

于是, 我们做一下修改(参考: :

<?php
    $file = "/tmp/中文名.tar.gz";
 
    $filename = basename($file);
 
    header("Content-type: application/octet-stream");
 
    //处理中文文件名
    $ua = $_SERVER["HTTP_USER_AGENT"];
    $encoded_filename = urlencode($filename);
    $encoded_filename = str_replace("+", "%20", $encoded_filename);
    if (preg_match("/MSIE/", $ua)) {
        header('Content-Disposition: attachment; filename="'
            . $encoded_filename . '"');
    } else if (preg_match("/Firefox/", $ua)) {
        header("Content-Disposition: attachment; filename*=\"utf8''"
            . $filename . '"');
    } else {
        header('Content-Disposition: attachment; filename="'
            . $filename . '"');
    }
 
    header('Content-Disposition: attachment; filename="'
        . $filename . '"');
    header("Content-Length: ". filesize($file));
    readfile($file);

恩, 现在看起来好多了, 不过还有一个问题, 那就是readfile, 虽然PHP的readfile尝试实现的尽量高效, 不占用PHP本身的内存, 但是实际上它还是需要采用MMAP(如果支持), 或者是一个固定的buffer去循环读取文件, 直接输出.

输出的时候, 如果是Apache + PHP mod, 那么还需要发送到Apache的输出缓冲区. 最后才发送给用户. 而对于Nginx + fpm如果他们分开部署的话, 那还会带来额外的网络IO.

那么, 能不能不经过PHP这层, 直接让Webserver直接把文件发送给用户呢?

今天, 我看到了一个有意思的文章: How I PHP: X-SendFile.

我们可以使用Apache的module mod_xsendfile, 让Apache直接发送这个文件给用户:

<?php
    $file = "/tmp/中文名.tar.gz";
 
    $filename = basename($file);
 
    header("Content-type: application/octet-stream");
 
    //处理中文文件名
    $ua = $_SERVER["HTTP_USER_AGENT"];
    $encoded_filename = urlencode($filename);
    $encoded_filename = str_replace("+", "%20", $encoded_filename);
    if (preg_match("/MSIE/", $ua)) {
        header('Content-Disposition: attachment; filename="'
            . $encoded_filename . '"');
    } else if (preg_match("/Firefox/", $ua)) {
        header("Content-Disposition: attachment; filename*=\"utf8''"
            . $filename . '"');
    } else {
        header('Content-Disposition: attachment; filename="'
            . $filename . '"');
    }
 
    header('Content-Disposition: attachment; filename="'
            . basename($file) . '"');
 
    //让Xsendfile发送文件
    header("X-Sendfile: $file");

X-Sendfile头将被Apache处理, 并且把响应的文件直接发送给Client.

Lighttpd和Nginx也有类似的模块, 大家有兴趣的可以去找找看


mod-xsendfile 在 Ubuntu 的安裝方法:
sudo apt-get install libapache2-mod-xsendfile
2012-05-05 01:27

[PHP] 使用 php5-ffmpeg 擷取影片圖片

前幾天在玩 FFmpeg 的時後,突然發現 Ubuntu 上多了 php5-ffmpeg 這個擴充套件,就想來玩玩看,看好不好用,有兩個結論:
  1. 讀取影片取決於 FFmpeg 的支援性,如果想要什麼格式都支援的話,建議自己重新編譯 FFmpeg。
  2. 效率並沒有我想像中的快,兩分鐘的影片取十張圖,大約 30 秒。
安裝方法:
sudo apt-get install ffmpeg php5-ffmpeg php5-gd

擷圖測試範例:
<?php
$page = 10;
$prefix = 'screencap';

$mov = new ffmpeg_movie('gt.avi');
$count = $mov->getFrameCount();
$range = (int)round($count/($page+1));

for($i=1; $i<=$page; $i++){
    $frameNum = $range*$i;
    $imgFile = $prefix.'_'.$i.'.png';

    $frame = $mov->getFrame($frameNum);
    if(!$frame){ continue; }

    $gdImage = $frame->toGDImage();
    if(!$gdImage){ continue; }

    imagepng($gdImage, $imgFile);
    imagedestroy($gdImage);

    echo '<img src="'.$imgFile.'" border="1" /><br />';
}

參考文件:
ffmpeg_movie object methods
FFmpeg and PHP
2012-05-03 14:49

[Ubuntu 11] HTTP Live Streaming 安裝與測試

安裝 Apache
apt-get install apache2

/etc/apache2/mods-available/mime.conf 加入以下內容:
# HLS file type
AddType application/x-mpegURL .m3u8
AddType video/MP2T .ts


Ubuntu 11.04 預設的 FFmpeg 是沒有啟用 h.264 的支援,所以要自己編譯。

安裝編譯時所需要的套件
apt-get update
apt-get install build-essential checkinstall subversion git libfaac-dev libjack-jackd2-dev libmp3lame-dev libopencore-amrnb-dev libopencore-amrwb-dev libsdl1.2-dev libtheora-dev libva-dev libvdpau-dev libvorbis-dev libx11-dev libxfixes-dev libxvidcore-dev texi2html yasm zlib1g-dev libx264-dev librtmp-dev


編譯 FFmpeg
cd /opt
git clone git://git.videolan.org/ffmpeg
cd ffmpeg

./configure --prefix=/usr --enable-libopencore-amrnb --enable-libopencore-amrwb --enable-libfaac --enable-libmp3lame --enable-libtheora --enable-libvorbis --enable-libx264 --enable-libxvid --disable-ffplay --enable-shared --enable-gpl --enable-postproc --enable-version3 --enable-nonfree --enable-avfilter --enable-pthreads --enable-vdpau --enable-librtmp 

make -j$(grep processor /proc/cpuinfo |wc -l)

checkinstall --pkgname=ffmpeg --pkgversion="5.0.1" --backup=no --deldoc=yes --default


segmenter 是用來切割 FFmpeg 轉好的 ts 檔
編譯 segmenter
cd /opt
svn co http://httpsegmenter.googlecode.com/svn/trunk
cd trunk

sed 's/\/local//g' Makefile.txt > Makefile

make -j$(grep processor /proc/cpuinfo |wc -l)
checkinstall --pkgname=segmenter --pkgversion="2" --backup=no --deldoc=yes --default


測試影片轉檔
cd /var/www
ffmpeg -i gt4.avi -f mpegts -vcodec libx264 -acodec libmp3lame gt4_pre.ts

ffmpeg -i gt4.avi -f mpegts -acodec libmp3lame -ar 48000 -ab 64k -s 720x480 -vcodec libx264 -b 800k -flags +loop -cmp +chroma -partitions +parti4x4+partp8x8+partb8x8 -subq 5 -trellis 1 -refs 1 -coder 0 -me_range 16 -keyint_min 25 -sc_threshold 40 -i_qfactor 0.71 -bt 200k -maxrate 800k -bufsize 800k -rc_eq 'blurCplx^(1-qComp)' -qcomp 0.6 -qmin 10 -qmax 51 -qdiff 4 -level 30 -aspect 720:480 -g 30 -async 2 gt4_pre.ts


測試 RTMP 串接轉檔
ffmpeg -i rtmp://flashstream.adobe.com/ondemand/flash/cs5/prod/production-performance_400x224 -f mpegts -vcodec libx264 -acodec libmp3lame rtmp_pre.ts


測試影片切割
segmenter -i gt4_pre.ts -d 10 -o gt4_pre -x stream.m3u8 -p http://192.168.0.10/


利用 pipe 從轉檔到切割
ffmpeg -i gt4.avi -f mpegts -vcodec libx264 -acodec libmp3lame - |segmenter -i - -d 10 -o gt4_pre -x stream.m3u8 -p http://192.168.0.10/


m3u8 檔案格式
#EXTM3U
#EXT-X-TARGETDURATION:10
#EXTINF:11,
http://192.168.0.10/gt4_pre-1.ts
#EXTINF:11,
http://192.168.0.10/gt4_pre-2.ts
#EXTINF:11,
http://192.168.0.10/gt4_pre-3.ts
#EXTINF:11,
http://192.168.0.10/gt4_pre-4.ts
#EXTINF:5,
http://192.168.0.10/gt4_pre-5.ts
#EXT-X-ENDLIST


以 HTML5 播放影片
<html>
  <head><title>Video Test</title></head>
  <body>
    <center>
      <video tabindex="0" width="720" height="480"><source src="/stream.m3u8"></video>
    </center>
  </body>
</html>


參考文件:
How to compile and install ffmpeg in Ubuntu 11.04
Install FFmpeg and x264 on Ubuntu Lucid Lynx 10.04 LTS
iPhone HTTP Streaming with FFMpeg and an Open Source Segmenter
HTTP Live Streaming draft-pantos-http-live-streaming-08
http live streaming(m3u8 streaming)(m3u8)
2012-04-29 21:16

[Linux] 檢查 SAMBA 與 NFS Server 是否存在

通常會透過 /etc/fstab 來處理掛載的設定,然後再使用 mount -a 來重新確認掛載,最好在排程的程序用到掛載目錄時也執行一次 mount -a,掛載目錄在斷線後是不會自動回復的,mount -a 的 Timeout 其實還蠻久的,尤其是 Server 不存在的時候,所以最好還是用對應的 client 先確認 server 是否存在。

而檢查 NFS 的 client 可以用 showmount 來處理,在 Ubuntu 上的安裝方式如下:
sudo aptitude install nfs-common

而 SAMBA 的 client 則是用 smbclient,在 Ubuntu 上的安裝方式如下:
sudo aptitude install smbclient


檢查 NFS Server 是否存在的流程

以 Shell 的方式檢查
# 先以 client 確認 server 是否存在
/sbin/showmount 192.168.0.6 >/dev/null 2>&1
if [ "j$?" != "j0" ]; then  
    echo "NFS Server is not exist"
    exit 1
fi

# 重新確認掛載 
mount -a >/dev/null 2>&1
if [ "j$?" != "j0" ]; then
    echo "NFS Server mount failed"
    exit 1;
fi

以 PHP 的方式檢查
/*先以 client 確認 server 是否存在*/ 
$state = shell_exec('/sbin/showmount 192.168.0.6 >/dev/null 2>&1; echo $?');
if(trim($state)!='0'){
    echo "NFS Server is not exist";
    exit;
}

/*重新確認掛載*/ 
if(shell_exec('mount -a 2>&1')){
    echo "NFS Server mount failed"
    exit;
}


檢查 SAMBA Server 是否存在的流程

以 Shell 的方式檢查
# 先以 client 確認 server 是否存在
smbclient -NL //192.168.0.6 >/dev/null 2>&1
if [ "j$?" != "j0" ]; then  
    echo "SAMBA Server is not exist"
    exit 1
fi

# 重新確認掛載 
mount -a >/dev/null 2>&1
if [ "j$?" != "j0" ]; then
    echo "SAMBA Server mount failed"
    exit 1;
fi

以 PHP 的方式檢查
/*先以 client 確認 server 是否存在*/ 
$state = shell_exec('smbclient -NL //192.168.0.6 >/dev/null 2>&1; echo $?');
if(trim($state)!='0'){
    echo "SAMBA Server is not exist";
    exit;
}

/*重新確認掛載*/ 
if(shell_exec('mount -a 2>&1')){
    echo "SAMBA Server mount failed"
    exit;
}
2012-04-23 16:47

[PHP] 簡易的圖片相似度比較

由於相似图片搜索的php实现的 API 不怎麼符合我的用途,所以我重新定義 API 的架構,改寫成比較簡單的函數方式,雖然還是用物件的方式包裝。

<?php
/**
 * 圖片相似度比較
 *
 * @version     $Id: ImageHash.php 4429 2012-04-17 13:20:31Z jax $
 * @author      jax.hu
 *
 * <code>
 *  //Sample_1
 *  $aHash = ImageHash::hashImageFile('wsz.11.jpg');
 *  $bHash = ImageHash::hashImageFile('wsz.12.jpg');
 *  var_dump(ImageHash::isHashSimilar($aHash, $bHash));
 *
 *  //Sample_2
 *  var_dump(ImageHash::isImageFileSimilar('wsz.11.jpg', 'wsz.12.jpg'));
 * </code>
 */

class ImageHash {

    /**取樣倍率 1~10
     * @access public
     * @staticvar int
     * */
    public static $rate = 2;

    /**相似度允許值 0~64
     * @access public
     * @staticvar int
     * */
    public static $similarity = 80;

    /**圖片類型對應的開啟函數
     * @access private
     * @staticvar string
     * */
    private static $_createFunc = array(
        IMAGETYPE_GIF   =>'imageCreateFromGIF',
        IMAGETYPE_JPEG  =>'imageCreateFromJPEG',
        IMAGETYPE_PNG   =>'imageCreateFromPNG',
        IMAGETYPE_BMP   =>'imageCreateFromBMP',
        IMAGETYPE_WBMP  =>'imageCreateFromWBMP',
        IMAGETYPE_XBM   =>'imageCreateFromXBM',
    );


    /**從檔案建立圖片
     * @param string $filePath 檔案位址路徑
     * @return resource 當成功開啟圖片則回傳圖片 resource ID,失敗則是 false
     * */
    public static function createImage($filePath){
        if(!file_exists($filePath)){ return false; }

        /*判斷檔案類型是否可以開啟*/
        $type = exif_imagetype($filePath);
        if(!array_key_exists($type,self::$_createFunc)){ return false; }

        $func = self::$_createFunc[$type];
        if(!function_exists($func)){ return false; }

        return $func($filePath);
    }


    /**hash 圖片
     * @param resource $src 圖片 resource ID
     * @return string 圖片 hash 值,失敗則是 false
     * */
    public static function hashImage($src){
        if(!$src){ return false; }

        /*缩小圖片尺寸*/
        $delta = 8 * self::$rate;
        $img = imageCreateTrueColor($delta,$delta);
        imageCopyResized($img,$src, 0,0,0,0, $delta,$delta,imagesX($src),imagesY($src));

        /*計算圖片灰階值*/
        $grayArray = array();
        for ($y=0; $y<$delta; $y++){
            for ($x=0; $x<$delta; $x++){
                $rgb = imagecolorat($img,$x,$y);
                $col = imagecolorsforindex($img, $rgb);
                $gray = intval(($col['red']+$col['green']+$col['blue'])/3)& 0xFF;

                $grayArray[] = $gray;
            }
        }
        imagedestroy($img);

        /*計算所有像素的灰階平均值*/
        $average = array_sum($grayArray)/count($grayArray);

        /*計算 hash 值*/
        $hashStr = '';
        foreach ($grayArray as $gray){
            $hashStr .= ($gray>=$average) ? '1' : '0';
        }

        return $hashStr;
    }


    /**hash 圖片檔案
     * @param string $filePath 檔案位址路徑
     * @return string 圖片 hash 值,失敗則是 false
     * */
    public static function hashImageFile($filePath){
        $src = self::createImage($filePath);
        $hashStr = self::hashImage($src);
        imagedestroy($src);

        return $hashStr;
    }


    /**比較兩個 hash 值,是不是相似
     * @param string $aHash A圖片的 hash 值
     * @param string $bHash B圖片的 hash 值
     * @return bool 當圖片相似則回傳 true,否則是 false
     * */
    public static function isHashSimilar($aHash, $bHash){
        $aL = strlen($aHash); $bL = strlen($bHash);
        if ($aL !== $bL){ return false; }

        /*計算容許落差的數量*/
        $allowGap = $aL*(100-self::$similarity)/100;

        /*計算兩個 hash 值的漢明距離*/
        $distance = 0;
        for($i=0; $i<$aL; $i++){
            if ($aHash{$i} !== $bHash{$i}){ $distance++; }
        }

        return ($distance<=$allowGap) ? true : false;
    }


    /**比較兩個圖片檔案,是不是相似
     * @param string $aHash A圖片的路徑
     * @param string $bHash B圖片的路徑
     * @return bool 當圖片相似則回傳 true,否則是 false
     * */
    public static function isImageFileSimilar($aPath, $bPath){
        $aHash = ImageHash::hashImageFile($aPath);
        $bHash = ImageHash::hashImageFile($bPath);
        return ImageHash::isHashSimilar($aHash, $bHash);
    }

}
2012-04-12 14:03

[Ubuntu] 時間同步設定

繼上次Ubuntu 時間及時區設定 [Linux]那篇文章後,最近有學到新的時間同步的設定方式。

vim /etc/cron.daily/ntpdate
#!/bin/bash

# Sync NTP Server
ntpdate -s tock.stdtime.gov.tw watch.stdtime.gov.tw time.stdtime.gov.tw clock.stdtime.gov.tw tick.stdtime.gov.tw ntp.ubuntu.com pool.ntp.org

# Update BIOS time
hwclock --systohc

chmod +x /etc/cron.daily/ntpdate
2012-04-11 21:09

[MySQL] 整數型態的大小

類型Byte肯定位數最大位數最大值無符號最大值
TINYINT123127255
SMALLINT2453276765535
MEDIUMINT378838860716777215
INT491021474836474294967296
BIGINT81920922337203685477580718446744073709551615
2012-03-16 22:55

[PHP] 檢查 XML 文件結構

利用 SimpleXML 去檢查 XML 結構是否符合規格,為了讓這個程式可以多用途,採用了一個基準文件的作為結構準則,依據裡面定義的節點跟屬性,去檢查文件是否符合基本要求的格式。

<?php

/**檢查 XML 文件結構
 * @param string $baseFilePath 基準結構文件
 * @param string $checkFilePath 待檢查文件
 * @return bool 當結構與基準文件相符合時則回傳 true,否則是 false
 * */
function checkXmlFileStructure($baseFilePath,$checkFilePath){
    /*開啟 Base File*/
    if(!file_exists($baseFilePath)){ return false; }
    $base = simplexml_load_file($baseFilePath);
    if($base===false){ return false; }

    /*開啟 Check File*/
    if(!file_exists($checkFilePath)){ return false; }
    $check = simplexml_load_file($checkFilePath);
    if($check===false){ return false; }

    /*比較起始點的名稱*/
    if($base->getName() != $check->getName()){ return false; }

    /*比較結構*/
    return checkXmlStructure($base,$check);
}

/**檢查 XML 結構
 * @param SimpleXMLElement $base 基準結構物件
 * @param SimpleXMLElement $check 待檢查 XML 物件
 * @return bool 當結構與基準物件相符合時則回傳 true,否則是 false
 * */
function checkXmlStructure($base,$check){
    /*檢查屬性*/
    foreach ($base->attributes() as $name => $baseAttr){
        /*必要的屬性不存在*/
        if(!isset($check->attributes()->$name)){ return false; }
    }

    /*當沒有子節點時,則檢查對象也不能有子節點*/
    if(count($base->children())==0){
        return (count($check->children())==0);
    }

    /*將檢查對象的子節點分群*/
    $checkChilds = array();
    foreach($check->children() as $name => $child){
        $checkChilds[$name][] = $child;
    }

    /*檢查子節點*/
    $checked = array();
    foreach($base->children() as $name => $baseChild){
        /*跳過已經檢查的子節點*/
        if(in_array($name, $checked)){ continue; }
        $checked[] = $name;

        /*檢查必要的子節點是否存在*/
        if(empty($checkChilds[$name])){ return false; }

        foreach ($checkChilds[$name] as $child){
            /*遞迴檢查子節點*/
            if( !checkXmlStructure($baseChild, $child) ){ return false; }
        }
    }

    return true;
}


/*==============================================================================*/

if(isset($_SERVER['argv'])){
    parse_str(preg_replace('/&[\-]+/','&',join('&',$_SERVER['argv'])), $_GET);

    if(empty($_GET['base_file']) || empty($_GET['check_file'])){
        echo "Run: ".basename(__FILE__)." base_file=base.xml check_file=check.xml\n"; exit(1);
    }

    exit( checkXmlFileStructure($_GET['base_file'],$_GET['check_file']) ? 0 : 1);

}else{
    if(empty($_GET['base_file']) || empty($_GET['check_file'])){
        echo "Run: ".basename(__FILE__)."?base_file=base.xml&check_file=check.xml<br />"; exit;
    }

    echo( checkXmlFileStructure($_GET['base_file'],$_GET['check_file']) ? '1' : '0');
}


使用方式(shell)
php check_xml_file_structure.php base_file=base.xml check_file=check.xml

if [ "j$?" != "j0" ]; then
    echo "Run Error"
fi


測試範例 1
base_1.xml
<?xml version="1.0" encoding="UTF-8"?>
<items>
    <item>
        <Category>Category文字</Category>
        <Title>Title文字</Title>
    </item>
</items>

check_1.xml
<?xml version="1.0" encoding="UTF-8"?>
<items>
    <item>
        <Category>Category文字</Category>
        <Title>Title文字</Title>
    </item>
    <item>
        <Category>Category文字</Category>
        <Title>Title文字</Title>
        <Description>Description文字</Description>
    </item>
</items>


測試範例 2
base_2.xml
<?xml version="1.0" encoding="UTF-8"?>
<items>
    <item category="Category文字" Title="Title文字"/>
</items>

check_2.xml
<?xml version="1.0" encoding="UTF-8"?>
<items>
    <item category="Category文字" Title="Title文字" Description="Description文字" />
    <item category="Category文字" Title="Title文字" />
    <item category="Category文字" Title="Title文字" Description="Description文字" />
</items>
2012-03-14 14:48

[Ubuntu 11] 安裝 Redmine 與 SVN

安裝 LAMP & Redmine
# 安裝 LAMP
apt-get install apache2 php5 mysql-server php5-mysql libapache2-mod-php5 libapache2-mod-auth-mysql 

# 安裝 svn, dav_svn
apt-get install subversion libapache2-svn 

# 安裝 redmine
apt-get install redmine redmine-mysql libapache2-mod-fcgid libapache2-mod-passenger

# 可以使用下面的方式重新設定 redmine DB 連結
#dpkg-reconfigure redmine 

# 啟用 Apache 套件 php5, headers, expires
a2enmod php5 dav_svn auth_mysql cgid fcgid passenger rewrite ssl setenvif 

# 安裝 git, phpmyadmin
apt-get install mercurial git-core phpmyadmin

# 連結 phpmyadmin 設定檔
cd /etc/apache2/conf.d/
ln -s ../../phpmyadmin/apache.conf phpmyadmin.conf
service apache2 restart


安裝 Redmine 套件
gem install pandoc-ruby rdiscount rpeg-markdown bluefeather

cd /usr/share/redmine/vendor/plugins


# 安裝 Code Review 套件
hg clone https://bitbucket.org/haru_iida/redmine_code_review
rake db:migrate_plugins RAILS_ENV=production


# 安裝 Markdown Extra formatter 套件
git clone git://github.com/juno/redmine_markdown_extra_formatter.git


# 安裝 reStructuredText formatting 套件
git clone git://github.com/alphabetum/redmine_restructuredtext_formatter.git
cd redmine_restructuredtext_formatter
git checkout pandoc-ruby


建立SVN庫
mkdir -p /home/repoadmin/repos
svnadmin create /home/repoadmin/repos/team1
svnadmin create /home/repoadmin/repos/team2
chown -R www-data:www-data /home/repoadmin/repos


建立SVN認證時需要的DB使用者(redmine_svn_auth)
CREATE USER 'redmine_svn_auth'@'localhost' IDENTIFIED BY 'redmine_svn_auth';
GRANT SELECT(id, login, hashed_password, status ,type) ON redmine_default.users TO 'redmine_svn_auth'@'localhost';


設定 Apache2 Site
cd /etc/apache2/sites-available/
cp default redmine_svn
vim redmine_svn

<VirtualHost *:80>
    ServerAdmin webmaster@localhost
    DocumentRoot /usr/share/redmine/public

    <Directory />
        Options FollowSymLinks
        AllowOverride None
    </Directory>

    <Directory /usr/share/redmine/public>
        Options ExecCGI FollowSymLinks
        AllowOverride None
        Order allow,deny
        Allow from all

        RewriteEngine On
        RewriteRule ^$ index.html [QSA]
        RewriteRule ^([^.]+)$ $1.html [QSA]
        RewriteCond %{REQUEST_FILENAME} !-f [OR]
        RewriteCond %{REQUEST_FILENAME} dispatch.fcgi$
        RewriteRule ^(.*)$ dispatch.fcgi [QSA,L]
    </Directory>

    <Location /svn>
        DAV svn
        SVNParentPath /home/repoadmin/repos
        SVNPathAuthz off

        AuthBasicAuthoritative Off
        AuthUserFile /dev/null
        AuthType Basic
        AuthName "Subversion Repository"

        # auth_mysql help in http://localhost/doc/libapache2-mod-auth-mysql/DIRECTIVES.gz
        Auth_MYSQL On
        Auth_MySQL_Host localhost
        Auth_MYSQL_DB redmine_default
        Auth_MYSQL_Username redmine_svn_auth
        Auth_MYSQL_Password redmine_svn_auth
        Auth_MYSQL_Password_Table users
        Auth_MYSQL_Username_Field login
        Auth_MYSQL_Password_Field hashed_password
        Auth_MySQL_Password_Clause " AND status=1 AND type='User' "
        Auth_MYSQL_Empty_Passwords Off
        Auth_MYSQL_Encryption_Types SHA1Sum
        # Options: Crypt_DES, Crypt_MD5, Crypt, PHP_MD5, SHA1Sum, MySQL, Apache

        Require valid-user
    </Location>

    LogLevel warn
    CustomLog /var/log/apache2/redmine_access.log combined
    ErrorLog /var/log/apache2/redmine_error.log
</VirtualHost>


重新啟動 Apache
a2dissite default
a2ensite redmine_svn
service apache2 restart


測試網址


參考來源:
將 Redmine 安裝於 Debian、Ubuntu Linux
Ubuntu 10.04 using Passenger
svn 使用和 redmine 相同帳號進行認證
2012-03-08 19:38

Aptana Unified Builder 卡住

Aptana 2 的建置器(Aptana Unified Builder)時不時就會卡住,通常會發生這種狀況的原因,就是專案中有某個檔案無法正常解析,或路徑不對造成的。

解決的辦法是先關閉『專案->自動建置』,然後將有問題的專案複製一份到新的工作區,然後用過濾法找出無效的檔案,然後先刪除再重新建立。
2012-03-08 16:43

Ubuntu 10 設定預設語系

sudo vim /etc/default/locale
LANG="zh_TW.UTF-8"
LANGUAGE="zh_TW:zh"
2012-03-08 16:00

[Linux] 使用 MD5 檢查 FTP 上傳的檔案

#!/bin/bash
PATH=/bin:/sbin:/usr/bin:/usr/sbin:/usr/local/bin:/usr/local/sbin:~/bin
export PATH

MAIL_TO="my_mail@gmail.com"
TARGET_PATH="/var/www/file/show.mp4"
FILE="upload_file"
EXTEND="mp4"

cd /home/ftp_user


# md5 file is not exist
if [ ! -f $FILE.md5 ]; then exit 0; fi

# MD5 check sum 
md5sum -c $FILE.md5 >/dev/null 2>&1
if [ "j$?" != "j0" ]; then  
 # Notice: md5 check fail 
 echo "" |mail -s "[Failed] $FILE.$EXTEND md5 check sum fail" $MAIL_TO
 rm -f ./$FILE.md5
 exit 1; 
fi

mv ./$FILE.$EXTEND $TARGET_PATH
rm -f ./$FILE.md5

exit 0;
2012-03-07 14:06

[Ubuntu] 安裝 Oracle Client 與 PDO_OCI

Oracle Database Instant Client 下載 Client/SDK
(Version 10.2.0.4 Instant Client Package - Basic, Instant Client Package - SDK)
oracle-instantclient-basic-10.2.0.4-1.i386.rpm
oracle-instantclient-devel-10.2.0.4-1.i386.rpm

# 安裝套件轉換器
apt-get install alien 

# 轉換 rpm 套件到 deb,並安裝
alien -i oracle-instantclient-basic*.rpm
alien -i oracle-instantclient-devel*.rpm

# 安裝 Apache2,PHP,MySQL
apt-get install apache2 php5 mysql-server php5-mysql libapache2-mod-php5

# 安裝 PEAR 
apt-get install php-pear php5-dev dh-make-php make re2c

# 下載 PDO_OCI 原始檔 
pecl download pdo
pecl download pdo_oci
tar zxvf PDO-1.0.3.tgz
tar zxvf PDO_OCI-1.0.tgz

mkdir -p PDO_OCI-1.0/include/php/ext/
mv PDO-1.0.3 PDO_OCI-1.0/include/php/ext/pdo
cd PDO_OCI-1.0/
phpize
./configure --with-pdo-oci=instantclient,/usr,10.2.0.4

make -j$(grep processor /proc/cpuinfo |wc -l)
make install  # /usr/lib/php5/20xxxxxx+lfs/pdo_oci.so

vim /etc/php5/conf.d/pdo_oci.ini # 建立 pdo_oci.ini, 內容如下:
extension=pdo_oci.so

vim /etc/apache2/envvars # 在最後面加入環境變數, 內容如下: 
export NLS_LANG="TRADITIONAL CHINESE_TAIWAN.UTF8"
export NLS_DATE_FORMAT="YYYY-MM-DD HH24:MI:SS"

# 重新啟動 Apache 
service apache2 restart

參考來源:
Debian 安裝設定 PHP 連 Oracle extension 使用 PDO(PDO_OCI)
Oracle Instant Client
2012-02-13 11:51

Excel 提醒重複輸入相同的資料

先來瞭解一下 COUNTIF 的使用方式,以下是 Office 官方的片段說明:
計算某範圍內符合某搜尋準則的儲存格個數。
語法:COUNTIF(range,criteria)
range
是您想計算符合準則之儲存格個數的儲存格範圍。
criteria
是用以決定是否要列入計算的搜尋準則,可以是數字、表示式或文字。例如,criteria 可以是 32、"32"、">32" 或 "apples"。


只要在『資料驗證』中加入重複資料檢查的條件,就可以自動提醒重複輸入相同的資料,不囉唆!看圖說故事吧!

先將 A 欄整個選取,然後『資料 -> 驗證』


設定 -> 選擇『自訂』 -> 公式 =COUNTIF(A:A,A1)=1


在『錯誤提醒』中填寫想要的提示訊息


增加一個相同的資料來測試一下
2012-02-13 10:48

Excel 使用[自動篩選]找出重複的資料

先來瞭解一下 COUNTIF 的使用方式,以下是 Office 官方的片段說明:
計算某範圍內符合某搜尋準則的儲存格個數。
語法:COUNTIF(range,criteria)
range
是您想計算符合準則之儲存格個數的儲存格範圍。
criteria
是用以決定是否要列入計算的搜尋準則,可以是數字、表示式或文字。例如,criteria 可以是 32、"32"、">32" 或 "apples"。


只要能算出重複的數量,就可以使用『自動篩選』來找出重複資料了,所以需要額外的欄位來計算重複的數量,太多廢話了,還是看圖說故事吧!

在B欄加入公式=COUNTIF(A:A,A2)


選擇B1這個欄位,然後『資料 -> 篩選 -> 自動篩選


接著在篩選選項中選擇『(自訂...)


將重複數量大於 1 的項目篩選出來


很簡單就可以找出重複的資料了
2012-02-13 10:16

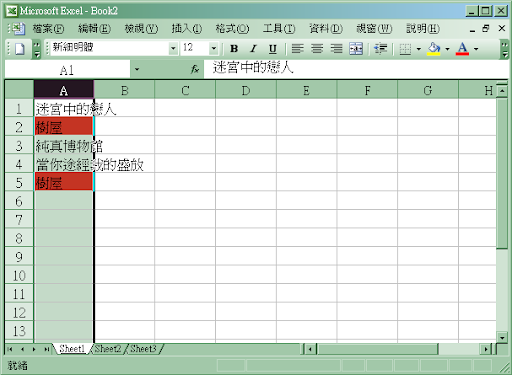
Excel 標記重複的資料

先來瞭解一下 COUNTIF 的使用方式,以下是 Office 官方的片段說明:
計算某範圍內符合某搜尋準則的儲存格個數。
語法:COUNTIF(range,criteria)
range
是您想計算符合準則之儲存格個數的儲存格範圍。
criteria
是用以決定是否要列入計算的搜尋準則,可以是數字、表示式或文字。例如,criteria 可以是 32、"32"、">32" 或 "apples"。


透過『設定格式化的條件』就可以很容易做到『標記重複資料』,接著就來看圖說故事吧!

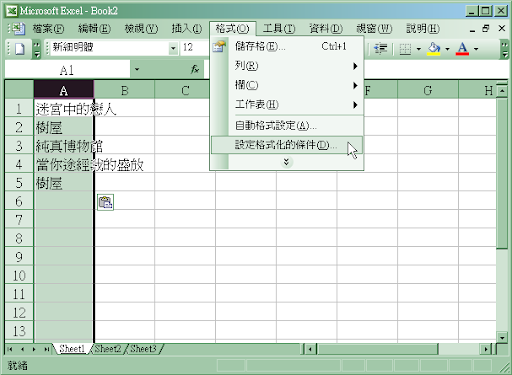
先將 A 欄整個選取,然後『格式 -> 設定格式化的條件


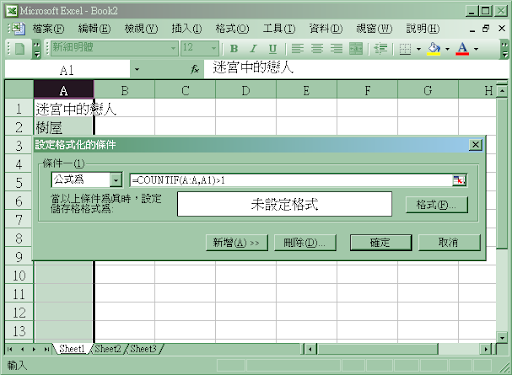
選擇『公式為』,再輸入 =COUNTIF(A:A,A1)>1,在設定要套用的『格式


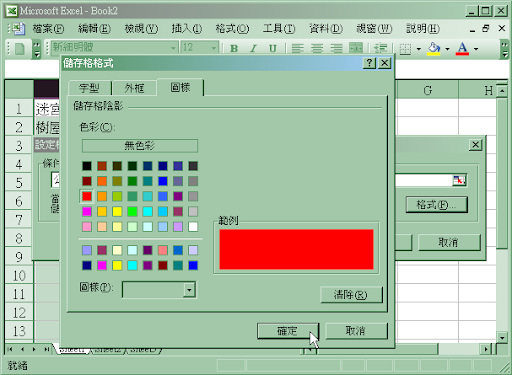
在『圖樣』中將背景設定為紅色


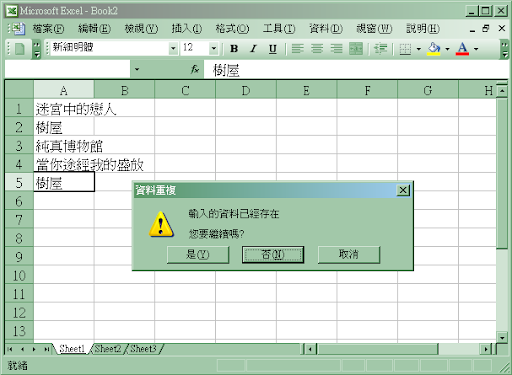
然後就可以看到有重複的資料就被標示為紅色底色了
2012-02-01 15:18

[VBA] Office Excel 2003 連接 Web Service

參考來源:Excel 透過 VBA 呼叫 Web Service

首先需要加入 Soap Library
在『Visual Basic編輯器』中:工具 -> 設定引用項目 -> 勾選『Microsoft Office Soap Type Library v3.0』

'連接 EpgSoap
Set EpgSoap = New SoapClient30
EpgSoap.MSSoapInit ("http://webservices.daehosting.com/services/isbnservice.wso?WSDL")

'請求 EpgSoap
MsgBox EpgSoap.IsValidISBN10("986-7889-18-5")

'關閉 EpgSoap
Set EpgSoap = Nothing
2012-02-01 14:05

[PHP] 用 SoapServer 建立 Microsoft Office Research Service

這裡我用 Webservice Helper 來處理 WSDL 的問題,所以範例也是 Base 在 Webservice Helper 上面,在開始前請檢查是否有 php_soapphp_xsl 這兩個套件。


為了相容於 Research Service 的名稱空間,在輸出入的定義上需要在包一層資料類型,所以需要以下的類型定義:
StatusResponse.class.php
<?php
/**
 * Return object to Status method
 */
class StatusResponse {
    /** @var string */
    public $StatusResult;
}

Registration.class.php
<?php
/**
 * Input object to Registration method
 */
class Registration {
    /** @var string */
    public $registrationXml;
}

RegistrationResponse.class.php
<?php
/**
 * Return object to Registration method
 */
class RegistrationResponse {
    /** @var string */
    public $RegistrationResult;
}

Query.class.php
<?php
/**
 * Input object to Query method
 */
class Query {
    /** @var string */
    public $queryXml;
}

QueryResponse.class.php
<?php
/**
 * Return object to Query method
 */
class QueryResponse {
    /** @var string */
    public $QueryResult;
}


接著是建立 Web Service 的 Method,主要定義 Registration 跟 Query 這兩個 Method 就可以了,Registration 是用在新增 Research Service 到 Research Pane 時會呼叫的 Method,主要是提供 Research Pane 所需要的 Service 資訊。
而 Query 則是真正再處理資料查詢的 Method,而 QueryResponse 中的 domain 及 QueryId 必需與 QueryXml 中所給的相同,不然 Client 端會無法辨識回傳結果。
<?php
/**
 * Microsoft Office Research Service
 *
 */

class MsOfficeResearch {

    /**
     * Entry point to test if server is alive. Will return 'ONLINE' or 'OFFLINE'
     * @param void
     * @return StatusResponse
     */
    function Status() {
        $result = new StatusResponse;
        $result->StatusResult = 'ONLINE';
        return $result;
    }


    /**
     * Basic registration entry point
     * @param Registration $registrationXml
     * @return RegistrationResponse
     */
    public function Registration($registrationXml) {
//      debugDump('registrationXml: '.$request->registrationXml);

        $dom = new DOMDocument();

        $proUpdate = $dom->createElementNS("urn:Microsoft.Search.Registration.Response",'ProviderUpdate');
        $proUpdate->appendChild( new DOMElement('Status',"SUCCESS") );

        $providers = $proUpdate->appendChild( new DOMElement('Providers') );
        $provider = $providers->appendChild( new DOMElement('Provider') );
        $provider->appendChild( new DOMElement('Id',"{62E1D68D-E1C4-4CC5-9D0C-D4B7999C4B77}") );
        $provider->appendChild( new DOMElement('Name',"Research Service") );
        $provider->appendChild( new DOMElement('QueryPath',"http://".$_SERVER['HTTP_HOST'].$_SERVER['SCRIPT_NAME']) );
        $provider->appendChild( new DOMElement('RegistrationPath',"http://".$_SERVER['HTTP_HOST'].$_SERVER['SCRIPT_NAME']) );
        $provider->appendChild( new DOMElement('Type',"SOAP") );
        $provider->appendChild( new DOMElement('Revision',"1") );

        $services = $provider->appendChild( new DOMElement('Services') );
        $service = $services->appendChild( new DOMElement('Service') );
        $service->appendChild( new DOMElement('Id',"{0297CD20-047F-4256-0104-000004040001}") );
        $service->appendChild( new DOMElement('Name',"Research Service Name") );
        $service->appendChild( new DOMElement('Description',"Research Service Description") );
        $service->appendChild( new DOMElement('Copyright',"") );
        $service->appendChild( new DOMElement('Display',"On") );
        $service->appendChild( new DOMElement('Category',"RESEARCH_GENERAL") );

        $response = new RegistrationResponse;
        $response->RegistrationResult = $dom->saveXML($proUpdate);
        return $response;
    }


    /**
     * Basic entrypoint for Query
     * @param Query $queryXml
     * @return QueryResponse
     */
    function Query($queryXml) {
        if(is_object($queryXml)){ $queryXml = $queryXml->queryXml; }
//      debugDump('queryXml: '.$queryXml);

        /*解析請求的 XML*/
        $dom = new DOMDocument();
        $dom->loadXML($queryXml);
        $domain = $dom->getElementsByTagName('Query')->item(0)->getAttribute('domain');
        $queryId = $dom->getElementsByTagName('QueryId')->item(0)->nodeValue;

        /*建立返回的結構*/
        $packet = $dom->createElementNS("urn:Microsoft.Search.Response",'ResponsePacket');
        $packet->setAttribute('revision',"1");
        $response = $packet->appendChild( new DOMElement('Response') );
        $response->setAttribute('domain', $domain );
        $response->appendChild( new DOMElement('QueryId', $queryId) );
        $range = $response->appendChild( new DOMElement('Range') );
        $results = $range->appendChild( new DOMElement('Results') );
        $content = $results->appendChild( new DOMElement('Content',"","urn:Microsoft.Search.Response.Content") );

        /*請求查詢*/
        $status = "ERROR_NO_RESULTS_FOUND";
        $queryText = trim( $dom->getElementsByTagName('QueryText')->item(0)->nodeValue );
        if(!empty($queryText)){
//          debugDump($queryText);
            $line = $content->appendChild( new DOMElement('P') );
            $line->nodeValue = htmlspecialchars($queryText, ENT_QUOTES);
            $status = "SUCCESS";
        }

        $response->appendChild( new DOMElement('Status',$status) );

        /*設定回傳結構*/
        $response = new QueryResponse;
        $response->QueryResult = $dom->saveXML($packet);
        return $response;
    }

}


關於資料交換的 XML 格式如下:
Registration Response XML
<ProviderUpdate xmlns='urn:Microsoft.Search.Registration.Response'>
    <Status>SUCCESS</Status>
    <Providers><Provider>
        <Id>{88686849-2DD9-474d-9300-778E3336FA77}</Id>
        <Name>EpgTools</Name>
        <QueryPath>http://localhost/service.php</QueryPath>
        <RegistrationPath>http://localhost/service.php</RegistrationPath>
        <Type>SOAP</Type>
        <Revision>1</Revision>
        <Services><Service>
            <Id>63d351db-d12e-448b-8541-9f794e1ec977</Id>
            <Name>Research Service Name</Name>
            <Data>1031/1033/4</Data>
            <Description>Research Service Description</Description>
            <AboutPath>helpId:553713956</AboutPath>
            <Copyright>All content Copyright (c) 2003.</Copyright>
            <Display>On</Display>
            <Category>RESEARCH_GENERAL</Category>
            <OptionsPath></OptionsPath>
            <Parental>Unsupported</Parental>
        </Service></Services>
    </Provider></Providers>
</ProviderUpdate>

Query XML
<QueryPacket xmlns="urn:Microsoft.Search.Query" revision="1" build="(11.0.5606)">
    <Query domain="{6E3B8AA1-5131-403E-AEF3-E7AFC2E88557}">
        <QueryId>{5A4FD162-DB71-45BC-8721-F059D28947B3}</QueryId>
        <OriginatorId>{F6FF7BE0-F39C-4ddc-A7D0-09A4C6C647A5}</OriginatorId>
        <SupportedFormats>
            <Format revision="1">urn:Microsoft.Search.Response.Document:Document</Format>
            <Format revision="1">urn:Microsoft.Search.Response.Content:Content</Format>
            <Format revision="1">urn:Microsoft.Search.Response.Form:Form</Format>
        </SupportedFormats>
        <Context>
            <QueryText type="STRING" language="zh-tw">test</QueryText>
            <LanguagePreference>zh-tw</LanguagePreference>
            <Requery></Requery>
        </Context>
        <Range id="result"></Range>
        <OfficeContext xmlns="urn:Microsoft.Search.Query.Office.Context" revision="1">
            <UserPreferences>
                <ParentalControl>false</ParentalControl>
            </UserPreferences>
            <ServiceData>EWATW</ServiceData>
            <ApplicationContext>
                <Name>Microsoft Office</Name>
                <Version>(11.0.5606)</Version>
                <SystemInformation>
                    <SkuLanguage>zh-tw</SkuLanguage>
                    <LanguagePack>zh-tw</LanguagePack>
                    <InterfaceLanguage>zh-tw</InterfaceLanguage>
                    <Location>TW</Location>
                </SystemInformation>
            </ApplicationContext>
            <QueryLanguage>zh-tw</QueryLanguage>
            <KeyboardLanguage>zh-tw</KeyboardLanguage>
        </OfficeContext>
        <Keywords xmlns="urn:Microsoft.Search.Query.Office.Keywords" revision="1">
            <QueryText>test</QueryText>
            <Keyword>
                <Word>test</Word>
            </Keyword>
        </Keywords>
    </Query>
</QueryPacket>

Query Response XML
<ResponsePacket xmlns="urn:Microsoft.Search.Response" revision="1">
    <Response domain="{6e3b8aa1-5131-403e-aef3-e7afc2e88557}">
        <QueryId>{5A4FD162-DB71-45BC-8721-F059D28947B3}</QueryId>
        <Range><Results>
            <Content xmlns="urn:Microsoft.Search.Response.Content">
                <any />
            </Content>
        </Results></Range>
        <Status>SUCCESS</Status>
    </Response>
</ResponsePacket>


範例下載:
SearchService.zip


參考資料:
Serveur SOAP en PHP 5 pour "Microsoft Office Research Service"
The Definitive Hello World Custom Research Service Tutorial
Microsoft.Search.Response.Content Schema Documentation
2012-01-24 18:58

[轉載] EXCEL 巨集與VBA介紹

轉載自:EXCEL 巨集與VBA介紹

巨集:一連串的執行指令所構成,可以利用Visual Basic程式指令、也可以利用錄製巨集的方式來錄寫指令。

如何錄製巨集:
  1. 如果要執行巨集,則需要更改「EXCEL選項」\「信任中心」\「信任中心設定」\「巨集設定」
  2. 在「檢視」、「巨集」/「錄製巨集」
  3. 設定「巨集名稱」、快速鍵(Ctrl+英文鍵),將巨集儲存位置
  4. 開始錄製相關動作(錄製是以絕對位址方式來錄製,如果要以相對位址來錄製則要選「以相對位置錄製」)
  5. 停止錄製
  6. 查看巨集程式碼,並作必要的修正
  7. 執行巨集(可以利用「執行巨集」或快速鍵、或利用表單按鈕來執行),如果要編修表單時,可以按下Ctrl+該物件,進行修改。


範例:(錄製巨集)
  1. C6至C12的數值格式設定「"進貨" #,##0;"出貨" #,##0」
  2. 「檢視」、「巨集」、「開始錄製」,並開始執行下列指令
  3. 選取範圍C6至C12,並執行「複製」
  4. 選取範圍B6至B12,並按下「選擇性貼上」,選擇貼上「值」與運算「加」
  5. 選取範圍C6至C12,並按下「Del」,清除儲存格內容
  6. 在儲存格C6按一下
  7. 停止錄製巨集
  8. 在工作表中,產生一個按鈕,並指定該按鈕執行該巨集,並將其按鈕文字改為異動
  9. 每次輸入異動資料(正的表示進貨,負的表示出貨),按下按鈕即可執行巨集


VBA簡介:
Visual Basic for Applications,利用VB來延申Office的能力。開啟EXCEL 顯示開發人員(在「EXCEL選項」/「常用」中勾選),再撰寫或修改VBA程式。

VBA主要的組成要件:物件,其中包括
  1. 屬性:對物件狀態的描述,可以定義物件的特性(大小、顏色、狀態等)。
  2. 方法:物件的某些特定動作,可以指定動作的細別內容。其主要結構如下:
    物件.方法 指定引數1:=xl常數1, 指定引數2:=xl常數2,....

    指定引數設定為某些內建常數,每個內建常數前會有前綴字連接。
    • EXCEL物件的常數會以xl開始。
    • VB的陳述式及函數的常數會以vb開始。
    • Office物件模式的常數會以mso開始。
  3. 事件:物件的觸發反應。


EXCEL常用的物件
  1. Workbook 活頁簿
  2. Workbooks 活頁簿集合
  3. Workbooks("filename") 檔名為filename的活頁簿
  4. ActiveWorkbook 正在作用中的活頁簿
  5. Sheets 活頁簿中所有工作表
  6. Sheets(n) 活頁簿中第n張工作表
  7. Worksheet 工作表
  8. Worksheets 所有工作表(包括圖表)
  9. Worksheets("sheet") 指表名為sheet工作表
  10. ActiveSheet 正在作用中的工作表
  11. Columns("c1:c2") c1至c2欄(其中c1,c2為A~Z或AA~XFD等欄名)
  12. Rows("r1:r2") r1至r2列(其中r1,r2為1~1048576等列名
  13. Range("x1:x2") x1至x2間的儲存格(其中x1,x2為儲存格位址名稱)
  14. cells(i,j) 儲存格(第i列、第j行)
  15. ActiveCell 目前的儲存格
  16. Selection 目前所選取的物件
範例:
Workbooks("Book1").Sheets("Sheet1").Range("A1:D5").Font.Bold = True
Worksheets("Sheet1").Cells.ClearContents
Worksheets("Sheet1").Rows(1).Font.Bold = True
Range("1:1,3:3,8:8")
Worksheets("Sheet1").Cells(6, 1).Value = 10
Worksheets("Sheet1").[A1:B5].ClearContents
ActiveCell.Offset(1, 3).Font.Underline = xlDouble 


活頁簿常用屬性:
  • ActiveWorkBook.Name 目前活頁簿的名稱
  • ActiveWorkBook.Save 儲存目前的活頁簿
  • ActiveWorkBook.SaveAs Filename := "filename" 另儲新檔
  • WorkBooks.Add 新增活頁簿
  • WorkBooks(i).Close [SaveChange, Filename, RouteWorkbook] 關閉指定的第i個活頁簿
    • SaveChange := True 改變儲存
    • SaveChange := False 不會改變儲存
    • SaveChange 省略時,會出現對話方塊
    • filename := "檔名"
  • WorkBooks.Open "filename" 開啟一個活頁簿
  • Application.Windows 所有活頁簿視窗
  • WorkBooks.Count 活頁簿的數量
  • WorkBooks.Item(Index) 傳回單一活頁簿,由索引值指定


工作表常用屬性:
  • Worksheets.Add [Before, After, Count, Type] 新增工作表
    • Before := Worksheets(n) 出現於某工作表之前
    • After := Worksheets(n) 出現於某工作表之後
    • Count := n 新增工作表數量
    • Type := xlWorksheet (工作表) 或 xlChart (圖表)
  • WorkSheets.Name 工作表名稱
  • WorkSheets("Sheet1").Activate 設定工作表為目前作用的功作表


儲存格常用屬性:
  • Rows.RowHeight 指定範圍內的所有列高
  • Columns.ColumnsWidth:指定範圍內的所欄寬
  • expression.NumberFormatLocal 以本地的數字格式
  • Range.CurrentRegion 目前區域是指以任意空白列及空白欄的組合為邊界的範圍
    範例:
    Worksheets("Sheet1").Activate
    ActiveCell.CurrentRegion.Select
    
  • expression.Address(RowAbsolute, ColumnAbsolute, ReferenceStyle, External, RelativeTo) 以參照的方式
    • RowAbsolute 為True,則用列的絕對位址
    • ColumnAbsolute 為True,則用欄的絕對位址
    • ReferenceStyle 預設值為xlA1,如為xlR1C1則為R1C1的表達方式
  • expression.count 傳回範圍的數量(可以是欄數、列數或儲存格數量)
  • expression.Item(RowIndex, ColumnIndex) 代表相對於指定之範圍某個位移距離的範圍。
  • expression.value 傳回或設定物件的值
  • expression.Formula 傳回或設定物件的公式,代表 A1 樣式註解以及巨集語言中的物件公式。
    範例:Worksheets("Sheet1").Range("A1").Formula = "=$A$4+$A$10"
  • expression.FormulaR1C1 傳回或設定物件的公式,並以巨集語言中的 R1C1 樣式標記法表示
    範例:Worksheets("Sheet1").Range("B1").FormulaR1C1 = "=SQRT(R1C1)"
  • expression.Text 傳回或設定物件的文字
    範例:
    Set c = Worksheets("Sheet1").Range("B14")
    c.Value = 1198.3
    c.NumberFormat = "$#,##0_);($#,##0)"
    MsgBox c.Value
    MsgBox c.Text


常用方法:
  • Range.Select方法/Selection屬性 設定目前選取的範圍/使用目前所選取的範圍
    範例:
    Sub Macro1()
        Sheets("Sheet1").Select
        Range("A1").Select
        ActiveCell.FormulaR1C1 = "Name"
        Range("B1").Select
        ActiveCell.FormulaR1C1 = "Address"
        Range("A1:B1").Select
        Selection.Font.Bold = True
    End Sub
    
  • expression.Copy 將目前所選取的物件復製至剪貼簿
  • expression.Cut 將目前所選取的物件剪下
  • expression.Delete 將目前所選取的物件刪除
  • expression.Paste 將剪貼簿的內容貼上
    範例:
    Sub CopyRow()
        Worksheets("Sheet1").Rows(1).Copy
        Worksheets("Sheet2").Select
        Worksheets("Sheet2").Rows(1).Select
        Worksheets("Sheet2").Paste
    End Sub
    
  • expression.RasteSpecial(Paste,Operation, SkipBlanks, Transpose)
    範例:
    With Worksheets("Sheet1")
        .Range("C1:C5").Copy
        .Range("D1:D5").PasteSpecial _
            Operation:=xlPasteSpecialOperationAdd
    End With
    
  • Range.Activate 目前的儲存格
  • Range.Clear 清除資料
  • Range.ClearContents 清除資料內容
  • Range.ClearFormats 清除資料格式
  • Range.ClearComments 清除註解
  • expression.AutoFit 自動調整列高和欄寬
  • Range.FillDown、Range.FillUp、Range.FillLeft、Range.FillRight 填滿
  • Range.Offset(RowOffset, ColumnOffset) 指定區域的位移列與行
    範例:
    Sub MoveActive()
        Worksheets("Sheet1").Activate
        Range("A1:D10").Select
        ActiveCell.Value = "Monthly Totals"
        ActiveCell.Offset(0, 1).Activate
    End Sub


程式語法:

  • Dim 陳述式(變數)
    Dim varname [ As [New] type]
    type 包括 Byte、Boolean、Integer、Long、Single、Double、Date、String、Object等
    Set 陳述式(物件)
    Set objectvar = {[New] objectexpression | Nothing}
    例:Set RangeA = Range("A1:B2")
    範例:
    Sub Random()
        Dim myRange As Range
        Set myRange = Worksheets("Sheet1").Range("A1:D5")
        myRange.Formula = "=RAND()"
        myRange.Font.Bold = True
    End Sub
    
    With 多種屬性設定
    With 物件
        .屬性1 = 設定值
        .屬性2 = 設定值
        ....
    End With
    範例:
    Sub AddNew()
    Set NewBook = Workbooks.Add
        With NewBook
            .Title = "All Sales"
            .Subject = "Sales"
            .SaveAs Filename:="Allsales.xls"
        End With
    End Sub
    
    Array 陣列
    Array(Range1, Range2, ....)
    範例:
    Sub Several()
        Worksheets(Array("Sheet1", "Sheet2", "Sheet4")).Select
    End Sub
    
    InputBox 函數
    InputBox("文字說明",[,title][,default][,xpos][,ypos][,helpfile, context])
    MsgBox 函數
    MsgBox "文字說明"
    Union 將多個範圍合併成單一Range物件
    Union(Range1, Range2, ...)
    範例:
    Sub MultipleRange()
        Dim r1, r2, myMultipleRange As Range
        Set r1 = Sheets("Sheet1").Range("A1:B2")
        Set r2 = Sheets("Sheet1").Range("C3:D4")
        Set myMultipleRange = Union(r1, r2)
        myMultipleRange.Font.Bold = True
    End Sub
    
    For... Next 陳述式
    For counter = start to end [ step stepvalue]
        [statements]
        [Exit For]
        [statements]
    Next [counter]
    範例:
    Sub CycleThrough()
        Dim Counter As Integer
        For Counter = 1 To 20
            Worksheets("Sheet1").Cells(Counter, 3).Value = Counter
        Next Counter
    End Sub
    
    For Each... Next 陳述式
    For Each element In group 
        [statements]
        [Exit For]
        [statements]
    Next [element]
    範例:
    Sub ApplyColor()
        Const Limit As Integer = 25
        For Each c In Range("MyRange")
            If c.Value > Limit Then
                c.Interior.ColorIndex = 27
            End If
        Next c
    End Sub
    
    Do ... Loop 陳述式
    Do [{While | Until} condition]
        [statements]
        [Exit Do]
        [statements]
    Loop
    Do
        [statements]
        [Exit Do]
        [statements]
    Loop [{While | Until} condition]
    If ... Then ... Else ... 陳述式
    If condition Then [statements][Else elsestatements]
    If condition Then
        [statements]
    [ElseIf condition-n Then
        [elseifstatements]...
    [Else
        [elsestatements]]
    End If


範例:(VBA程式範例)
Sub pmt_title()
    Dim rate As Single
    Dim nper, i As Integer
    Dim pv, totali, totalp As Double
    Dim start As Date
    Dim color1 As Variant

    start = Range("C2").Value
    pv = Range("C3").Value
    rate = Range("C4").Value
    nper = Range("C6").Value

    '清除所有有明細表
    Range("A11:E65536").Clear

    With Cells(11, 1)
        .Value = 0
        .HorizontalAlignment = xlCenter
        .Interior.Color = RGB(255, 255, 255)
    End With

    With Cells(11, 2)
        .Value = start
        .HorizontalAlignment = xlCenter
        .NumberFormat = "ge年mm月dd日"
    End With

    Cells(11, 5) = pv
    pv1 = pv

    For i = 1 To nper
        If i Mod 2 = 1 Then
            color1 = RGB(255, 255, 150)
        Else
            color1 = RGB(255, 255, 255)
        End If

        With Cells(11 + i, 1)
            .Value = i
            .HorizontalAlignment = xlCenter
            .Interior.Color = color1
        End With

        With Cells(11 + i, 2)
            .Value = DateAdd("m", i, start)
             .HorizontalAlignment = xlCenter
             .Interior.Color = color1
            .NumberFormatLocal = "ge年mm月dd日"
        End With

        With Cells(11 + i, 3)
            .Value = -IPmt(rate / 12, i, nper, pv)
            .Interior.Color = color1
            .NumberFormat = "_-$* #,##0.00_-"
        End With
        totali = totali + Cells(11 + i, 3)

        With Cells(11 + i, 4)
            .Value = -PPmt(rate / 12, i, nper, pv)
            .Interior.Color = color1
            .NumberFormat = "_-$* #,##0.00_-"
        End With
        totalp = totalp + Cells(11 + i, 4)

        With Cells(11 + i, 5)
            .Value = pv - totalp
            .Interior.Color = color1
            .NumberFormat = "_-$* #,##0.00_-"
        End With
    Next i


    With Range(Cells(10, 1), Cells(11 + nper, 5)).Borders
        .LineStyle = xlContinuous
        .Weight = xlThin
        .Color = RGB(0, 0, 0)
    End With
    Cells(12 + nper, 1) = "合計"

    With Range(Cells(12 + nper, 1), Cells(12 + nper, 2))
        .MergeCells = True
        .HorizontalAlignment = xlCenter
        .Interior.Color = RGB(255, 200, 255)
    End With

    With Cells(12 + nper, 3)
        .Value = totali
        .Interior.Color = RGB(255, 200, 255)
        .NumberFormat = "_-$* #,##0.00_-"
    End With

    With Cells(12 + nper, 4)
        .Value = totalp
        .Interior.Color = RGB(255, 200, 255)
        .NumberFormat = "_-$* #,##0.00_-"
    End With

    With Range(Cells(12 + nper, 1), Cells(12 + nper, 4)).Borders
        .LineStyle = xlContinuous
        .Weight = xlThin
        .Color = RGB(0, 0, 0)
    End With

End Sub

'===================================================================
Sub clearall()
    Range("A11:E65536").Clear
End Sub